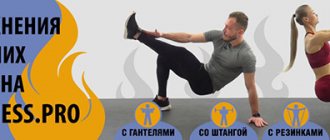
Home ▸ Articles ▸ Workouts ▸ Exercise Straight Arm Pulldown
The Straight Arm Lat Pull exercise is a variation of the classic Lat Pulldown exercise. Only in this case do you perform the movement while standing and keep your elbows straight the entire time.
The straight arm lat pulldown is a great workout for the latissimus dorsi through a wide range of motion, and is beneficial for those whose back muscles are not sufficiently worked in regular lat extension exercises.
How to do lat pulldowns with straight arms
Step 1 : Attach the rope handle to the high pulley of the rope station. Take an end in each hand and face the cable station.
Step 2 : Squeeze your shoulder blades together and lower them down as if you were trying to stuff them into your back pockets. Make your chest into a wheel.
Step 3 : Lower your ribs, tuck your tailbone under you, and tighten your core. Your torso should feel like one dense, solid column. Bend your hips back until your torso is at a 30-45 degree angle.
Step 4 : Move a little away from the station to stretch the cable, extend your arms above your head. You should feel a stretch in your lats (the muscles on the sides of your back). Place your feet shoulder-width apart.
Step 5 : Slowly lower your arms down to your sides in an arcing motion with your elbows until your hands are in line with or just behind your hips.
Step 6 : Slowly move your arms back to extend your arms again.
The straight arm row can also be performed using a straight or curved bar, but the rope allows you to lock the shoulder into a better position and slightly increase the range of motion. As a result, you will experience greater muscle activation.
If possible, use two rope anchors on one rope to get a wider grip and even more compression in the final position. Another option is to use a band, which will increase tension in the final range of motion, helping you get more contraction at the bottom of the movement.
In any case, it is important to keep your elbows extended, as any flexion will involve the triceps and reduce the involvement of the lats.
https://youtu.be/b4JCKlKMTt0
Description[edit | edit code]
Without bending your arms at the elbow joints, pull the rope handle of the block down so that in the final position your arms are parallel to your body. Slowly return to the starting position and repeat the exercise.
Initial position
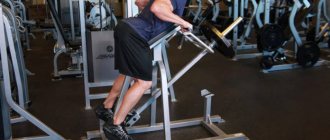
- Stand facing the top block and move one leg forward for stability. It should account for about 70 percent of your body weight.
- Grasp the rope handle and hang it slightly wider than shoulder-width apart.
- Straighten your back and keep your spine in a neutral position.
Recommendations for implementation
- Do not use inertial force. The movements should be slow and controlled when performing pulldowns with straight arms.
- Don't roll your shoulders in front. Spread your chest, lower your shoulder blades.
- The arms should be straightened at the elbow joints, but not turned off at the elbow joints.
- Give your body a stable position. The back is straight, the spine is in a neutral position. Halfway through the movement, you should feel a strong tension in your abdominal muscles.
Muscles involved when performing the pull-down exercise with straight arms
- Leg: gluteus maximus, thigh muscles of the left leg.
- Torso: abdominal muscles, erector spinae muscle.
- Shoulder joint: rotator cuff.
- Shoulder blade: serratus anterior, rhomboids, inferior trapezius.
- Arm: triceps, wrist flexors.
Movement analysis[edit | edit code]
| Major joints | Brachial |
| Movements performed in the joints | Down: extension. Up: flexion |
| Main muscles involved in movements | Latissimus dorsi, teres major, pectoralis major, posterior deltoid |
Benefits of straight arm lat pulldowns
- Improved connection between muscles and brain. The straight arm row is ideal for athletes who don't feel their lats working in traditional rowing exercises. Keeping your arms straight prevents your mid-back and biceps from taking control of the movement, so you can focus on the lateralis muscles you're trying to work better.
- Greater range of motion than standard pulley pulls.
- Improving deadlift stability. The straight arm pull-up strengthens the lats in the same way as lifting weights—pulling the barbell tightly to your body (“curling” it around your shins at the bottom of the lift/around your hips at the top).
- The ability to keep the barbell in contact with your body throughout the deadlift creates a stronger, more consistent movement and reduces the risk of injury.
What groups of spinal muscles are affected by exercises?
There are three of them:
- Trapezius (upper back) - their load makes the back more powerful.
- Latissimus muscles (located in the middle part) - their development visually thins the waist and gives the back a V-shaped silhouette.
- Straightening muscles (lower part) - the main result of their strengthening is more reliable stabilization of the lower back under particularly heavy loads (deadlifts, squats and bends using a barbell, etc.).
In addition, the shoulder muscles and arms (biceps, triceps), and abdomen (abs) are partially involved. The muscles of the thighs and buttocks are also involved during the deadlift.
When to Use the Straight Arm Reach
Perform straight-arm pull-ups before deadlifts or other back exercises to prepare your lats for the force and increase muscle growth in that area. Because the straight-arm lat pulldown provides an intense stretch for the lats in the top (starting) position, this exercise is also useful early in a workout to improve back and shoulder mobility.
Try doing the exercise at the end of your workout for several sets of 10-15 reps with short rest periods in between (30-45 seconds). This will greatly improve blood flow to the area, which itself is a mechanism for muscle growth.
Use it instead of rowing or rowing if you have a lower back injury. This exercise does not bend or extend the shoulders, so it prevents unwanted movement or tension in the lower back.
Exercise technique:
- Grab the handle of the cable trainer and move away from it at a distance of approximately one to two meters. Your hands should be positioned on the handle of the machine wider than shoulder width (see photo).
- Move your body back at an angle of 30° and extend your arms forward. If you can’t immediately stretch your arms forward, to make the task easier, take another half step back until you reach the correct position. After this (but not before!) start the exercise.
- Perform a pull-down, keeping your arms straight so that they are as close to your body as possible. This movement should be performed while exhaling. Try to hold your hands in this position for a few seconds to feel the muscles as much as possible.
- As you inhale, smoothly raise your arms to the starting position.
https://youtu.be/5W_59YoV25I
How to Stretch Before a Straight Arm Extension
The straight-arm lat row can stretch your lats and increase mobility, but you should warm up your upper body before doing it. The following video from Onnit toughness coach Christian Placencia is a sample warm-up you can use before working out your upper body or back.
- Regression. If you feel that other back muscles besides the lats are involved in pulling the straight arms, reduce the load or try working with a band instead of a cable. You can also perform the movement while standing more upright, which will stretch your lats less and make the movement easier to control.
- Development. To make the straight arm pulldown more rigid, use a longer rope or two rope handles at the same time. This will allow you to increase your range of motion.
1.Use a different number of reps per set per workout.
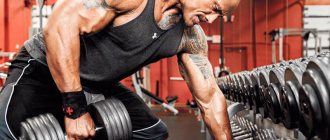
Everyone is accustomed to the fact that a low number of repetitions is used when working on strength, and medium and high ones are best suited for muscle hypertrophy and the development of endurance. Therefore, usually, depending on the goal, we use the number of repetitions that we consider appropriate to achieve our goal at a particular moment. I suggest you use all rep ranges in one workout. Choose your favorite leg exercises. Do the first approach with the maximum weight for 5 repetitions, do the second approach for 10 repetitions, accordingly the weight will have to be reduced compared to the first approach, and the third approach will be for as many as 20 repetitions. This circuit will allow you to shock your muscles in new ways, resulting in increased hypertrophy.
What are the alternatives to straight arm lat pull-downs?
If you don't have a cable station or band at your disposal, you can use the following substitutes to get a similar training effect to the straight-arm lat pulldown.
- Pullover with dumbbells or kettlebells. Lying on a bench and pulling the weight from behind your head to your chest stretches your lats, but also engages your chest and triceps to a certain extent, which isn't ideal if your goal is to develop your lats.
- Gironde Pulldown. This pulldown/row combination works well on the back, but does not provide the same lat isolation as a straight arm pulldown.
HIIT for fat burning
Circular - 3 laps
* — The service is in beta testing
2 - Plyometrics
This is another way to make changes to your workout, get your heart rate up and shake up your fitness regime. Plyometric exercises are an intense, extended form of physical activity in which the muscles are first stretched and then compressed. The main thing here is speed and power. Plyometrics include jumps, steps and cones.
Here are just a few of the exercises you might like:
Star jumping
Running in place with emphasis on the wall
Plyometric push-ups with kettlebell
From the simplest: Legs are bent at the knees and stand shoulder-width apart, arms extended in front of you. Jump onto the bench and straighten your legs. Repeat 6 times.
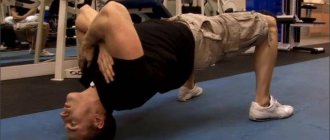
3 - TRX hinges
TRX (from English Total Body Resistance Exercise) is a relatively young exercise machine. In the mid-90s, it was invented by former Marine detachment commander Randy Hetrick. In order to somehow maintain his shape while waiting for the next combat mission, Randy decided to make himself a light and compact device.
View this post on Instagram
4- Kettlebell training
Only have one kettlebell available at home? You are already incredibly lucky. Until now, haven't you associated kettlebells with interesting full-body workouts?
Most exercises with kettlebells are quite technically difficult for beginners and girls. And many avoid this projectile for this reason. But make no mistake—kettlebells can be a huge ally in achieving your goal.
And, if you're someone who's looking for a new thrill in the gym and a little tired of the machines, kettlebells might be just what you've been looking for. Here is an example of a simple program. Can you complete it in 5 minutes?
4 – A New Look at Strength Training
Strength exercises are a new approach to work that will tighten your body. There is a misconception that “weight lifting” is invented only for men, because women have no need for bulky muscles. But this is nothing more than a delusion.
For women, such strength training helps them become stronger, their body becomes more elastic, and excess fat and calories are burned many times faster than, for example, cardio.
Studies have shown that after a strength session, our metabolism increases for up to 48 hours. Isn't this an incentive to go to the gym today?
5 – Weight training
Try rope yoga. The key here is to use your own weight to create resistance.
In order to diversify your workout in the gym, even rings from a horizontal bar are suitable (it will be good if the belts can be adjusted in length, because this will allow you to regulate the load). This is an excellent exercise for the abdominal muscles, back and biceps.
Lower the rings to chest level, grab them with your hands, while your body is tilted back and forms a straight line with your legs. Straighten your arms, lowering your body even lower, and now pull the rings towards your chest.
That's all you need to end your workout routine. Shake up your fitness regime, step away from your routine and make changes to your gym routine. Use these exercises in the gym, show them to your friends and work for results with them!
Women's bodybuilding is not only fashionable and cool, doing it brings undeniable benefits, making your health strong and your body sexy and elastic!
Leg workout
, is undoubtedly one of the most difficult tasks you will face on your way to the body of your dreams. A lot of effort is required to make your legs look truly impressive and harmonious. If you look at it, most of the gym goers don’t really like to pump their legs, because - It’s hard!
But here there is one catch: if you don’t train your lower body, then your figure will never look harmonious, and a big body on small legs is also funny.
If you decide that you do need legs, then I will give you some tips that will help you progress in increasing leg size very quickly:
Peculiarities
It is recommended to do overhead pull-downs with straight arms at the end of the workout. The technique is not too complicated. As a rule, the weights are set lightly, otherwise the athlete will be pulled forward.
Performed in three versions:
- pulling elastic bands or belts with two hands;
- pulling elastic bands or belts while kneeling;
- rowing in a machine with a cable handle.
Crossover trainer: design and training features
Almost every gym has a universal block-type device called a crossover. Its classic design consists of two power blocks connected by a frame. There are other modifications of the simulator:
- single-sided block rack;
- corner crossover;
- triple design;
- double block or block frame.
All crossovers are equipped with upper and lower traction blocks, the height of which is adjustable depending on the height of the athlete and the goals of the activity.
Advantages of working in a block simulator
Crossover training is characterized by great variability: here you can influence the target muscles in a variety of ways from different angles.
Working with free weights has many benefits, but it tends to lose some of the load as you return the weight to the starting position with each repetition. This does not happen in a crossover: due to the specifics of the cable-pulley system, muscle fibers actively work regardless of the phase of the exercise.
Any movement in this simulator, due to the cable mechanism, occurs in accordance with a given vector. This minimizes the work of stabilizer muscles and makes it possible to feel the contraction of the target muscles, which is important for beginners. However, if a beginner athlete is interested in gaining muscle mass, he should not avoid basic exercises with free weights.
Working out the shoulder muscles in a crossover
The muscles covering the humerus are the object of intense training for gym goers. The biceps (biceps muscle located on the inside of the shoulder) and triceps (three muscle bundles on the back of the humerus) form an attractive shape of the arms and are an indicator of decent physical shape. To give greater clarity to this area, a crossover is used.
Arm extension on the upper block
The exercise in isolation loads the triceps. It is performed with different handles, but the rope allows you to work in a larger amplitude and makes it possible to “hook” the deepest muscle fibers.
Having secured the selected handle to the upper block, set the weight. Stand facing the machine, slightly tilting your body forward and slightly bending your legs at the knee joints (“soft knees”). You can put one leg forward a little. There is a natural arch in the back, the chest is straightened.
Taking the handle, lower it down so that an angle of 90 degrees or a little more is formed between the forearms and the shoulder.
- Using the force of the triceps brachii muscle, the handle is lowered towards the front surface of the thighs until the arms are fully straightened. Elbows are kept close to the body. Exhalation should coincide with the moment of maximum effort.
- At the bottom point, linger for 1-2 counts, contracting the triceps.
- While inhaling, slowly, without allowing inertial raising of the arms, return to the starting position.
Do 10–15 times in 3–5 sets.
The features, advantages and disadvantages of the exercise are discussed in the video:
Video: Arm extension on the upper block
Bending arms on the upper block
This movement loads the biceps and brachialis, the brachialis muscle located underneath it. It is done while standing on the floor or sitting on a bench.
This exercise will require a double pulley and D-handles attached to the cables in the top position.
- Holding the handles with a reverse grip (wrists away from you), they are located in the central part of the device. It is desirable that the blocks are 30–40 cm above the shoulder line.
- The arms, slightly bent at the elbows, are statically tense and are located in the same plane with the racks of the simulator. The hands are slightly turned towards the head.
- Straining the biceps, while exhaling, pull the handles towards the head.
- When the brushes reach the line of the temples, stop for 1–2 counts.
- Inhaling, slowly and under control bring your hands to the starting position.
Do 10–12 times in 3–4 approaches.
Do not relax your shoulders or wrists until the set is completed, as this can lead to a sprain or dislocation.
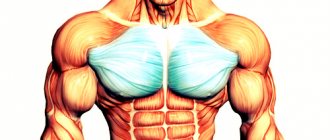
Training the pectoral muscles in a crossover
The pectoral muscles are a large muscle mass that requires high-quality development. To get not only the desired muscle volume, but also clear definition, you need to supplement basic exercises with isolating exercises. Crossover training is perfect for this purpose.
This exercise is suitable for those who, for some reason, do not have the opportunity or desire to do bench presses in the classic version. It does not have the same pronounced mass-gaining effect, but it helps to draw the relief of the pectoral muscles, is less traumatic for the shoulder joints and can be performed without the help of a belay partner.
Before starting the lesson, attach the handles to the lower blocks of the crossover and install weights. Place a bench in the center of the device and lie down on it. The handles are pulled towards you so that the arms bent at a right angle are at the lower border of the chest.
- Taking a deep breath, as you exhale, simultaneously squeeze both handles up.
- In the top position they freeze for a couple of seconds.
- As you inhale, lower your arms to the starting position, maintaining the tension of the pulley cables and not unnecessarily moving your arms down.
Perform 15 repetitions in 4-5 approaches.
The exercise can be done on a horizontal or inclined bench.
Reduction of arms on a block simulator
This movement, reminiscent of the flapping wings of a bird, contributes to the detailed delineation of the pectoral muscles, perfectly complementing the basic exercises.
You have to work on a double block, on each side of which the required weight is installed at the top. Taking the D-shaped handles in your hands, you take a stable position in the center of the device, maintaining a flat back position while maintaining a natural deflection. The body is slightly tilted forward (no more than 15-20 o from the vertical position). The handles are spread to the sides until you feel a slight stretch in the pectoral muscles. The elbows remain slightly bent (“soft elbows”) and are positioned slightly behind.
- Exhaling, bring the handles in a wide arc to the center of the body (at the level of the abs). At the start, jerky movements should be avoided.
- When your hands come closer to each other, you need to stop for 1-2 counts, contracting your pectoral muscles.
- While inhaling, slowly return along the same trajectory to the starting position.
The work is carried out due to the shoulder joints with a stationary body. Movements are made under control and slowly, without jerking, due to the efforts of the pectoral muscles. You should not exercise with absolutely straight arms: this activates the triceps and overloads the elbow joints.
Video: Correct technique for bringing hands together in a crossover
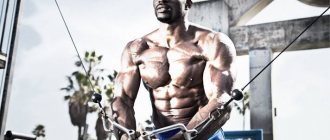
Back training in a crossover: lat pulldown with straight arms
The block simulator allows you to train your back in different ways, one of which is the overhead pull-down, or a pullover performed with straight arms. This exercise concentrates the load on the latissimus muscles and promotes the formation of a V-shaped torso.
Having installed the weight and secured the handle to the upper block, grab it with a wide grip. Positioning yourself facing the device (feet are at shoulder level), step back 1-2 steps and slightly pull the block towards you with your hands so that they are slightly above shoulder level. Elbows and knees should be slightly bent. The upper part of the body is tilted forward at an angle of about 30 degrees.
- After inhaling, they begin to pull the handle to the lower part of the body. The most difficult part of the movement occurs as you exhale. The arms are kept almost straight, with a slight bend at the elbows.
- When the handle approaches the hip line, pause for a second, concentrating on peak muscle contraction.
- While inhaling, raise your arms slowly and under control to the starting position, excluding “throwing” up. Do not raise the handle too high, including your shoulders in the movement.
Perform 15–20 times in 3–4 approaches.
Video: Technique for pulling the upper block with straight arms
Working out the deltoid muscles on the block
Training the deltoids is not an easy task, since the three bundles that form this muscle are not always worked evenly by exercises with free weights. Isolated movements are no less important here. Many of them can be performed in a crossover.
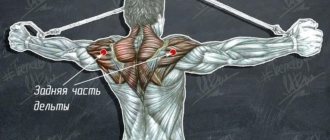
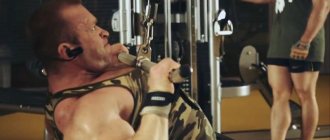
Chin row on the upper block while standing
This movement specifically loads the rear deltoids, which are traditionally lagging behind.
Before starting work, install a weight and attach a rope handle to the upper block, take it in your hands and move about 1.5 m from the simulator. The shoulders are in a position parallel to the floor.
- Inhaling, pull the handle towards the chin (photo). During movement, the elbows are located above the forearms. Shoulders should be kept down. The main effort coincides with exhalation.
- At the end point of the trajectory, make a short pause, straining the rear deltoid. The body remains level.
- Inhaling, bring your arms to the starting position, while simultaneously stretching your shoulders. This movement is done under control.
Perform 10–12 times in 3 approaches.
Video: Performing pulley rows to the face
Crossover leg exercises
The block simulator will add variety to traditional training programs for the development of the lower part of the body and will become a safe alternative for those for whom classic squats, deadlifts and lunges are not recommended for health reasons.
Squats with a block - how to do it correctly
By exercising in this version, you can specifically pump up your buttocks: a specific technique allows you to squat as deeply as possible, which is impossible in the classic version. An additional bonus is the absence of axial load on the spine.
Choosing the right weight is important for crossover squats. It is selected so that the athlete does not fall back (too little weight) and does not follow the cable forward (excessive weight). You may need to do a few trial repetitions at the beginning of your training to make the right choice.
Having decided on the weight, attach a handle to the lower block (a short straight or rope handle will do). It is taken from a squat, keeping the back in a flat position with a natural arch. Without allowing the back to round, they move back a few steps. The cable assumes a tense position. The legs are placed slightly wider than the shoulders, and the toes are pointed slightly to the sides. The shoulder blades are brought together, the back and abs are tense. The body is slightly tilted back.
- As you inhale, lower yourself into a deep squat, moving your pelvis back. It is very important not to lean your body forward - this can injure your back.
- With a powerful effort from the buttocks, pushing off with the heels, exhale and return to the starting position. At the top point, the gluteal muscles are additionally compressed.
- Having completed the required number of repetitions, approach the machine with a straight back and, crouching, release the handle.
Do 10–15 repetitions in 3 sets.
The deeper this squat is done, the more the buttocks are worked. Crossover training allows you to squat almost to the floor.
Video: How to squat correctly in a crossover
Leg abduction on a block
The block simulator allows you to perform this exercise in different versions: it all depends on the starting position. To do this, you need to place a special cuff on the lower block of the device. It is attached to the ankle of the working leg. After completing the required number of repetitions, the cuff is moved to the other leg. You can work with one and the other leg without a pause for rest.
Table: Leg abduction on a block in different variations
| Name of movement | Starting position | Basic movement | Muscle activation |
| Taking the leg back | Facing a block device with one leg cuff | As you exhale, with the force of the gluteal muscle, move the leg back and up to the maximum possible height | Buttocks, posterior thigh area |
| Taking the leg to the side | Sideways to the simulator, the cuff is attached to the leg located closer to it | Exhaling, move the leg with the cuff to the side, slightly overlapping with the supporting leg | Inner thigh area |
| Adduction of the leg | Sideways to the machine with the cuff on the leg further away from it | As you exhale, move the leg with the cuff to the side; upon returning to the initial position, bring it slightly overlapping with the support | Gluteus medius, hip adductor |
These exercises are done in 3 sets of 10–15 repetitions on each leg.
All movements are performed smoothly, without pulling the cable or involving the entire body in the work. At the top point, pause for 1-2 counts, concentrating on contracting the target muscles. Lower the leg slowly and under control, without “throwing” it down and without relaxing the muscles.
Abductions and adductions in a crossover do not give the effect of losing weight in the legs and buttocks, but help correct muscle relief.
Crossover abdominal workout
In the block simulator, one of the most effective exercises for strengthening the abdominal muscles is performed, called “prayer”. It is inferior in popularity to traditional crunches on a Roman chair, although it is safer for the back and, when performed regularly and technically correctly, gives noticeable results.
Having installed the optimal weight on the upper block, take the rope handle in your hands and position yourself with support on your knees (you need to place a mat under them) approximately a meter from the simulator. As you go down, keep your back straight. You need to hold the handle in front of you in the forehead area.
- As you exhale, with the force of your abdominal muscles, twist your body, moving your head towards the floor.
- While inhaling, slowly return to the original position.
Do 12–15 repetitions in 3–4 approaches.
When making such a simple movement, it is important to ensure that it is not a tilt, but a twist. The main effort is made by the abdominal muscles - pulling the block with your hands should be excluded (their position remains unchanged).
The “prayer” exercise requires a clear “brain-muscle” connection: without concentration on the work of the abs, it will not be effective.
Video: Abdominal training using the upper block
It is advisable to perform exercises in a block simulator after completing the basic part of the workout - let them become the final chord, “honing” the muscles.
Crossover can be used for training using a superset system for different muscle groups. For example, you can combine a bench press and overhead pull-down in one set to effectively work the pectoral muscles. A superset will help to qualitatively load the triceps: bench press with a narrow grip, combined with extension of the upper block.
It is recommended for athletes to use crossover training as the main part of the program during the “drying” period. This will allow them to work on the definition of muscle relief from different angles with minimal risk of injury.
In the block simulator you can quickly change the working weight. This design feature is used when exercising according to the “pyramid” principle: a series of several approaches is performed with a consistent reduction in the weight without pauses for rest.
The crossover simulator will not replace basic exercises with free weights, but will successfully complement them, increasing the effectiveness of training. It is ideal for athletes who, for various reasons, cannot train with dumbbells and barbells.
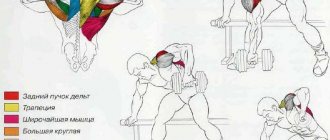
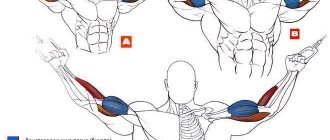
The straight-arm lat pulldown is an isolation exercise for developing the back muscles.
The work includes the latissimus muscles, the teres major muscles and the long heads of the triceps, which, in particular, are responsible for the correct position of the shoulder joint. It also develops the shoulder girdle and trapezius muscles well.
Main working muscle groups:
latissimus muscles.
Accessory muscle groups:
trapezius muscles, triceps, rear deltoids.
Straight arm pull-down of the upper block - execution technique.
1. Stand facing the machine. Place your feet shoulder-width apart and take a couple of small steps away from the machine so that you can feel the tension on the cable.
2. Take the handle with straight hands, with an overhand grip, thumbs on top of the handle, the distance between the hands is shoulder width. Keep your back straight and motionless, tighten and tuck your abdominal muscles.
3. Inhale and use both hands at the same time to pull the weight down, holding the handle, until it touches the front of your thighs.
4. Keep your arms straight, although it is acceptable to bend them slightly at the elbows. As you exhale, lower the weight to the starting point. Do not raise your arms above shoulder level. Don't indulge in heavy weights until you get stronger!
A great exercise to wake up your lats. An excellent effect is achieved with the help of a large amplitude of movement, thanks to which the muscles are worked out so well.