The Lever Row is a highly effective exercise that is technically easier to perform than many other exercises that develop the back muscles. It is also safer than similar exercises, such as T-bar rows, dumbbell rows or bent-over barbells. The row exercise in a lever simulator is aimed at developing the latissimus muscles and effectively widens and thickens the back. There are two types of simulator, as well as options for performing the exercise. Let's look at the features of each of them.
Advantages and disadvantages of traction in a hummer
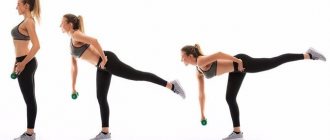
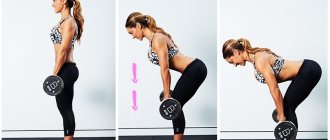
The main advantage of lever arms is the lack of stress on the spine. The hummer row allows you to work your back muscles as efficiently as possible due to the large range of motion. When performing this exercise, the latissimus muscles are well stretched and contracted. This exercise increases the width of your back and also creates a V-shaped silhouette. Traction in a lever trainer allows you to work with large weights. This type of deadlift can be used in training by athletes with back problems. This is possible due to the support and fixation of the spine throughout the entire range of motion.
But there is still a fly in the ointment! Despite the fact that this exercise relieves stress from the back, it is not recommended for those athletes who have shoulder injuries.
Vertical block row in front of you
The final exercise, to develop the width of the back, is to perform a vertical pull-down in front of us. The technique is the same as in the previous exercises: bend slightly to concentrate the load on the lower regions of the latissimus muscles, grip shoulder-width apart.
A grip that is too wide limits range of motion and does not allow the muscles to fully stretch and contract. There is a misconception that the wider the grip, the wider the back muscles, but this is not true. It all depends on how you feel, stretch and contract the target muscle.
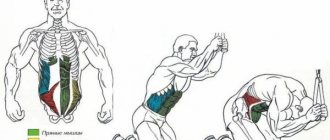
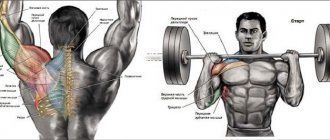
What muscles work
- Trapezius muscles.
- Rhomboid muscles.
- Round muscles (major and minor).
- Latissimus muscles.
also indirectly involved :
- Forearm muscles.
- Posterior bundle of deltoid muscles.
- Abdominal muscles (static load).
- Biceps.
Types of grip in the lever pull in the simulator
There are three grips: horizontal, vertical and intermediate, in which the hand is at an angle of 45 degrees.
- When performing rows with a horizontal grip , the load is focused on the upper back, namely the trapezius muscles, teres major and minor, latissimus and rhomboids, and posterior deltoids.
- Vertical grip , in addition to the latissimus muscles, emphasizes the rhomboid and teres muscles.
- An intermediate grip is rarely found in gyms due to the design of the machines. As such, it does not have an effect on a specific muscle group.
Basic mistakes
Too much weight
I have already spoken about this error many times. Athletes greatly overestimate their capabilities. And instead of working with the working weight for 8-10 reps. They prefer to do it 1-2 times, but with a lot of weight, and there is no question of correct technique. And instead of microtraumas, which are a consequence of muscle growth. They suffer serious injuries. Injuring muscles and joints.
Help with your back and legs
This error follows from the previous one. When an athlete cannot cope with the weight, additional muscle groups are activated. These include the lower back and legs. And instead of lat pulldowns, we get an analogue of the leg press and hyperextensions (extensions) in one bottle. To avoid this, choose the right weight.
Performing elbow curls instead of rows
As mentioned earlier, with deadlifts it is very easy to cross the line between working the biceps and the back muscles. Therefore, we definitely need to develop neuromuscular communication. To do this, take enough time to practice the technique. Focus on retracting your shoulder blades and moving your elbows rather than bending your arms.
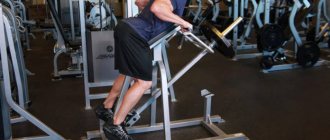
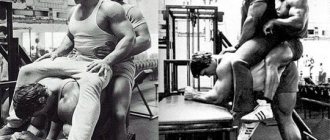
Horizontal thrust in a hummer
This exercise is similar to a horizontal block row. Of course, pulling in a hummer is much more convenient to perform, and the athlete does not receive stress on the spine thanks to the support that fixes the torso.
In order to perform the exercise correctly and get the maximum effect from the deadlift, you should set up the machine correctly. To perform the exercise, you need to take a sitting position. The seat depth should be adjusted so that your hands are at the level of the elbow joint when moving. If the hands are higher during the movement, the biceps will be involved in the work.
- The chest support is located at the level of the solar plexus.
- The lower back should be in a natural arch, as should the upper back.
- While performing the exercise (pulling the levers towards you), you exhale, while you need to bend the thoracic region and bring the shoulder blades closer to each other.
- The elbows should be pressed as close to the torso as possible during the pull. This nuance will ensure maximum load on the latissimus dorsi muscles.
- You should return to the starting position slowly. The stretch of the latissimus muscle should be maximum - with the arm straightened at the elbow joint. There is no need to return the lever to its support. Inhale while returning the levers.
The movement must be performed concentrated and smoothly. The technique should not contain jerks or sudden, fast movements. Sudden movements will engage the obliques, which in turn will reduce the effectiveness of the deadlift and can easily lead to injury.
Errors
- “Rowing” with the body, that is, jerking your back back during the start of the movement, and pushing off with your feet from the floor or supports of the machine in order to lift the weight faster;
- Aggressive footwork during the approach. No pedaling, pushing, or extension of the knee joint is allowed;
- Displacement of the body along and across the support of the simulator;
- Biceps jerks, lifting weight with arms;
- Raising the elbows to the sides as in the rear deltoid row, but when working at waist level;
- “Rest” between the repetitions prescribed by the plan, that is, dropping the weight on the supports and pausing in the movement for a few seconds
Read more: How to speed up metabolism for weight loss at home ways to improve metabolism in the body to lose weight
Features of traction in a hummer with one hand
Lever pull machines allow you to work with one hand. Sometimes working with one hand will be more important due to the performance of more concentrated movements. When performing deadlifts with one hand, you need to fix the position of the body with your free hand. Pay attention to the fixation of the hand in the peak position of the amplitude. Typically, when performing an exercise with one hand, the body rotates following the movement of the hand, thereby engaging the biceps and serratus muscles.
Upper hummer thrust
The row in a vertical machine is very similar to the row of the upper block. This version of the exercise is considered more “advanced”, since in a lever simulator the exercise can be performed with one hand. If you compare the work of the muscles, there is no difference in the exercises, and the pull-down of the upper block can also be done with one hand. This traction option is suitable for those athletes who cannot perform pull-ups. The technique of execution is absolutely the same as when performing lat pull-downs.
- While performing the movement, your back should be kept straight and your lower back should be arched.
- Exhale while pulling the weight down.
- And inhale while returning the load upward.
To further engage the latissimus dorsi, you can lean your torso slightly forward.
Preparing for the exercise
The trajectory should be selected so that it is close to horizontal. This is the optimal type of motion trajectory. The horizontal position is achieved by correctly setting the seat height. The athlete must touch the pad of the exercise machine with the solar plexus; if this is not the case, the exercise is performed incorrectly, due to “breaking with the biceps.”
Read more: Fold exercise - step-by-step technique
The height of the seat should be such that your feet touch the ground completely and are stable. The grip is selected so that the work trajectory is close to horizontal. There should be no discomfort in the shoulder joints.
Recommendations for performing hummer back rows
In the training process, rows in the simulator should be placed as the second or third exercise after pull-ups. For beginners or athletes who cannot do pull-ups, the lever row can be used as a basic exercise.
Here is an example of training the back muscles, the sequence of exercises and rowing in a lever machine as the final exercise.
- Pull-ups.
- Upper block pull (behind the head).
- Rows in a lever machine (vertical grip).
- Hyperextension.
Athletes with a certain level of physical fitness can perform exercises in the range of three to four sets of 8-12 repetitions.
For beginning athletes, the number of approaches can be reduced to 2-3, and the number of repetitions performed in the range of 12-15.
For physically unprepared women, this exercise will not be a good option. It can be replaced with various traction options, both in block simulators and with sports equipment (free weights). Lever lifting may be of interest to athletes of the fairer sex who have reached a high level of physical fitness. The exercise is performed as the main one in back training. The number of approaches should be limited to three, the repetition range from 15 to 20.
For most gym goers, the classic training scheme is suitable, which consists of 4 approaches and 12 repetitions, not counting the warm-up approach, of course.
Technique for performing exercises on a vertical machine
Strict adherence to the technique of performing exercises in a vertical simulator will help minimize the likelihood of injury to the athlete.
The generally accepted algorithm consists of successive stages:
- Set the required number of blocks that you plan to use during the exercise. Take the starting position, sitting on the supporting part of the structure and clasping the handrails of the simulator with your hands. The legs must be fixed in special bolsters.
- As you exhale, pull the handle down until it is level with the area slightly below the back of your head. During exercises, the elbows move in a perpendicular plane. The back remains consistently straight.
- Hold the position for 5 seconds.
- Slowly relax the muscles and return to the original position.
The direction of muscle development depends on the grip at the time of performing a vertical row.
Grip width
| Type of grip | Short description |
| Straight grip | The backs of the palms are turned forward. It is recommended to use for the best pumping of the latissimus dorsi muscles. |
| Reverse grip | The backs of the palms are directed back. To work your biceps, you need to pull the block towards your chin. |
| Neutral grip | Used when working with heavy weights. |
| Wide grip | Most effective for strengthening the muscles of the shoulder girdle. The hands are located slightly wider than the shoulders. |
| Narrow grip | The hands must be placed on the handle of the block structure at a distance less than the distance between the shoulders. When performing the exercise with a close grip, the elbows are slightly moved to the sides. |
The main difference between rows and pull-ups is the technique of performing the exercises. If in the first case the athlete is required to pull the block-structured handrail down (the working weight is determined by the fitness instructor), then when doing pull-ups the person works with his own weight.
Vertical rows in the simulator differ from pull-ups in that in the second case you can only work with your own weight. The weight on the machine is adjustable.
Vertical rows are included in the training program if the athlete has contraindications for pull-ups or does not have sufficient strength.
To avoid injury while performing vertical rows, athletes must strictly follow the fitness trainer's recommendations regarding the number of sets and repetitions. For women just starting to practice strength training, 3 sets of 10 repetitions would be optimal. In this case, the “working weight” should not exceed 15 kg.
As the muscle corset adapts to a given level of load, the number of approaches can be increased to 4, and repetitions to 12. If a girl has previously been involved in sports and is now recovering after a long break, the initial load for her will be 4 sets of 15 repetitions.
The initial working weight for women when performing exercises in a block simulator should not exceed 15 kg. After 3-4 weeks of active sports, it is recommended to increase the total weight of the blocks used to 20.
Further weight gain should occur as the muscle corset adapts to the given level of load (but not more than 5 kg in 2-3 weeks).
Technical errors
The most common mistakes that prevent you from achieving maximum results from regularly performing vertical rows are:
Scroll:
- stooped position of the shoulders during the exercise;
- curved spine due to incorrect position;
- lifting the buttocks from the supporting surface while relaxing the muscles;
- shifting the load (from the back to the arms, in particular the biceps);
- incorrect selection of “working weight”, which prevents compliance with the exercise technique.
The above mistakes are made not only by beginners who have not previously dealt with power loads, but also by experienced athletes who do not pay due attention to the technique of performing the exercise in question.
The cable row, performed along the vertical axis, can be performed in several ways. Depending on the area that needs more careful work, the athlete needs to take a specific starting position, as well as position his hands in accordance with the required grip.
Row while seated
To achieve maximum results, vertical pull-downs from a sitting position must be performed in strict accordance with the algorithm below.
Technique:
- Select the “working weight” by installing a limiter over the required number of blocks. Sit facing the movable handle. Straighten your back, pull your stomach in, place your hands on the handrail.
- As you exhale, pull the cable down until it reaches the required position (the end point depends on which zone the specific exercise is aimed at working).
- Hold the position for 3 seconds.
- Smoothly return the limbs to their original position.
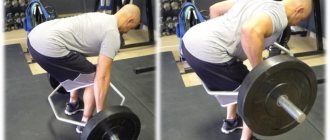
Bent-over row
This version of performing vertical traction is aimed at strengthening the muscular corset of the back and arms (biceps):
- Sit on the supporting part of the block structure facing the cable. Place your hands on a fixed bar with an overhand grip (hands slightly shoulder-width apart). The back is straight.
- Lean your body back slightly, and, on the contrary, move your shoulders forward.
- As you exhale, pull the cable toward your chest, bringing your shoulder blades together.
- Hold the position for 3 seconds.
- As you inhale, return your hands to their original position.
Back row
To work the back muscle corset using vertical traction, you need to:
- Having previously set the “working weight”, sit on the simulator. Place your hands at a distance slightly greater than the space between your shoulders. Straighten your back, rest your feet on the floor.
- As you exhale, pull the handle down and lower it to chest level.
- Hold the position for at least 5 seconds.
- As slowly as possible, inhaling air through the nose, return the upper limbs to their original position.
Depending on which area needs to be worked more, the muscles of the back or arms, fitness trainers include vertical rows behind the head or to the chest in the training programs of their clients. By bringing the movable handle closer to the chest, the athlete uses the muscles of the front surface of the body and arms to the maximum, while, by placing the cable behind the head, he trains the back muscles.
Despite the similarity of the technique for performing the loads under consideration, studies show that the classic orientation of the exercise (“in front of you”) causes half as much injury to a person’s shoulder joints.
The reverse grip row will allow you to work your back muscles to the maximum, avoiding stress on the chest or muscles of the upper extremities:
- Sit in the block structure, facing the cable. Straighten your back, place your hands on the handle of the exercise machine, turning your hands with the backs of your palms towards you.
- Simultaneously with exhalation, bend your arms and pull the bar towards you.
- Touch the chin with the movable handle. Hold the position for 5 seconds. The body must remain static while changing body position.
- Inhaling slowly, straighten your arms.
Grips of different widths are used to work muscles from different angles, concentrating the impact on a specific area.
According to their width, grips are:
- wide (arms are wider than shoulders);
- medium (the hands are placed on the handrail opposite the shoulders);
- narrow (arms are fixed between the shoulders).
The technique of performing the exercise does not change depending on the chosen grip type. Vertical rows with a narrow grip in a block simulator are used when it is necessary to work out the muscles of the arms, with a medium grip to provide a complex load, and with a wide grip for targeted impact on the chest and back (provided the correct amplitude is used).
One arm row
When performing vertical rows with one hand, you should follow the recommended algorithm of actions:
- Sit in the simulator, turning your face to the movable handle. Straighten your back, rest your feet on the floor. Place one hand on the movable platform, turning the back of your hand away from you. Place the other hand on the knee of the leg of the corresponding side of the body.
- As you exhale, pull the cable down without changing your body position.
- Bringing the handle to chest level, fix the position for 7 seconds.
- Slowly extend your arm.
Pull in front of you
The vertical row in front of you is a classic version of this load. Compliance with the technique of performing the exercise ensures that the required muscle group is thoroughly worked out (the direction of the exercise is determined by the selected grip).
Technique:
- Sit on the support bench of the machine, having previously set the “working weight”. Place your hands in the selected grip on the movable handle. Place your feet on the floor and straighten your back.
- Pull the cable towards you, accompanying this action with exhalation.
- Having reached the chest area, fix the position for 7 seconds.
- Slowly return to the starting position.
Don't miss the most popular article in the section:
Glutamic acid - what it is, why and how it is used in sports and bodybuilding.
The back row in a lever exercise machine is done as follows:
- Prepare your equipment. Adjust the seat height of the machine to suit your height. When performing the movement, your hands should be directed towards the belt.
- Sit down and rest your chest on a vertical surface. The spine is absolutely straight, the shoulder blades are pressed. Stretch your arms and grasp the handles of the machine. If you use a close grip, keep your elbows close to your body. When you pull the horizontal handles (wide grip), your elbows move out to the sides.
- Pull the handles towards you, bringing your shoulder blades together as much as possible at the end point of the movement. During the movement, the chest is “glued” to the supporting surface of the simulator, the position of the spine does not change. Don't lean back. It is also a mistake to turn your upper body to the side when performing one-arm deadlifts.
- Lower the weight, but do not return it to the support. The muscles must be tense all the time.
As a rule, lever deadlifts are done in 3 sets of 8-12 reps. It can be included in your workout along with other back exercises: bent-over barbell rows, one-arm dumbbell rows, or cable pull-downs.