Anatomy of the rear delts and how to train them
The rear delta is located on the back of the shoulder, that is, at the back of the back. It starts from the lower edge of the scapula and, together with the other bundles, is attached to the tuberosity of the humerus.
Its functions include:
- Retracting the arm back in any plane.
- Rotation (turn) of the hand outward (towards the thumb).
Knowing the function of the rear delts, we now understand the mechanics of their work and how to train them. That is, the main exercises for us will be all kinds of deadlifts with different weights: barbells, dumbbells, cable trainer. But the main thing that we must understand is that in pulling movements the back is actively working, in particular the lats and trapezius.
rear delt exercises
What then should we do to eliminate the back from the exercise?
To begin with, we need to choose the optimal point where we will pull the training equipment we have chosen. Everything is simple here, if you consider that in any back exercises we pull the weight towards the belt, then when training the deltoids you will have to shift the emphasis closer to the chest. This will help eliminate the lats. I suggest, as a guide, to take the center of the pectoral muscles as that very point.
As for the position of the elbows. Basically, when training the rear deltas, the arms are held so that the elbows are in the same plane as the shoulders. That is, if we draw a horizontal line, then the elbows and rear delts will not go beyond it.
Next, you need to choose the right weight
It shouldn't be too light. This way we will simply drown our muscles, but this will not lead to their increase. As for heavy weight, it is also not welcome. Because the deltas will not be able to do it and the back will come to their aid, which will take all the load upon itself. So take the weight that you can pull only due to the force of the deltoids.
Retracting the arm to the side from the lower block. • Bodybuilding & Fitness
The arm raise to the side from the lower block is an isolating exercise, great for working the middle deltoids, which makes the shoulders more powerful.
Main working muscle group: deltoid, trapezius muscle.
Accessory muscle groups: muscles of the forearm.
Pulling the arm to the side from the lower block - execution technique.
1. Set the appropriate weight on the machine to perform the movement technically correctly.
2. Take a position on the side of the machine, grasp the cable handle with one hand. Bend your back forward, place your feet wide and stable.
3. The trained arm is slightly bent at the elbow and should rise freely in the direction from the block, in its own plane. For safety and greater stability, hold on to the machine with your other hand. Before performing the exercise, raise the weight a couple of centimeters above the supports.
4. As you inhale, begin to pull the weight to the top point, just above your shoulder. The arm is still slightly bent at the elbow joint. As you exhale, slowly lower the weight down. Then do another repetition without any delay. Do the required number of sets and repetitions for each arm.
5. Abduction of the arms on the machine is reminiscent of a dumbbell raise to the sides, but in this case, the block machine will ensure complete isolation of the deltoid muscles for their detailed study, for each beam. Do the exercise after a few basic ones!
https://youtu.be/MupYSQfV8Vo
Rear delt exercises
Wide grip barbell row
Let’s start, according to tradition, with a basic exercise, and we definitely won’t find anything better than barbell rows to the chin. It will help increase the mass of our deltas. Of course, there are some technical points that you need to know and take into account when performing this exercise.
Firstly, grip width.
It should be wide so that your arms bend at the elbow and form a 90° angle. If you take a narrower grip, then the entire load will go to the upper part of the trapezius.
Secondly, body positions
. This is a very important point. If we stand straight, we will not be able to engage the rear deltoid. And we will do everything at the expense of the middle one, since the elbows will go up. To avoid this, you need to lean forward a little. Then, when lifting the barbell up, the elbows will go back, which is what we need.
Third, exclude the trapezoid from the exercise.
. This point is very important. After all, if we perform the exercise using the wrong muscles, then we are unlikely to achieve results in their growth. To exclude a trapezoid, you need to perform several actions:
- Select the correct weight of the barbell so that it is not too heavy. The rear deltoid is a small muscle and does not have the same strength as the trapezius.
- Try to stretch your trapezius. To do this, it is enough to spread your shoulders as far as possible to the sides and lower them down a little. This will sort of spread the trapezius across the back and reduce interference.
Technique:
Initial position:
- Take the barbell in your hand with a wide overhand grip.
- Lean your body forward slightly, spread your shoulders to the sides and lower them down.
- Keep your back straight, with a slight arch in your lower back. The chest is pushed forward.
- Feet are shoulder-width apart; for greater stability, you can bend them slightly at the knees.
Performance:
- We take a deep breath and, as we exhale, begin to pull the barbell up until our elbows reach the same line as our shoulders. No need to go any higher.
- After taking a short pause while exhaling, lower the barbell to its original position, stretching the rear deltoids.
https://youtu.be/pQw_LjdrvC8
Important!
Although the exercise is called a barbell row to the chin, we will pull somewhere around the middle of the chest. So we will load the deltas. If we continue to raise our elbows higher, then the trapezoid will come into play.
Bent over dumbbell swings
I have previously written about this exercise. For a better understanding, I suggest you read this article. You can find it here . I will just say a few key points. This exercise will help pump up the rear deltoids, as well as work each head separately. This is true for those who have developmental delays on either side (for example, many right-handed people have a weaker left hand). Also, there are several options for performing tilted swings. In this article we will look at the simplest of them, this is the standing option. It does not require special training or additional equipment. All we need are two dumbbells.
Execution technique
Initial position:
- Hold a dumbbell in each hand. The grip is neutral, palms facing the body.
- We move the pelvis back and tilt the torso forward. The back is straight, there is a slight arch in the lower back. Gaze forward
- Feet stand shoulder width apart. To increase stability, you can bend them slightly at the knee.
- We stretch the trapezius excluding it from the exercise.
- Dumbbells are lowered down.
Performance:
- We take a deep breath and as we exhale we begin to spread our arms in different directions, moving our elbows back. There is no need to contract the shoulder blades; we work only by contracting the rear deltas.
- After taking a short pause at the top point, as you exhale, begin to lower your arms to the starting position.
https://youtu.be/9J7POKcq4D8
Concentrate your attention on working the posterior head of the deltoid muscle. No need to make jerky movements. Our task is to move your elbows back smoothly and under control.
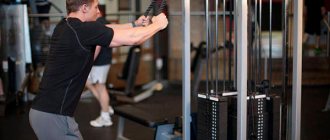
Pull of the upper block to the face
This exercise is isolated and is aimed at working out the rear deltoids. It's great for beginners and will help build the neuromuscular connection between the brain and shoulders. It will also allow you to practice your technique for performing more complex, basic exercises. The block to face row is not a bulking exercise, but it will help give your deltoids an expressive shape. Thus, it gives the shoulders a spherical appearance. It is performed in a crossover.
Execution technique
Initial position:
- Install the crossover block at face level (maybe a little higher).
- Next, select a handle. The most common is the cable handle. This is where I advise you to start, and then decide for yourself which one to use in the future.
- Step back two steps to tighten the crossover cable.
- Keep your back straight, you can lean back a little.
- Feet are shoulder-width apart and slightly bent at the knee.
Performance:
- Inhale and as you exhale, pull the handle towards your face, moving your elbows back as far as possible. While pulling, stretch the cable handle in different directions.
- Hold this position for a few seconds and return to the starting position with your arms straight.
https://youtu.be/CeuE2ADGYSU
As you can see, there is nothing complicated in this exercise, the main thing is to try to work exclusively with the back beam. You can pull the rope either towards your face or towards the middle of your pectoral muscles. Experiment with which option suits you best, then do it.
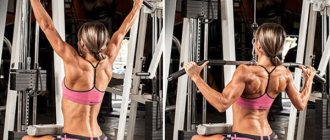
Raising arms in a crossover from the upper block
A very powerful exercise for creating a beautiful rear deltoid shape. Also, unlike the block pull to the face in the fly, each hand works separately. And we know that thanks to this, we can better work out the left and right deltas separately. Thus eliminating the imbalance in strength and appearance. Although the exercise looks easy, it is very difficult technically. The whole difficulty lies in the fact that it is very easy to deviate a little from the technique. To transform the exercise, we train not the shoulders, but, for example, the trapezius or triceps. To prevent this from happening, it is important to avoid certain things:
- Raise and bring your arms together at the same height. There is no need to lower your arms down while raising your arms, thereby engaging the latissimus muscles in the work.
- Do not straighten your arms while moving. The main task when performing crossover flyes is to keep your arms motionless and slightly bent at the elbow joint. If you straighten them, the triceps will join in the work and take on the entire load.
- Don't squeeze your shoulder blades. We have already discussed this point earlier. When bringing the shoulder blades together, the trapezoid is connected.
Make sure that only the rear deltas are worked.
Execution technique
Initial position:
- Place the crossover blocks at a level just above your shoulders.
- Take the left cable in your right hand, and the right cable in your left and cross them. Bring your hands together at eye level.
- Step back a few steps to tighten the cables.
- Keep your back straight, with a slight arch in your lower back. There is no need to lean to either side.
- Move your shoulders forward slightly to stretch your trapezius.
- Feet shoulder width apart. You can bend them a little at the knee.
Performance:
- Take a deep breath and as you exhale, spread your arms to the sides, moving your elbow back. Stay in this position for a few seconds.
- And while inhaling, bring your arms back to the starting position.
https://youtu.be/B2Yv5e0_WH8
Don't make jerky movements. Raise and lower your arms smoothly and under control. Feeling how the rear bundle of deltas contracts and stretches.
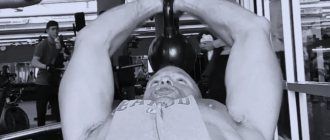
Raising arms in the simulator
This is the final exercise. It is performed while sitting in the Peck-Deck simulator. This is a kind of swing. Only if we work in them standing with dumbbells, then we will sit in the simulator. What will this give us? The load will be removed from the lower back, which is a huge relief for many, especially for people who have injuries in this area. And also, we can not worry about balance and focus all our attention on the work of the rear delts. The exercise is isolated. It is better to do it after the main exercises.
Execution technique
Initial position:
- Before you begin the exercise, you need to adjust the machine.
- Place the handles of the machine back so that they are behind the back of the machine at shoulder width.
- Sit on the seat facing the back and rest your chest against it.
- Grab the handles. You can use any grip: regular, reverse or parallel. There will be no difference in the effect on the muscles; rather, it’s just a matter of convenience.
- Move your shoulders forward slightly to stretch your trapezius.
Performance:
- Take a deep breath and as you exhale, move your arms back, thereby contracting the rear bundle of deltas.
- Stay in this position for a while, and as you exhale, begin to bring your hands towards each other, returning your hands to their original position.
https://youtu.be/kfECBFK5DRY
Since we have moved our shoulders forward, our range of motion decreases. Because of this, it will be necessary to increase the number of times in the approach. This is done in order to increase the time the muscle is under load.
Technique for performing dilutions
This movement has only a few technical features. They are aimed at ensuring that the load does not shift to the anterior and posterior bundles of the deltoid muscles. The front bundles raise the arms, the rear bundles pull them back. It’s simple - you don’t need to allow a swing with a clear emphasis on bringing your shoulder blades together and swinging forward with dumbbells swinging in front of your chest.
How to perform the movement:
- Stand directly in front of the mirror so that you can see your movements;
- Take dumbbells in your hands with minimal weight, but such that you can feel it;
- Move your forearm to the side, along an arched path, raising your elbow to the side, but not higher than your shoulder;
- Elbows slightly bent;
- The dumbbells in the hands turn in the same direction as the movement;
- When we move our arms to the sides, the little finger is at the top, the thumb is at the bottom, this causes the dumbbells to turn;
- Lifting and lowering are performed smoothly and slowly, without cheating the body and additional unnecessary movements
In normal mode, the movement is performed for 10-12 repetitions. But there are also special cases. For example, a person has very responsive slow muscle fibers and needs high repetitions or statics, that is, holding dumbbells at the top point. Or an option with a relatively low-repetition regime is possible, if the opposite is true. Here it is important to observe yourself and do what the body responds to.
Important: the exercise should not be performed using inertial force in any of the options. If you need to push with your legs, jump, or move your body, the weight is too heavy and needs to be reduced.
Tips for Maximum Productivity
Let's reiterate the important points:
- Work with the correct technique, performing movements using the rear deltas.
- Do not make sudden jerking movements. Take care of your shoulders!
- Eliminate the trapezoid from the movement. In order to do this, you need to move your shoulders forward, thereby stretching it across your back.
- If the rear deltas are lagging behind in development, then start shoulder training with them.
- Use dumbbell crossover exercises to correct imbalances between the right and left sides.
- Start training your deltoids with heavy basic exercises. Leave the isolated ones for last.
I hope the article was useful to you. Train your rear delts the right way.
Good luck to everyone in your training!
Shoulder training rules
In fact, dumbbell flyes are rarely a cause of injury unless the technique is truly horrendous.
Some athletes may throw weights toward their heads, raise their arms too high, swing aggressively, and rotate their arms backward at the shoulders during the movement. They run a serious risk, but not of muscle tears, as is commonly believed, but of sprained ligaments and subsequent inflammatory processes. The problem with shoulders is that they are loaded not only in sports, but also in everyday life. We sit a lot, raising our shoulders and overstraining our trapezius, we carry bags on one shoulder for a long time, stretching one half of our body and involuntarily shortening the other, and we often do sharp lifts of our arms without warming up. This leads to overload of the joints.
https://youtu.be/YJi9ff_eAsM
Let's say a person has never trained. He comes to the gym and starts doing bench presses, bench presses, sitting, standing, and a couple more presses, but this time with dumbbells. All of them work the deltoids and involve the joint. It is enough to overwork and make an awkward movement and you can get a tear or sprain.
For beginners, it is not recommended to do more than 2-3 bench press exercises in one workout. If there are too many exercises, it is better to leave abductions or swings for a light session, and not do them when the body has already received sufficient load. Ideally, the workout should include 1 heavy press, 1 assisted press, and 1 bench or standing abduction. Only then will the volume be adequate.
Anatomical features are also of great importance. If the trapezius is overdeveloped, the athlete will not be able to perform the movement using the shoulders alone. This must be taken into account when choosing weights and start literally with 2-3 kg.
Injuries are often accompanied by inflammation, which is not localized, but spreads throughout the muscle bundle. They often affect the nerves, which increases the pain. Shoulder injuries should be diagnosed by a doctor. Home treatment based on guesswork will not lead to anything good.
Some of them have already been mentioned. The shoulders “suffer” usually due to the athlete’s excessive zeal for the physical form. Simply put, everyone wants to pump them up faster because they give the figure an athletic look and therefore turn training any part of the body into “shoulders.” This is not rational and leads to injury. A beginning athlete should not train his shoulders on the same day as his chest and back.
There are two basic rules for creating a split for beginners:
- If you are performing a standing or seated press on shoulder training day, it does not need to be attached to your chest or back. Do shoulders with legs like the old school athletes and stay healthy;
- If there is no bench press in the workout, but only abductions and lifting, then perform shoulder training on the day of light bench press along with triceps work
Training shoulders with the back only makes sense if there is really nowhere else to put them, all the presses in the workout are heavy, the legs are also heavy, and the back is performed according to the “injury pumping” principle. But this is not typical in fitness. It's more of a powerlifter's approach.
Important: if a beginner is not yet doing splits, abductions can replace the bench press in some cases. For example, when during training the classic bench press with a barbell was taught, and the front deltoids were already overloaded.
Read more: Anti-aging drugs, nutritional supplements
Benefits of doing crossover exercises
Crossover classes are available even to beginner athletes. Simplicity of training, the possibility of a differentiated approach to loads - the beginning of the list of advantages of this simulator:
- convenience and safety of operation;
- uniform isolated load of the selected muscle group;
- multifunctionality: you can train different zones;
- rapid regime change.
Did you know? Muscle memory
- the connection between the right hemisphere of the brain and the muscles - makes it possible to return to fitness classes after a while without much stress on the body.
This is interesting: Is it possible to drink wine during pregnancy?
Secrets and subtleties of implementation
The tone of the ischial region, the inner plane of the lower body, can be achieved by loading muscles that are little used during “normal” times. A few tricks will help you perform the exercises correctly:
- By swinging to the side while sitting, you “fully” load the gluteus maximus muscle, and the result will be visible faster.
- During movement, carefully ensure that the limb is tense (but in moderation!).
- Exhale on the swing, inhale on the reverse movement. This will help avoid exercise inertia.
- Controlling the deflection of the lower back will enhance the effect of the exercise and at the same time train your back.
Learn more about crossover exercises for the chest, back, shoulders, arms, legs and buttocks.
A competent approach to crossover training will help you lose weight, tighten the muscles of the lower extremities, tone them, and most importantly, improve your overall well-being and mood.
Arm extension on the upper block
September 27, 2020 Admin Home page » Triceps
The correct technique for extending the arm on the upper block, the muscles being trained, the main nuances of the exercise + training videos from experts in the field of fitness and bodybuilding are described.
Description of the exercise
An overhand grip as shown in the figure allows you to perform the exercises better, thus leaving the elbow in a more stationary position. You can perform the exercise with an underhand grip, but watch your elbow, the more the elbow deviates, the less load the triceps will receive, straighten your arm at the elbow to the end.
Muscles trained
Extension of the arm on the upper block perfectly trains the triceps, additionally including the wrist and finger extensor muscles in the work.
Nuances of the exercise
1) Do not lean forward too much, otherwise you will help yourself with your body to straighten the handle down, keep your back straight, and only slightly tilt your body forward to relieve the load in the lumbar region.
2) Extension of the arm on the upper block is an isolated exercise, not a basic one, so it should be done at the end of the exercise, for example, after a basic close-grip bench press or dips.
3) Extension and flexion of the arm at the elbow is necessary completely; in a crossover, the load always remains on the triceps, and it does not matter whether the elbow is bent or straightened.
4) Performing the exercise with just one hand helps to better concentrate on the triceps; in this case, there is no fear that one stronger hand will steal the load from the weaker one.
5) For core stability, take one leg back, only so that they are not on the same line, there is a distance of approximately 20 cm between the feet.
Arm extension on the upper block video
Tags: exercises
bombatelo.ru