Tilts of the head back on the simulator[edit | edit code]
Inventory
: exercise machine for neck muscles.
Core muscles
: sternoclavicular, splenius capitis muscle.
Additional muscles
: trapezoidal.
Level of training
: intermediate to professional.
Keep your back
Don't help with your back muscles. Keep your back straight as you move. Any exercise for the neck muscles should be performed slowly and with moderate weight due to the very high likelihood of injuries such as pinched nerves and dislocated cervical vertebrae.
Step 1
. Sit on the exercise machine, rest your head on the pillow. Grab the handles.
Step 2
. Slowly tilt your head back, pressing down on the pillow and straining your neck.
Step 3
. Slowly return to the starting position.
Preparatory stage
Before performing an intense workout, the body needs to be prepared.
Important Tips
- Physical therapy should be performed to relieve pain.
- You need to perform the exercises in a constant development gradually, increasing the load.
- Do not overstrain your neck by performing exercises for a long time.
Basic execution rules
The most important thing in doing exercises is breathing. If during training your heart rate and respiratory rate increase, then you need to slow down the pace and reduce the number of repetitions.
All classes are conducted during remission.
After the first lessons, you should pay attention to whether problems have appeared in performing movements and whether tension and pain in the neck have increased. If this happens, then the number of repetitions should be reduced.
In order for classes to bring results, you need to hold your back correctly during classes.
In the first 2-3 weeks, classes should be carried out once or 2 times a day. After this, gymnastics are performed to maintain shape 3 times a week.
Tilts of the head to the sides on the simulator[edit | edit code]
Inventory
: exercise machine for neck muscles.
Core muscles
: sternoclavicular.
Additional muscles
: front, middle and rear stairs.
Level of training
: intermediate to professional.
Step 1
. Sit on the exercise machine, rest your head on the pillow. Grab the handles.
Step 2
. Slowly tilt your head to the right, straining your neck.
Step 3
. Slowly return to the starting position. Complete the prescribed number of repetitions. Changing position, repeat the exercises on the left side of the head.
Training without weights
The US Trainers Association has a universal training methodology. It includes three basic exercises. We already know one of them, lateral neck bends with a harness. I will present the remaining two below:
Straight wrestling bridge. You probably did everything in school on the bridge in physics. So, the wrestling version is performed without hands. The head acts as a fulcrum. Use your hands to help yourself to the starting position. The head should be slightly tilted back. Once in the desired position, remove your hands. Then begin to smoothly roll towards your legs, thereby increasing the load on the neck extensor muscles
Reverse wrestling bridge. This exercise must be supplemented with a regular wrestling bridge to maintain balance in the development of neck muscles. After all, in this execution the exercise trains the anterior cervical muscles. Due to the complexity and risk of injury, I recommend performing them only under the supervision of an experienced trainer.
Bend the head forward on the simulator[edit | edit code]
Inventory
: exercise machine for neck muscles.
Core muscles
: subcutaneous muscle of the neck.
Additional muscles
: splenium, lying below the hyoid bone.
Level of training
: intermediate to professional.
Step 1
. Sit on the exercise machine, rest your head on the pillow. Grab the handles.
Step 2
. Slowly bend your head forward, straining your neck.
Step 3
. Return to the starting position.
Keep your body
Do not lean on the machine with your whole body, work only with your neck muscles.
If this still happens, then reduce the training weight.
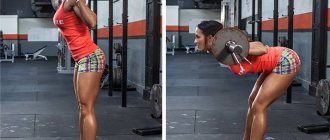
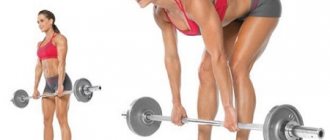
Side bends: what muscles work
The main load of bending the body to the sides is placed on the external oblique muscles of the abdomen. If they are well designed, they allow you to get beautiful curves of the silhouette. Additionally, the rectus abdominis muscle, internal oblique muscles, and stabilizers are involved.
Also, such lateral bends create a load on the lumbar spine, so the importance of correct technique is very great.
Tilts of the head to the sides[edit | edit code]
Inventory
: No.
Core muscles
: sternocleidomastoid, anterior, middle and posterior scalene.
Additional muscles
: splenium, lying below the hyoid bone.
Level of training
: intermediate to professional.
It is advisable to include this exercise in the warm-up at every workout, regardless of whether you are training your neck that day or not.
Step 1
. Feet shoulder-width apart, arms down. The muscles of the shoulder girdle and neck are in a relaxed position.
Step 2
. Slowly tilt your head to the right, achieving maximum stretch.
Step 3
. Without holding this position, return to the starting position and repeat on the other side of your head.
Take care of your spine
Avoid rotational movements in training. There is no benefit from them, but the harm is obvious - wear of the intervertebral discs.
Diagnostics
Specialists in applied kinesiology (the science that studies patterns of movement of muscle groups) conduct special diagnostics to identify normality or pathology. The example described above examines the correct functioning of the muscular structures: the muscles that tilt the head forward when they contract together.
What if, when tilted, the chin remains in the air without reaching the chest? Moreover, the distance can be either small or large. This means weakness of the cervical flexor muscles.
In such cases, the person is prescribed special therapeutic exercises. It helps build muscle strength in the deep flexors. It is performed with the head freely sagging, as well as using the technique of overcoming resistance.
Head tilts forward and backward[edit | edit code]
Inventory
: No.
Core muscles
: sternoclavicular muscle, splenius capitis muscle, subcutaneous muscle of the neck.
Additional muscles
: lying below the hyoid bone.
Level of training
: intermediate to professional.
Step 1
. Feet shoulder-width apart, arms down. The muscles of the shoulder girdle and neck are in a relaxed position.
Step 2
. Slowly and as low as possible bow your head. Without lingering in this position, return to the starting position.
Step 3
. Tilt your head back and, without pausing, return to the starting position.
After bending forward, be sure to pause in the middle position before bending back. This will ensure that you maintain a slow pace without sudden movements.
Additional benefit
Tilts prevent the deposition of salts on the rubbing surfaces of the joint. Thanks to this exercise, the natural spaces between the bones increase, the cartilage is massaged, as a result of which they are better supplied with blood, which means they do not lose elasticity longer and recover faster even when serious changes have occurred in them.
Recommendations for performing exercises
- Always start any workout with a warm-up.
For the cervical region, it will be enough to perform 3-5 circular movements of the head, tilting the head to the sides and forward/backward. This will help warm up the muscles. Perform the movements slowly, lingering at the extreme point for several seconds. - each exercise from the complex 6-8 times with weights or 10-15 times
if you do not use additional weight. - Do not use heavy weights as a burden.
Do not overload the cervical spine. Be aware of possible injuries. If you're new to this, don't use weights at all. - this complex every day
with little or no weight than to carry out “killer” workouts 2-3 times a week. - As weights, you can use weights in the gym or a special head helmet
to which additional weight is attached. For an easier option, you can use your own hands to create resistance. - each exercise as slowly and concentrated as possible.
Sharp jerks are strictly unacceptable here. - And, of course, don’t forget about proper nutrition.
After all, you probably train all muscle groups, and they need energy and material for construction -. Therefore, your entire diet should be aimed at growing muscle mass, and meals should be every 2-3 hours.
Synergists and antagonists
Several muscles can work to perform a single action or perform opposite ones. The head raisers are antagonists for the flexor group, and vice versa.
In fact, muscular structures that are opposite in action are designed to balance, build posture, and symmetry of the body. In general - to hold a person's head in an upright position.
The ratio of the degree of involvement of the listed muscle structures in the work depends on the posture, movements of the shoulders, arms, and the curvature of the human body as a whole. This is how a fine “tuning” of the head holding mechanism occurs, and lordosis of the body region is formed (in the area of the cervical spine).
We'll take a closer look at the muscles that tilt the head forward when they contract together.
Neck exercises
How to improve the condition of your neck?
My neck is still one of my weakest points. I know a lot of exercises for the neck, they undoubtedly improved the condition of my neck, but, alas, they did not bring it into ideal condition.
Meanwhile, my friend's neck is in excellent condition, despite our age difference. When I asked her what was the secret to the beauty of her neck, she replied:
THE NECK STARTS FROM THE COCCYX. And, indeed, I built the neck from the head, and the neck, meanwhile, is a continuation of the spine.
Now I found a wonderful set of exercises for the neck, started doing it, and my neck very soon began to come to life both externally (the flabbiness went away) and from the inside. For a long time I was an “experienced hypertensive patient,” but when I found this complex, after just a week I stopped taking blood pressure pills.
Of course, I shared this complex with friends (who did not need to solve the same problems as me, but they solved their problems), and almost immediately I received positive reviews about these exercises.
In general, this is a miraculous, tactful, effective complex!!!
Meet and join!
To make it easier to understand, I want to bring to your attention a video where I show these exercises.
Description of exercises:
Exercise 1. Shaking your head.
We start by stretching the spine: we move our shoulders down, pull ourselves up with the crown of our head, closing our eyes, and focus on the feeling of stretching the base of the neck. Maintaining this internal feeling of stretching, we begin to move our heads back and forth - smoothly, with a comfortable amplitude. We gradually increase the amplitude of movement and speed, depending on subjective sensations.
The number of repetitions is individual, depending on the problems in the cervical spine - for serious problems, we start with a small (5-7) number of repetitions. Problems will go away over time, and the number of repetitions can be increased.
Exercise 2. Turning the head left and right.
As before, we stretch the top of our head up. Smoothly turn your head left and right, gradually increasing the amplitude and speed. If there are problems in the cervical spine, such as a hernia, everything is done as smoothly and gently as possible, and the number of repetitions is gradually increased. For example, we add 1-2 movements per day - starting with 10, and gradually increase to 40-50 movements in each direction.
Exercise 3. Head tilts to the sides.
Tilting our head, we stretch our “upper” ear upward, trying to stretch the base of the neck and the area of the collar zone. When performing this exercise, it is important not to raise your shoulders, but still stretch your arms down so that the base of your neck is thoroughly stretched and warmed up. It is important to ensure that you do not compress the spine, but still stretch it upward due to the upward movement of the “upper” ear.
Exercise 4. Rotation.
There are several options for head rotation.
Option 1. The chin remains in one plane.
We make rotational movements with our head, draw a circle with the top of our head, and, at the same time, draw a circle with our chin. The body, if possible, remains motionless. We start with a small amplitude of movement, gradually the amplitude can be increased. We perform several movements in one direction, and then the same number of movements in the other direction.
Option 2. “Draw” circles with the whole face – also first in one direction and then in the other direction.
Both options are performed until you feel a comfortable, pleasant warmth in the neck muscles.
Exercise 5. Draw a circle.
The next exercise is to move your chin in a different plane. We seem to draw a circle with our chin, making “raking” movements from bottom to top. We make sure that the shoulders are not involved in this process.
Then we perform the same rotation in the opposite direction. We move our chin forward, down, towards ourselves. Raise your chin a little, slightly throwing your head back, and lower it in a circle, drawing this circle with your chin.
When you consider the neck muscles to be sufficiently warm, either traction (stretching) or short forceful fixation is performed.
Exercise 6. POWER FIXATION.
1. Push your palms with your forehead.
We place our palms on our foreheads. We take a smooth deep breath, and as we exhale, first gently and then press harder with our heads on our palms, and with our palms on our foreheads.
At the end of the exhalation, hold for some time and in the pause we maintain tension in the neck muscles.
Again we take a smooth breath and exhale. We put our hands down.
Pleasantly stretch your neck.
We repeat the exercise: inhale smoothly, as you exhale, gently press your palms onto your forehead, and your forehead onto your palms.
After this, we perform 2-3 cycles of calm breathing, maintaining tension in the neck muscles.
Gradually, as the neck muscles develop and the condition of the neck improves, the fixation time can be increased. At the initial stage, these are several repetitions with a short fixation; in the future, the fixation can be held longer, up to 0.5 minutes.
Please make sure that during this exercise there is no excessive straining and no spasms of the neck.
2. Push your palms with the back of your head.
We place our hands behind our heads and take a smooth deep breath. As you exhale, first gently, moderately, and then press harder with your head on your palms.
After completing the exercise, take a breath, lower your arms, and relax your head, this time stretching the back surface.
We repeat the exercise 2-3 times.
Again, take a deep breath, and as you exhale, gradually increase the tension - at the end of the exhalation it is maximum, but not so much that a strong muscle tremor occurs from overexertion.
If there are intervertebral hernias, this exercise is quite dangerous - you need to start it with moderate effort, gradually restoring the weakened muscles.
3. Push your palms with your temples.
We repeat the same thing, strengthening the sides of the neck. Let's take a deep breath. As you exhale, press your temple onto your palm, keeping your neck vertical. We inhale again, while inhaling we lower our arm and stretch our head in the direction opposite to the previous effort.
You can speed up this process a little if you place the opposite hand on top of your head, as if grabbing your ear. Under no circumstances put pressure on your head with your palm, but pull your head up diagonally. At the same time, we pull the other shoulder down.
We repeat the exercise 2-3 times, do not forget to repeat the stretching after each repetition to relieve tension in the muscles.
We repeat the exercise on the other side: take a deep breath, exhale smoothly, head vertical. After the load, stretch the muscles. We pull the opposite shoulder down, the ear up (or we help stretch the neck with the opposite hand, as described above). Smoothly inhale and exhale again. We strain our neck muscles and push our temple with our palm. And we do the stretching again. We grab the ear with the opposite hand, pull the shoulder down, and stretch the base of the neck.
At the same time, we feel how the muscles gradually relax.
Exercise 7. TRACTION EXERCISE.
We grab the area behind the head at the base of the jaw with our thumbs. The palms grasp the base of the skull from behind.
Now we bend our knees slightly and bend forward. Bending over, we weigh down the head with our hands and perform a gentle stretch with slight turns of the head, slightly rotating the head around the axis in a head down position.
We feel maximum stretching and relaxation of the neck muscles.
The amplitude of head movement is small. As you exhale, we slightly increase the impact of your hands.
Thus, we stretch the neck under the weight of the head and arms and a little due to strength.
The duration of traction depends on your subjective sensations - the goal is to achieve traction and relaxation.
After performing the traction, we slowly rise up and, standing, continue to relax our necks, slowly shaking our heads from side to side.
WORKING THE THORACIC SECTION.
Exercise 8. Shoulder rotation.
IP – sitting or standing, hands on the belt (place palms on the pelvis).
We begin rotating our shoulders. We raise our shoulders to our ears, make a circular movement, and bring our shoulder blades together. The hands are relaxed. The amplitude of movement is maximum. At the same time, we seem to massage the point between the shoulder blades.
Each movement is performed with exhalation. If our physical capabilities allow us, we gradually raise our shoulders higher and higher, and then move them further back.
Then we make the same number of movements in the opposite direction - we bring our shoulder blades together from behind and move our shoulders forward.
Exercise 9. Alternate shoulder rotation.
We continue to work with our shoulders, alternately rotating our right and left shoulders. In this case, natural twisting occurs. Attention is at the point between the shoulder blades. The back muscles move around this point.
When this exercise is performed correctly, breathing is relaxed, and a characteristic sound is heard that appears when the right and left lungs contract.
Now we do this exercise in the opposite direction.
Exercise 10. Shoulder rotation with arms extended.
We spread our arms to the sides, palms up. As you exhale, twist your palms inward, down. Pull your chin down and lower your head onto your chest.
Inhale – turn your palms up, stretch your face up. We stretch the pectoral muscles as much as possible, bringing the shoulder blades together.
Exhale again - twist your shoulders as much as possible, try to turn your palms upward from the inside, head lowered to your chest.
Inhale - turn around. We stretch our face up.
Exhale - curl up, face down, palms inward, down, continuing the turn, rising up from the inside.
We repeat this movement several more times.
As you exhale, stretch and twist the shoulder joints as much as possible. As you inhale, spin them back as much as possible.
We complete the complex with a recovery exercise. There should be no trembling in the muscles. The cervical spine should be relaxed.
Exercise 12. Relaxation.
Having finished the exercise, we rest a little: we remain lying on our stomach, placing our crossed hands under our forehead. In this position, natural traction is maintained, while the neck muscles can relax even more.
If at the end of the complex you feel tired, perform relaxation while lying on your back. In this case, you need to place a rolled-up blanket under your neck. It is important that, while lying in this position, you feel that the muscles of the neck and spine are completely relaxed and unloaded. The weight is distributed on the head and on the surface of the rolled roller.
Relaxation lasts from 5 to 10 minutes, preferably for as long as the active phase of doing the exercises lasted (in our case it’s 10 minutes.
I would like to draw your attention to the fact that relaxation is a mandatory exercise. In no case should you save time on final relaxation.
It is very important that relaxation takes almost the same amount of time as physical activity. Otherwise, the neck muscles will “stand up like a stake,” instead of gradually returning to their ideal, pristine state. During relaxation, you should feel that a pleasant warmth is spreading over your head and neck, because it is at this moment that they are washed with fresh blood.
Take your time to jump up and run to do different things. Right now you have no other pressing matters other than relaxing your neck and head.
Right now you have opened a channel for blood to enter the brain. This is exactly what we were trying to achieve by performing the complex - to return the neck to a state where it is not only externally in good condition, but also ensures the flow of blood (and therefore oxygen) to the brain.
A set of exercises taken from the website www.wildyogi.info/»>www.wildyogi.info
Tatiana Chekalova.
Share link:
Tilt function
The muscles that lower the head forward can work either individually or together. Let's look at their list in more detail:
- sternocleidomastoid;
- staircase (front);
- staircase (middle);
- staircase (rear).
An interesting fact is that during a smooth tilt, these muscles are relaxed. Lowering the head occurs due to relaxation of the muscles that perform the opposite function (maintain a vertical position):
- trapezoidal;
- adhesive;
- straightening the spine.
But if the vertebrae of the neck are flexed at a fast pace, with effort, then the muscles that tilt the head forward immediately come into play.
Treatment
It is useful to use homeopathic Viburkol suppositories against the background of teething, and apply medications to the gums that reduce pain and itching of the gums. When such measures do not help, it is necessary to prescribe sedatives (calming) drugs, drugs that reduce neuro-reflex excitability. Just as with affective-respiratory attacks, there is a wide variety of medications, ranging from herbal medicine, homeopathic remedies and multicomponent drugs to nootropics (glycine, pantogam, phenibut, etc.). Treatment for detected otitis is prescribed by an ENT doctor.