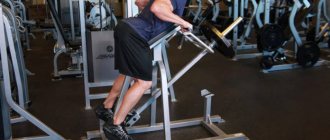
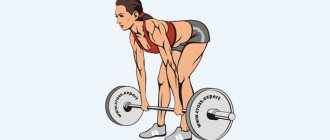
The Raider row is one of the ways to effectively increase muscle mass. To perform the exercise, any solid support is required. Its complex repetition can increase the width of the chest without the use of additional weights. The exercise is safe for health and can be used by both adults and children.
- Advantages
- History of the exercise
- Execution technique
- Benefit
- Useful tips
What is the exercise for?
The Rader row exercise is necessary to stretch the pectoral cartilage. As a result, the bone base increases. If the base itself is wide enough, then even muscles that are not too pumped up will look voluminous and impressive. That's the whole secret.
Counts:
- that the best age to perform the exercise is under 20 years old. During this period, a person develops bone tissue. It is in its final stages. At the age of 20 (for some, a little later or earlier), bones no longer develop. Further, only regression will occur.
- that the Rader deadlift is also recommended for those athletes whose age has long exceeded 20 years. With the right approach to the matter, the Rader row can increase the pectoral cartilage by a couple of millimeters. To prevent the result from disappearing, it is recommended to perform other compatible physical exercises along with the Rader deadlift.
What muscles work
The target muscle group in the Rader deadlift is the thoracic region, or more precisely, the upper pectoral bundles. An additional stabilizing function is taken on by the thoracic antagonists – the lats. The triceps and neck are stretched along with the chest and back.
The abs stabilize the core in most exercises performed while standing. However, in this case, it is recommended to keep the abdominal area relaxed in order to transfer the maximum weight of the body to the arms.
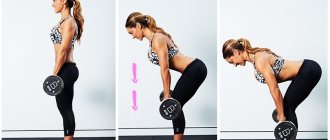
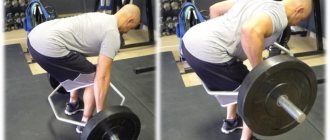
Technique for performing the Rader deadlift exercise
You can perform the exercise in a gym specially equipped for this purpose or at home. No additional professional equipment is required here:
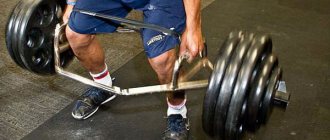
- A bodybuilder needs to find a foothold. For example, near the corner of a room or gym.
- Next, you need to straighten your arms and bend over, pushing your buttocks back.
- The chest, meanwhile, protrudes forward.
- A deflection forms in the lower back.
- With the correct technique of performing the exercise, the athlete feels tension in the chest area. The pectoral muscles are included in the work.
- The hands should be positioned so that the tension is felt real and strong.
- Now you need to move the body down and squeeze the support.
Technique for performing the Rader deadlift exercise
During the exercise, you can hear a click in the solar plexus area, this indicates that the pectoral cartilage has fallen into place.
This exercise is useful for those people who experience some discomfort in the lumbar region.
Athletes love the Rader deadlift because it can be performed anywhere - at home, on the street, in the gym, even... in the library! In the gym, the support can be a horizontal bar or a rack from an exercise machine. At home - a corner of a room, a door frame, on the street - a wall or corner of a residential building.
There aren't too many traction options for the Raider. There is only one correct technique for performing the exercise, which must be adhered to.
Leaning your head back will make the exercise more difficult. This “trick” can be performed when the usual Raider deadlift no longer brings the same stretch.
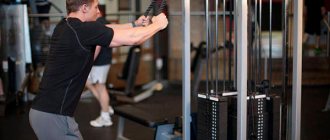
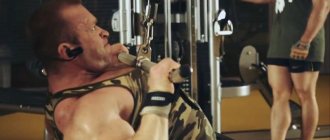
Pulldowns with a medium reverse grip
The lat pulldown with a wide straight grip (on the chest) is the most common option in fitness. The movement is suitable for those who cannot pull their heads, pull themselves up, or perform other movements. This exercise allows you to pump up the latissimus muscles, even if people have problems with strength and shoulder flexibility.
By training in a simulator, you can build up the “width of your back,” as athletes say. This movement allows you to press your shoulder blades towards your back and correct your posture. The exercise will help prepare the body for strength work - deadlifts and pull-ups.
Correct technique
- You need to choose the width of your grip so that your hands are slightly wider than your shoulders, but your shoulders can drop down and your shoulder blades can “pull” towards your spine;
- The grip is performed closed, standing facing the machine;
- Then the upper back bends slightly, the shoulders are removed from the ears, the shoulder blades are pulled towards the spine;
- The athlete sits on the machine bench, the body leans back a little, the chest rises up;
- The shoulders need to be turned back a little;
- The shoulder blades are pulled towards the spine;
- The lats gather, tighten towards the spine;
- Then the handle of the simulator is brought to the top of the chest;
- Peak muscle contraction is performed;
- The reverse movement consists of lowering the handle back
The movement is performed smoothly, without any pushing or jerking. It is important not to pull your biceps, not to throw your shoulders towards your ears, and not to yank the handle too hard. It is important to move the handle smoothly and not make the extension of your arms too large. Athletes think that the wider the grip, the better the back work, but this is not true. The grip should be chosen to be comfortable, so that it does not interfere with the work of the muscles.
Back workout. Upper block pull.
Common mistakes
- The most common mistake is the biceps pull. The first thing a person does is bend his elbows, and by contracting his biceps, he pulls the handle toward his chest. This is not correct, and takes the strain off the back;
- You should not pull due to inertia, tilting the body back, and pulling the handle to the top of the back with a jerk;
- Pull to the middle of the abdomen without arching the back or tilting the body. This only allows you to pump up your biceps and “hammer” your trapezius, so you shouldn’t do that;
- It is better to avoid the option when the weight is too heavy and the person is literally “thrown” up;
- Throwing your elbows back allows you to develop exclusively the posterior deltoid muscle, but not the latissimus or rhomboid muscles;
- “Humping”, that is, rounding the back in the thoracic region, can lead to injury in the shoulder joint and remove the load from the target muscles
READ MORE: What are nutrients in food, their types and role for human health
It is important to understand that this version of the exercise is for the upper bundles of the latissimus muscles. If the lower ones are not loaded, nothing bad happens. Is it possible to pull the block by the head? Modern fitness trainers rarely give their clients this exercise. Meanwhile, in bodybuilding and powerlifting it is used quite often.
A condition for using this movement safely is good mobility of the shoulder joint. Pulls for the head are performed with significantly less weight than for the chest. It more specifically works the rhomboid muscles and helps retract the shoulder blades and stabilize the back in all strength exercises.
It's a lat pulldown, baby!
This version of the exercise works the lower bundle of the latissimus muscles, it does not allow you to emphasize the load on the top, this is not necessary. Many athletes choose heavier weights for reverse grip deadlifts, but this is wrong. It turns out that the load goes to the biceps. It is better to take medium resistance or weight and pull the block, as if meeting the handle of the machine with your chest.
Correct technique
- The grip is shoulder-width apart, not narrower; a narrower hand position requires a special handle with double symmetrical handles to maintain healthy shoulders;
- On a regular handle, grab the notch in the middle, or, if there is none, the handle with gloved hands;
- The palms should be directed towards the athlete's face;
- They sit on the machine bench when the grip is already set and the fingers tightly clasp the handle;
- Then the arms seem to stretch upward, the shoulder blades are assembled towards the spine, the body is tilted back;
- By contracting the latissimus dorsi muscles, the athlete brings the handle of the exercise machine to the top of the chest;
- In this case, the forearms move along the body, the elbows move towards the floor;
- You should not put your elbows behind your back, as well as excessively contract your biceps;
- The reverse movement consists of gradually relaxing the back and moving the handle back;
- The arms are fully extended at the top point of the exercise.
Reverse grip lat pulldown: execution technique
Technical errors
- A grip error is holding the handle on your fingertips. This leads to overload of the forearms and a shift in emphasis to them. The forearms become clogged and the athlete cannot complete the required number of approaches and repetitions;
- It is technically incorrect to pull exclusively with the biceps, as if taking the back out of the range of work. From the outside it looks as if the athlete is pulling the handle with his hands and bringing it to his shoulders by bending his arms at the elbow joint;
- You can’t turn on the press too much; this usually happens due to the incorrectly chosen weight of the burden, and the tendency to twist forward, as it were, and pull the lower ribs towards the pelvic bones. This movement helps unload the back muscles, so it is unacceptable
This exercise serves to build perfect symmetry. It gives the latissimus dorsi muscle ideal contours and helps correct muscle imbalances. Due to its biomechanical nature, the movement puts more stress on the back and less on the biceps; even a beginner can isolate his back enough to make his workout more effective.
READ MORE: Deadlift from the pit - step-by-step execution technique
To perform the movement, you will need a special handle for a parallel grip; this is a handle with two handles shoulder-width apart. The problem may be that the handle does not fit the person in length, and anthropometrically does not allow the movement to be performed correctly and with full load. But for most body types, standard gym handles are a suitable option.
Correct technique
- You need to attach the handle for a parallel grip to the simulator or to the upper block of the crossover;
- Grip – parallel with palms facing each other, palm resting on the handle of the machine;
- Lowering the handle of the projectile begins with activating the lats;
- The elbows are brought to the body so as to ensure contact with the handle and the top of the chest;
- At the lowest point – peak contraction of the back muscles;
- Then – smoothly bring the handle of the simulator upward.
Parallel grip lat pulldown: technique and nuances
Technical errors
- Pull using the biceps alone to the top of the head, without tilting the body back;
- Jerks with arms, and sharp bends of the body back, working due to inertia;
- Twisting the body forward, “finishing with a press”;
- Huge weights, and heroic pull of them with the whole body;
- Raising the elbows to the sides, leading to shoulder injuries and shifting the load to the biceps;
- “Excessive flexion” of the hand at the wrist shifts the load to the forearms;
- Holding the handle on your fingers also shifts the load to your forearms;
- You cannot pull the handle towards your hips, then only your arms will work, and then in the wrong, anatomically unnatural plane.
There is an opinion that the parallel handle is designed for horizontal traction (towards the belt). Yes, this can be a convenient option if the goal is to work the back with the posterior bundles of the deltoid muscle together. But for the “depth” of the back, beautiful relief and overall muscle mass, the vertical row with a parallel handle is a good choice.
An option for making block pulls could be a crossover pull with different types of handles. If there is no block exercise machine in the gym, you can install a step platform or bench to the handle of the crossover and perform exercises in it.
The hammer row is similar in biomechanics, but it allows for a greater stretch and contraction of the lats. Hammer is a good trainer, but not all gyms have it, so the option with a crossover is closer to most.
An option for performing a vertical pull is to simultaneously or alternately pull the handles of the crossover in a kneeling position. The handles are secured from above, the kneeling position is performed on the mat, exactly in the middle of the crossover handles. While pulling the shoulder blades toward the spine, you must simultaneously bring your elbows toward your body along an elliptical path and push your chest up. This movement engages the “outer” lats and allows you to create a beautiful contour of the back.
If an athlete has an imbalance between the development of the right and left half of the back, a crossover row is performed while kneeling with one hand. The mechanics of the movement are reminiscent of a regular block pull, but with an emphasis on one side.
The athlete must independently control the position of the back while performing all variations of the exercise. His task is not just to feel the muscles, but to imagine the biomechanics of movement in his head in order to consciously involve all the back muscles in the work. You also need to remember that there are no universal set-repetition schemes.
An athlete can perform lat pulldowns in the range of 6 to 20 repetitions, in 3-5 working sets. The specifics depend on the purpose of the cycle and the degree of muscle development. The only condition is that you need to gradually progress in working weights, and try to complement vertical rows with horizontal ones. For harmonious development, you need to apply the principles of plane training, that is, balance the number of rows and presses in your training program.
READ MORE: Sumo deadlift correct technique which muscles work
Wide-grip lat pulldown!!! Kock technique!) VOD
Tips for doing the exercise
Tips for Performing Raider Rows
To make this exercise useful, remember:
- After performing the Rader row, there should be some tension in your chest. It should not be pronounced or painful;
- try to perform deadlifts in different positions, bringing your legs together and spreading them, leaving your hands at the level of your head or slightly above it;
- you must find the ideal position in which you will be as comfortable as possible;
- do not spread your arms too wide, they should be close to each other, this is the condition for performing the exercise;
- There must be tension in the chest; if it is not there, it means that the Rader row is being performed incorrectly; consultation with a professional is required;
- Without a good arch in the lower back, the Rader row cannot be performed;
- The exercise must be performed after a set of breathing exercises in order to prepare the chest for stress;
- you need to start the exercise with 10 approaches, gradually increasing the number to 20-30;
- relax your stomach, the abs do not require tension;
- do not start with a long delay during the exercise, otherwise you may experience an attack of dizziness or fainting;
- To make the chest wider, you need to perform the exercise daily or every other day; long breaks are not recommended here.
Recommendations
- To achieve maximum stretching of the pectoral muscles, experiment with distance.
- Keep in mind that the higher your arms are raised, the more your lower back will work.
- Bend your knees together with your body.
- There is no need to tense your core muscles when bending. Shift your body weight to your arms and chest.
- Don't forget to hold your breath while bending over. This will create additional pressure on the chest and the bursting feeling will be felt more strongly.
- Maximum stretching in the chest can be achieved by tensing the neck muscles and moving the head back while standing. But this can be done by experienced athletes.
- Always focus on personal feelings. Their absence is an indicator of incorrect deadlift performance.
If you are inexperienced, dizziness may occur due to insufficient training of the cardio-respiratory system. Stop working and try again later. Start with a minimum number of repetitions and gradually increase the time incline. Otherwise, you can get a stretch of the sternal cartilage.
Benefits of exercise
It is important to understand that performing the exercise will not give the athlete strength and dexterity, nor will it increase power and endurance. But only it is capable of qualitatively and fairly quickly stretching the chest to the values needed by the athlete. This is especially important for bodybuilders, for whom the aesthetic side of the issue is more important than strength.
It is not the bones that are being stretched, but the cartilage. Exercise can also bring relaxation, if this is what the athlete is aiming for. It is also used before strength training as a stretching exercise.
The Rader deadlift is recommended not only for professional athletes, but also for ordinary people. Warming up the chest is simply necessary in order to improve air circulation in the lungs. If you spend a lot of time at the computer, the Rader row is an excellent warm-up option for you. You can even perform Rader rows in the office. Without leaving the premises.
You can do the exercise several times a day. There are no special restrictions in this matter. It has a positive effect not only on the chest, but also on the back and legs. Hands. Relieves fatigue, swelling, excessive tension.
Important nuances
Rader rows performed after heavy breathing exercises (when the chest space is maximally expanded) will give maximum effect. As we already know, the author of the exercise performed it after breathing squats.
The abdominal muscles should be relaxed. If you tense your abs, the Rader row will be less effective.
Calculate your strength if you have minimal training. Large breathing exercises can cause dizziness. Act gradually, consistently and wisely.
Execution options
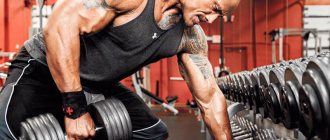
One-arm lever row
To perform rows with one hand, it is necessary to fix the body so that the other hand can grab the handle of the machine. The “non-working” half of the back is stable, the scapula is brought to the spine and lowered to the pelvis. The working half of the back begins by bringing the scapula toward the spine and synchronously flexing the elbow joint. The technique is similar to a conventional lever pull. This exercise allows you to balance muscle development and achieve an even gain of muscle mass. For those who have spinal curvature and poor posture, this is a priority movement.
Preparation and when to do it
Before starting the exercise, you need to carry out a set of breathing exercises, preparing the chest for work. It is also important to find a comfortable place to stretch. In general, this is the simplest thing: you need a section of the wall on which you can rest your hands. Some fitness trainers recommend pushing against a protruding corner.
Place one hand on one side of the corner, the other on the other, and you can begin to perform. It is also important that the floor under your feet does not slip.
Rader rows can be performed before or after strength training. In both cases it will bring results. In the first case, it will prepare the chest muscles for work, and in the second case, it will help relieve muscle strain. As mentioned above, this deadlift is performed according to the athlete’s feelings: some need to warm up, others need to relax.