Execution technique
Forward bends are at the initial level of difficulty. The technique must be perfect to avoid injury and get the most out of your training.
Forward bends
Proceed as follows:
- Stand up straight and straight. Feet shoulder width apart.
- Tighten your abs. Tilt your body down. The work is done in the hip joints. The back remains straight.
- Having reached the lowest point, stay there for a while.
- Using your gluteal muscles, return to the starting position and repeat the required number of times.
If flexibility is poorly developed and you cannot reach the floor, then you are allowed to bend your knees. With regular training, your flexibility will improve and you will be able to easily perform with straight legs. Overweight girls do it to lose belly fat.
After mastering this exercise, it is recommended to use weights, for which dumbbells and barbells are used.
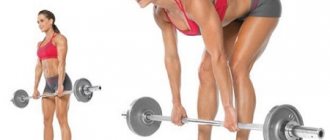
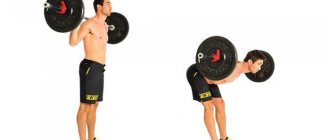
With a barbell
To practice the technique of bending over with a barbell, a minimum weight or an empty bar is suitable. It is done like this:
- Place your feet shoulder-width apart. Place the barbell just below your neck.
- Straighten your shoulders and bend your knees. Only experienced athletes can perform forward bending from a standing position with straight legs and a barbell.
- Slowly lower your body until it is parallel to the floor. The pelvis is retracted.
- Using your buttocks and thighs, return to the starting position.
The level of inclination depth is adjusted by the hamstrings. You should not try to make the bend deeper if this stretch does not correspond to your level of training.
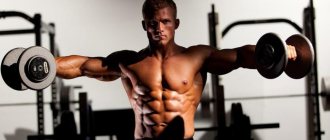
With dumbbells
Such weights are usually used by girls. For this exercise you will need 2 dumbbells of the required weight.
- Take the starting position: feet shoulder-width apart, back straight, shoulder blades pulled together, and take dumbbells in your hands and place them along your body.
- Lean forward while keeping your back straight. Move your pelvis back. If it is not possible to straighten your legs completely, then bend them at the knees.
- Return to the starting position. It is recommended to repeat 3-5 approaches 10-12 times.
When performing it, it is important to monitor your breathing. Doctors have different opinions on this issue and it is better to focus on the characteristics of the body.
In a standing position, the chest is expanded, and the lungs are able to accommodate the maximum amount of air. In an inclined position, the opposite is true. Therefore, it is recommended to bend as you exhale and return to the starting position as you inhale.
Mistakes when performing the forward bend exercise
To perform the exercise correctly, you need to know not only the technique of execution, but also the mistakes that are most often made during execution. Forward bends were no exception to this rule. Do not forget to monitor the position of your back and lower back. They perform the main movement in this exercise, therefore, it is they who are at risk of being injured. Try not to relax your back. There is always a natural arch in the lower back. The only exceptions to the rule are some Pilates techniques.
But, the instructor will tell you about this feature, or it will be written in the instructions for performing the exercise:
- Avoid sudden movements. Bend over and return to the starting position smoothly.
- Remember the chest area. It must remain "open". Shoulders straightened. Otherwise, the movement will be incorrect. This will ruin your efforts.
Forward bends are a simple exercise that does not require any special skills or additional equipment.
It can be performed absolutely anywhere: at home, on the beach, in the gym to tidy up problem areas or just stretch your muscles. It will perfectly complement and diversify your workouts.
Technique
Slowly lean forward until it is comfortable for you.
Legs are straight or slightly bent at the knees. Body weight is evenly distributed on the feet from toes to heels. Keep your head down and look at the floor throughout the entire torso bend exercise.
Inhale, direct the air into the stomach if you know how to do this - without allowing the chest to expand and the torso to rise. Squeeze your buttocks together as hard as possible; if you find it difficult to do this, imagine that you are holding a coin between them and clench your fists until your knuckles turn white. Stay in this position for one second.
Exhale, releasing air and tension at the same time. Think of the sudden pop and deflate effect of a tire when you get a puncture. If you read the book carefully, you know that your body will drop down a little and at the same time the muscles of its back surface will stretch: the gluteal muscles, the hamstrings, but to a greater extent the muscles of the lower back.
To protect yourself from hyperventilation and dizziness, wait a couple of seconds before breathing in again.
Repeat the exercise of bending your torso in front until you can no longer bend lower or you begin to feel some discomfort - dizziness, heaviness in the head, discomfort in the back. For some exercisers, being in a head-down forward bend position is definitely a bad idea; talk to your doctor about whether you should do this exercise.
When you've reached your maximum range of motion for now, or you've simply had enough reps completed, bend your knees and lower yourself into a half-squat before returning to an upright position.
This is very important to ensure safe training for your back!. Scientists have discovered that when your spine is bent too far or your back is too rounded, the muscles in your lower back simply shut down, leaving all the work of supporting the spine to the ligaments
This means two things for you: first, if you try to return to the original vertical position from a very low bend, using your back muscles and keeping your legs straight at the knees, it is very likely that you will get injured. Secondly, in order not to stretch your ligaments, you will not hang in a relaxed state for a long time in the intervals between contractions of the trained muscles. Therefore, bending the torso forward is a very useful and necessary exercise for your body.
Scientists have discovered that when your spine is bent too far or your back is too rounded, the muscles in your lower back simply shut down, leaving all the work of supporting the spine to the ligaments. This means two things for you: first, if you try to return to the original vertical position from a very low bend, using your back muscles and keeping your legs straight at the knees, it is very likely that you will get injured. Secondly, in order not to stretch your ligaments, you will not hang in a relaxed state for a long time in the intervals between contractions of the trained muscles. Therefore, bending the torso forward is a very useful and necessary exercise for your body.
Simplified version
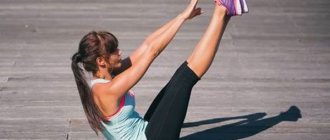
If the exercise is too difficult for you at this stage, learn an easier version of this pose. Dandasana also has a positive effect on the body, and its regular practice will allow you to sit in paschimottanasana.
The most important thing is not to bend your back. Sit on the floor and straighten your legs in front of you. Pull your toes towards you and tighten your knees. You should feel a strong contrast - the upper body is completely relaxed, but the legs are very tense. Your task is to stay in this position for 1-2 minutes. You can help yourself a little with your hands.
If you have trouble keeping your back straight or are experiencing lower back pain, help yourself with yoga straps. Pass it through your feet and fix it at the desired length with your palms. This will make this pose much easier.
You can also make the movement easier by placing a thick pillow between your torso and legs. Alternatively, you can sit on a chair and simply lean forward, lowering your hands to the floor.
Nuances
There are a number of recommendations that should be followed when performing the exercise.
- Don't try to do the exercise with your legs straight straight away. This mainly applies to barbell bending. Over time, the stretch will improve, allowing you to bend over with your legs straight.
- If bending is carried out with a barbell, then the weight should be optimal. With it you should repeat 6-8 high-quality inclinations using the correct technique.
- Watch your breathing.
- Do not make sudden movements when bending over. This is often the cause of spinal injury.
Taking these recommendations into account, anyone can master this exercise with the correct technique and develop flexibility.
Advantages and disadvantages
The main advantage of bending is the development of many muscle groups, which become elastic. The spine becomes more flexible and during the exercise the vertebrae move into place, which improves the athlete’s health.
The exercise is ideal for home workouts and has the following beneficial effects on the body:
- improves spinal flexibility and hip mobility;
- improves hamstring stretching;
- strengthens working muscle groups;
- improves blood circulation. Thanks to these beneficial actions, certain diseases are prevented.
Bends from a standing position have a number of advantages. However, there are contraindications for which it is not recommended to perform the exercise. The aggravating moments are:
- problems with the spine, in which tension in the lumbar muscles is prohibited;
- frequent headaches, high blood pressure and vascular diseases.
Absolute contraindications include the following conditions:
- intervertebral hernia;
- radiculitis;
- pathologies of the respiratory system, including allergies;
- lower back pain;
- pregnancy. In this case, the exercise is strictly prohibited.
The benefits and harms of exercise are quite large. In order not to cause harm to your health, you need to consult a doctor and get permission to exercise. This is especially true for athletes with back problems.
Table of scoring for performing U-FP-2 (torso forward bending)
| Points | Col. once | Points | Col. once | Points | Col. once | Points | Col. once | Points | Col. once | Points | Col. once |
| 100 | 70 | 78 | 59 | 56 | 48 | 37 | 37 | 26 | 26 | 15 | 15 |
| 98 | 69 | 76 | 58 | 54 | 47 | 36 | 36 | 25 | 25 | 14 | 14 |
| 96 | 68 | 74 | 57 | 52 | 46 | 35 | 35 | 24 | 24 | 13 | 13 |
| 94 | 67 | 72 | 56 | 50 | 45 | 34 | 34 | 23 | 23 | 12 | 12 |
| 92 | 66 | 70 | 55 | 48 | 44 | 33 | 33 | 22 | 22 | 11 | 11 |
| 90 | 65 | 68 | 54 | 46 | 43 | 32 | 32 | 21 | 21 | 10 | 10 |
| 88 | 64 | 66 | 53 | 44 | 42 | 31 | 31 | 20 | 20 | 9 | 9 |
| 86 | 63 | 64 | 52 | 42 | 41 | 30 | 30 | 19 | 19 | 8 | 8 |
| 84 | 62 | 62 | 51 | 40 | 40 | 29 | 29 | 18 | 18 | 7 | 7 |
| 82 | 61 | 60 | 50 | 39 | 39 | 28 | 28 | 17 | 17 | 6 | 6 |
| 80 | 60 | 58 | 49 | 38 | 38 | 27 | 27 | 16 | 16 |
Bend to one leg - Parshvottanasana
- Perform Mountain Pose. We retract the tailbone and open the pelvis in front. Gently guide the lower abdomen towards the spine. We move the ribs away from the upper abdomen, as if lengthening and opening the entire front part of the body.
- Relax your shoulders and stretch the back of your neck, reaching the top of your head towards the ceiling.
- We stretch our arms to the sides and turn our shoulders forward so that our thumbs are turned down.
- We place our hands behind our backs and join our palms in a namaste (prayer) position in the middle of the back behind the heart. We press the outer edges of our palms towards the spine, while moving the inside of our elbows back and opening our shoulders in front.
- We take a deep breath, enjoying the opening of the chest.
- We take a step back with our left foot. To make it easier to maintain balance, place your feet hip-width apart. If balance is not an issue, place the arch of your left foot in line with your right heel. Turn your left leg slightly outward. Rotate your pelvis completely toward your right leg.
- As you exhale, bend slowly forward from the pelvis. Do not lift your chin, lengthen the back of your neck and point your forehead towards your right knee.
- Try to touch your stomach to your right thigh (ideally, you should “lay” your navel on your thigh). Pull your forehead towards your right knee or shin (depending on your stretch level).
- Remember: both legs must remain straight and strong. Your knees should not shake. It is better to bend at your level, without touching your forehead to your knee, but with straight legs, than to bend your knees and touch them and not get enough effect.
- Stay in the pose for several breaths. With each inhalation, lengthen your spine, keeping your pelvis level. With each exhalation, deepen the bend.
- As we inhale, we return to the vertical position. We take a step forward with our left foot and again enter the Mountain pose.
- We repeat the exercise on the other side.
For a simplified version of Parshvottanasana:
- Put your hands on your hips
- grab your elbows behind your back,
- bend your front leg at the knee,
- bend parallel to the floor without lifting your chin.
The gaze in the One Leg Bend pose is directed towards the tip of the nose. The additional effect you get by performing this asana is relaxation. And for this, I think, it’s worth working hard. Remember that the effect that yoga and meditation gives does not appear the next day, but be persistent and you will definitely succeed! Body, mind and soul will develop in complete harmony, you will be healthy and happy!
In order to receive by email the complete free course “Yoga Lessons on “Live Easy!” in the form of audio lessons, leave your details in the form below:
Paschimottanasana Seated Forward Bend
Date: 8/01/2012 / 543
The Seated Forward Bend pose is more difficult than it seems at first glance. By performing this asana, you intensively stretch the entire lower part of the body. The word “paschimottanasana” translated from Sanskrit means “seated forward bend”: “paschima” means “west”, and “otana” means “strong, intense”. In yoga, the back of the body is associated with the fuse, the crown of the head with the north, the heels with the south, and the front of the body with the east. The “reverse” to the Seated Forward Bend pose is the Tilt Airplane pose, which helps stretch the front of the body. The pose “ Seated Forward Bend: The Seated Forward Bend pose is usually performed in the first cycle of yoga classes; it opens the cycle of asanas associated with sitting bends. This is followed by a cycle of shoulder stand, followed by a cycle of bending back. When performing the “Seated Forward Bend” pose, sit on the floor, tilt your body forward, trying to reach your feet with your hands, make sure that your back and knees are straight. Benefits of the “Seated Forward Bend” pose: - The benefits provided by the Seated Forward Bend pose work on the entire body, inside and out. - This pose benefits the entire backside of your body by helping to stretch and tighten the hamstrings, back muscles and spine. - While performing this pose, you perform a delicate massage of the internal organs, which normally improves the functioning of your stomach, promotes the proper functioning of the spleen, liver and pancreas, which makes the Seated Forward Bend pose very useful for people suffering from diabetes and hypoglycemia. - Also the Seated Forward Bend pose helps burn excess belly fat, relax, stimulate your nervous system and help relieve stress and nervous tension. - Performing this pose has a calming effect on the mind and body, will help keep you youthful and energetic, will balance the flow of prana in your body and protect you from diseases , will make you a calmer and more confident person. “Seated Forward Bend” step by step: The “Seated Forward Bend” pose is a position that you will perform better and better time after time. This pose is a great test to determine how flexible your body is.1. Sit on the floor, stretch your legs forward, bring your knees and feet together. Sit directly on your buttocks, straighten your spine; your head, neck and back are in line and perpendicular to the floor.
What not to do!
Other news on the topic:
- Pada Hasthasana: Standing Forward Bend
- Performing Mayurasana: “Peacock”
- Dhanurasana: Bow pose
- Chakrasana Bridge Pose
- Reverse stretches step by step
Muscle work during bending
Contrary to popular belief, frontal bends pump up not only the oblique abdominal muscles. With proper technique, physical exercises involve different muscle groups, and when performing variations of an element, auxiliary muscles are also included in the work.
With the help of body tilts you can effectively develop:
- oblique, rectus and transverse muscles of the abdominal region;
- latissimus dorsi muscles;
- gluteal muscles;
- back of the thigh;
- complex of deep lumbar muscles.
Also, in the process of bending, the stabilizer muscles and extensors of the spine actively work.
Benefits, features of the exercise
Forward bends have been familiar to us since childhood. We were forced to do this simple movement in kindergarten, school during physical education classes, in adult life, people involved in sports repeat it regularly in different variations. It has a beneficial effect on the condition of the muscles of the back, spine, hamstrings, hips, etc. It is used for stretching the splits, during strength training in the gym, as well as in such calm fitness areas as yoga and Pilates.
Forward bends can be performed in various variations. Combining them with other exercises makes it possible to increase the load and work the upper and lower body at the same time. For example, this is how a combination of bends with air squats or lunges works. By adding weights in the form of a barbell to the bends, you can tighten your buttocks and the back of your thighs in a short time.
In addition, this exercise stimulates blood circulation. The risks of various vascular diseases are reduced. Therefore, you should not exclude it from your training.
I. Constant and progressive forward bending of the torso
A. Diseases of the spine and large joints
Diseases of the spine and large joints are usually accompanied by pain and (or) form a mechanical cause of torso tilt. Vertebral syndrome occurs. (Pathological kyphosis and skeletal deformations in spondylitis, ankylosing spondylitis, trauma, tumors and congenital diseases of the spine, coxarthrosis, rheumatoid arthritis, reflex muscular-tonic syndromes).
Diagnosis
confirmed by neuroorthopedic, radiological or neuroimaging studies.
[], [], [], [], [], [], [], []
B. Postural disorders in late stages of Parkinson's disease and parkinsonism
Standing and walking in a “flexor position”, accelerated steps with the body tilted forward in the context of other manifestations of parkinsonism (hypokinesia, resting tremor, muscle rigidity, postural disorders). A combination of both of the above reasons (joint diseases and parkinsonism) is possible.
[], [], [], [], []
C. Progressive weakness of the extensor muscles
Myopathy involving the muscles of the pelvic girdle and paraspinal muscles is mentioned here rather conditionally, since it causes a forward tilt not of the entire body, but only of the pelvis.
The patient's pelvis, due to weakness of the extensors, tilts forward and the patient, compensatory, in order to maintain an upright posture, leans
back,
forming hyperlordosis. In fact, here the torso is constantly tilted back (hyperextension). In the absence of such compensation, the torso would be constantly tilted forward.
Other diseases accompanied by weakness of the extensor muscles of the trunk, for example, amyotrophic lateral sclerosis (proximal forms or a rare onset of the disease with weakness of the extensor muscles of the back); progressive spinal amyotrophy; dermatomyositis; glycogenosis (type 2, Pompe disease); Carnitine deficiency - for the same reasons, are rarely accompanied by a constant forward tilt of the body. Patients experience difficulty in straightening their torso (for example, after bending over to pick something up) and use “myopathic techniques” to help themselves.
[], []
D. Tilted spine syndrome in the elderly
This syndrome is observed only when standing and walking in people over 60 years of age (“strong spine syndrome”). The syndrome should be differentiated from vertebral syndrome (kyphosis), but passive extension of the trunk in these patients is normal. Some patients may experience pain in the lower back, but they are transient and usually resolve spontaneously as the disease progresses. CT scanning of the paraspinal muscles reveals hypodensity (decreased muscle tissue density). Sometimes a slight increase in CPK is possible. EMG shows nonspecific mild signs of myopathy (not in all patients). The disease is slowly progressive. Its nature and nosological independence have not been fully established.
Exercises to pump up the neck muscles
Such training should definitely become a component of the daily warm-up, regardless of whether it is planned to work the neck muscles that day or not.
It is done like this:
- stand up straight, place your feet approximately equal to shoulder width, and lower your arms freely downwards. Relax the muscles of the shoulder girdle and neck. Slowly bend your head to the right, trying to achieve maximum stretch. Without stopping at the extreme point, return to the starting position and repeat the exercise in the other direction;
- IP is the same as in the previous exercise. Slowly bend your head down, trying to touch your chin to your chest. Without stopping at the end point, return to the IP, fix your head in this position for just a couple of seconds, and bend it back in the same way. Then return to the original one.
Lateral bends: technique of execution
How to do side bends correctly?
First of all, don't take on too much. If you immediately take dumbbells weighing 3 kilograms or more without preparation, you can not only injure the muscles, but also get the opposite effect to the expected one - that is, pump the oblique abdominal muscles too much, as a result of which the waist size will not decrease, but increase.
Although, in order to achieve such a result, months of intense training are needed, and only a few can withstand such a pace. But in any case, it’s not worth the risk and it’s better for girls to start training with 1.5 kg dumbbells.
If you practice at home, you can pour water into 1.5-liter bottles and use them as weight.
Bends to the side to pump up the waist can be done in several ways.
First, standing and sitting, with a barbell instead of dumbbells, and with two dumbbells at the same time or with only one of them. In the first case, they will create a counterbalance for each other, which will help reduce the load and the effectiveness of the exercise. Therefore, professional athletes recommend doing the exercise with one dumbbell.
Options for performing the side bend exercise:
- When training with one dumbbell, you need to take it in your hand with a regular grip, with your palm turned inward. Your free hand should be placed on your waist or behind your head. Inhaling, slowly lower the hand with the dumbbell down, sliding along the side of the thigh. In this case, the body must be bent in a strictly lateral plane. It is not allowed to bend forward or backward. At first, it is better to do the exercise in front of a mirror. The load should be at the same level as the knee and only after that you can return to the IP. After completing 10–15 repetitions, change hands;
- You need to perform side bends with two dumbbells in exactly the same way, with the only difference being that they need to be done alternately, first in one direction, then the other. Watch your posture: your head should be raised, your gaze directed forward. When doing backbends while sitting on a chair, try to lower your hand with the dumbbell as low as possible, and do not forget to linger at the lowest point for a short time, achieving maximum contraction of the oblique abdominal muscles;
- You can start doing side bends with a kettlebell once enough time has passed and your body gets used to the load created by dumbbells. You can also gradually increase the load by performing this exercise with a barbell on your shoulders. Hang one weight plate on each side, secure them with a lock, place the barbell on your shoulders and, gripping it so that your palms are facing forward, begin to perform backbends in one direction or the other. If you want to achieve the same effect as performing side bends with one dumbbell, then hang only one weight and work first one side and then the other.
How else can you work your abdominal muscles?
It is very useful to perform body turns on a special metal flat round apparatus.
If you don’t have one, perform twisting bends, which are called “windmills”.
Here's another good exercise: place your feet slightly wider than your shoulders and bend alternately towards your left leg, then towards the center and towards your right leg.
Do three sets of 15 reps at a moderate pace. This will allow you to work not only the abdominal muscles, but also the back muscles, or more precisely, the lumbar region.
Combine such training with a special diet and within a couple of months you will see the result not only on your scales, but also on the centimeter with which you regularly measure your waist circumference. Good luck!
Circular rotation of the body
Training allows you to stretch the oblique muscles located in the ribs. At the same time, relaxation of the spine in the lumbar region is observed.
The exercise is done observing the following points:
- in a vertical stance, the palms are placed on the belt;
- the feet are spread shoulder-width apart, the legs are slightly bent at the knees;
- fix the hips motionlessly;
- the upper part of the body describes a wide circle in a clockwise direction;
- perform a similar movement in the opposite direction;
- then they move on to holding the body motionless, describing circles in space with only their hips.
It is advisable to make 3-4 rotations in each direction. Thanks to this exercise, the spine and back muscles will be prepared to accept increased loads.
Types of physical activity
After mastering the technique of standard body tilts forward, you can move on to studying the varieties of this physical activity. This will not only diversify your workouts, but also increase the tone of the deep muscles, which are difficult to work with regular frontal bends.
Varieties of inclinations can be combined with each other and regularly alternated on different days of training. People who especially need constant low-impact and gentle exercise will be able to independently create personal fitness programs according to their level of physical fitness and depending on their sporting goals.
Variations of the element include the following forward bends:
- springy, with intermittent movements;
- with palms touching the floor surface;
- with dumbbells or a gymnastic ball in front of the chest;
- with a gymnastic stick extended above the head;
- with legs brought together;
- with feet spread wider than shoulder level;
- in the splits (for experienced athletes);
- diagonally to one or the other leg in a standing position;
- to the feet diagonally from a sitting position;
- with chin extension.