General principles of the exercise
Next we will talk about several variations of the exercise, but before moving on to a description of the technique of each type, we should mention the general principles of correct squats with dumbbells.
- Working out the inner thighs is facilitated by wide stance of the legs and turning the toes outward (more than 45 degrees).
- Working out the gluteal muscles is facilitated by the maximum possible range of motion (below the level of parallel with the floor).
- Working out the outer thigh is facilitated by a narrow and parallel stance of the legs.
- Working out the hamstrings is facilitated by a slight bend forward and moving the buttocks back during movement.
Dumbbell Leg Workout Plan
It is advisable to do lunges at the beginning or middle of classes, when the muscles are not yet so tired. This basic movement seriously works the lower body. To pre-warm up the joints, leg muscles and ligaments, you can do an approach without weights or with minimal weights.
Before training your legs, you also need to stretch and warm up your muscles well. Watch our complete 5-minute pre-workout warm-up.
Leg workout for men and women with dumbbells
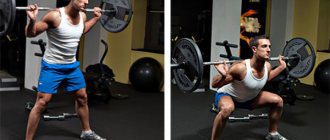
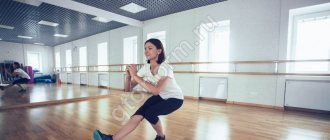
1. Squats with dumbbells
Take the dumbbells in your hands, bend your arms and place the dumbbells on your shoulders. Squat down until your thighs are parallel to the floor, slightly tilting your body forward. Perform squats with dumbbells in 4-5 sets of 10-12 repetitions.
How to squat correctly
2. Lunges in place
Take a wide step forward, resting your back foot on your toes. Take dumbbells, arms down along your body. Lower your pelvis down, doing a classic lunge in place. Then repeat on the other leg. Perform lunges with dumbbells in 3-4 sets of 10-12 repetitions.
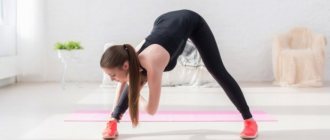
3. Romanian deadlift
To work your hamstrings, perform Romanian deadlifts. To do this, take the dumbbells in your hands with an overhand grip and lower your arms so that the dumbbells are near your hips. Bend your body forward, bending your knees and lowering the dumbbells along your legs. Keep your back straight. Perform Romanian deadlifts for 4-5 sets of 10-12 reps.
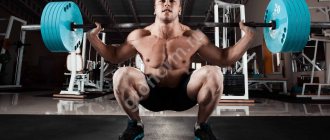
4. Goblet Squats
Spread your legs wider than with classic squats and point your toes out to the sides. Take one dumbbell and hold it near your chest. Squat until your thighs are parallel to the floor, moving your pelvis back and tilting your body slightly forward. Perform goblet squats with dumbbells in 4-5 sets of 10-12 reps.
Errors and precautions
The “pistol” exercise is characterized by a complex technique, failure to comply with which can lead to injury. In addition, it is not suitable for everyone.
- For example, with pathology of the knees and spine, such squats are contraindicated.
- Also, athletes with a low level of physical fitness should not undertake this exercise. Failure to comply with the technique can result in injury, and it will be of very little use.
To start pistol squats, you need to master classic squats well. Then move on to lead-up exercises and, at the same time, train flexibility by doing stretching.
It is recommended to take into account the following points:
- Breath. Proper breathing will allow you to avoid mistakes and perform the exercise as technically as possible.
- It is forbidden to make sudden movements. Jerks, falls and other sudden actions should not be performed.
- The knee is strictly behind the toe line. If this position is violated, the critical load on the joint increases, which can lead to injury.
- The center of gravity should be on the heel, not the toe.
- The back is straight, without bending forward.
What gives you confidence.
You don't try to slow your downward movement as much as possible for fear of being crushed by the heavy barbell.
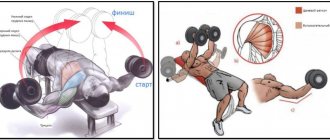
Pause to sit on the box (bench), while trying as much as possible to maintain tension in your torso (core). This will allow the glutes and hamstrings to be fully engaged as you rise up from the bench, due to the fact that you will have to lean forward slightly when lifting off the bench.
And this is the ideal trajectory of body movement when lifting upward.
If the quadriceps are overstrained during the lowering phase, then the redistribution of the load on the buttocks and the back of the thigh does not occur completely.
Bench squats help correct this by forcing the muscles to fire more efficiently and improve results quickly.
How squats help in prolonging life
Canadian scientists studied people of different age groups. They tested push-ups, squats, flexibility and grip strength. And they came to the conclusion that the greater the endurance, the lower the mortality rate. Moreover, during squats, the most important indicator was not the strength of the legs, but the ability to do as many repetitions as possible.
What do these studies mean?
During squats, different muscle groups are involved. They degenerate with age. The more tissue that dies, the sooner death occurs. For example, in men under the age of 50, the number of muscle fibers in the lateralis muscle remains unchanged. But having passed this age limit, the muscles begin to degrade.
The number of fibers decreases by half over a couple of decades. Muscle tone, activity and normal functioning can be maintained through training. Preserving muscle mass and physical performance is an excellent prevention of aging of body tissues.
You need to train your legs less often
This is truly a fundamental approach to training each muscle group.
You need to train less if you want to lift heavy weights in all exercises.
Exercising too often is one of the biggest problems boys and girls face.
Especially people over 30 and 40 years old.
This does not mean that it is impossible to gain muscle mass and increase strength at an older age as well as in your 20s. However, recovery from exercise is typically slower.
And this is completely normal.
Learning to squat on one leg
Even if you already know how to squat well, you won’t be able to do it on one leg without preparation. To learn how to pistol squat, you need to train by performing lead-up exercises.
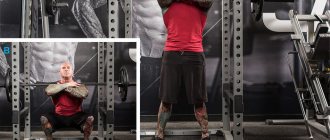
Narrow leg squats
Ideally, both legs should be side by side - this type of squat will allow the quadriceps to get used to the load. You can do this exercise well in a Smith machine, where you don't risk losing your balance.
Technique:
- It is necessary to place the barbell on the shoulder girdle and the top of the trapezius muscles, placing your legs as close to each other as possible.
- In the Smith machine, the feet can be moved quite far forward. This is just useful for preparing for single leg squats.
- While inhaling, with a straight back, we squat as low as possible without bringing our knees beyond the line of our toes.
- As you exhale, we return to the starting position.
If you have any lower back problems, you can try the following narrow leg squat variations to strengthen your lower body muscles:
Wall Squats
The partner in this case acts as a counterweight, keeping you from falling backwards.
Supported pistol squats
After or at the same time that you have mastered the technique of squatting with narrow legs, we begin to try the “pistol” with different belay options.
Do back squats
The simplest option is to squat on one leg on a bench, sofa, chair or other support, which should be gradually lowered.
Technique:
- We choose a support on which we will sit.
- To maintain balance, your arms can be extended forward or spread to the sides.
- One leg should be straightened and raised in the air.
- The second one needs to be bent and sit on a support.
This needs to be done slowly and in a controlled manner, but chances are that at first you will simply fall onto the bench. This is fine. Gradually the muscles will become stronger and you will be able to perform the exercise correctly.
"Pistol" with support
The support can be used in other ways.
You don’t have to sit on it, but hold onto, for example, a door handle, TRX hinges, a chair or a partner’s hand.
This option is best mastered after you begin to be able to squat on a support more or less under control, since this exercise is more difficult.
Technique:
- We firmly grasp the support with one hand or two.
- Inhaling, we begin to slowly lower ourselves down.
- As we exhale, we stand up.
Please note that the lower you sit, the more you will pull on the support, so you need to make sure that the support is secure, otherwise you will fall back along with the person or chair. At first, you may not squat very low, but gradually you should try to touch the calf muscle of the thigh
At first, you may not squat very low, but gradually you should try to touch the calf muscle to the thigh.
"Pistol" supported on the wall
Just like narrow leg squats, start doing wall squats, trying not to hold onto anything else.
At first, you can squat shallowly - until your thighs are parallel to the floor or slightly higher. Gradually you need to drop below parallel.
You can perform this exercise dynamically, or using statics and lingering at the lowest point.
Pistol squats - lightweight options
Once you have started to get comfortable with squats with support and support, you can start doing pistol squats, but using some tricks.
Squats on a bench
In this case, you are already squatting without support, but also in a somewhat lighter version.
Technique:
- We stand on a bench or other support so that the supporting leg stands securely and firmly on the surface, and the second leg can fall below the level of the support.
- For balance, we hold our hands in front of us, sit down, without extending our free leg, but lowering it down. This will help you maintain your balance.
- As we exhale, we stand up.
Counterweight squats
This is perhaps the rare case where extra weight can help, acting as a counterweight and preventing you from falling.
You can use a kettlebell, dumbbell, medicine ball, or other type of weight. You can hold it at arm's length or near you.
As in the previous versions, at first you can not squat all the way, gradually lowering yourself lower.
DETAILS
So, are you ready to box squat? Fine.
Phase I
First of all, take the correct starting position. Keep in mind that your entire body should be tense. If any part of the body is relaxed, it will become your weak link and cause failure.
Before getting into the starting position, grab the barbell and place your feet shoulder-width apart or slightly wider. And already under the bar, begin to strain. Start squeezing the bar as if you want to bend it over your back.
Then bring your shoulder blades together as much as possible while simultaneously moving your elbows forward. This will ensure that your upper back is held in this position during the lift. If the elbows move out to the sides, the bar may move forward at a certain point during the lift. The key to success with heavy squats is to maintain the shortest possible trajectory. Any deviation from this line will lead to failure.
Now that your upper back is tight, begin to tighten your midsection muscles. First, fill your stomach as much as possible with air. During inhalation, the air flow should be directed into the diaphragm, not into the chest. Puff up your belly and press it against your waist. This will stabilize and support the lower back. If you have trouble imagining this, tighten your belt one notch looser and inflate your belly until it feels tight.
Belly breathing goes against the grain of those who believe it causes lower back injuries. In 30 years of box squatting at Westside, there were 23 lifters who squatted over 800 pounds, 6 who squatted over 900 pounds, and 1 who squatted even more. None of them had lower back problems. Another aspect of this is waist circumference. My normal waist circumference is 42 inches. If I fill my belly with air, the circumference becomes 48 inches. A wider base equals a stronger lifter. This is why lifters with wider waists squat more.
The pyramids in Egypt have a wide base and they have stood for centuries. As car salesmen say, wider is better.
I learned this lesson in 1990 at a powerlifting meet in Toledo. I just tried a 760 squat and failed. This was my second attempt, and I decided to approach the same weight for the third. I had some doubts because the second attempt didn't even look like a squat. To say that I was crushed would be an understatement. The weight just smashed me across the floor! I couldn't even stand up. This weight was 20 pounds over my personal best and I spent 4 months training on this.
I didn't understand what the problem was or how to fix it. Before the third attempt, when I was already bandaged, Louis Simmons came up to me and told me to tense my stomach. At the time I had no idea what he was talking about, but I realized it after a few minutes. When I climbed under the bar, I saw that Louis would belay me from behind (no pressure, eh?). When I began to take the starting position, he told me to inflate my stomach and rest it on my belt. Now I understood what he was talking about. I was always told to tighten my stomach, but never told to puff up and push in.
And I noticed that I had never felt so tough and stable. As I squatted, I pressed my belly into my belt and literally took off with the weight! I picked up a weight that was pushing me into the floor a little earlier because I learned to use my stomach! In my opinion, this quality is one of the most underrated in powerlifting today. Many lifters don't know how to use their core muscles to start the squat. Some do nothing at all, while others suck in their stomach.
This may be fine for those aiming to squat 400 pounds, but if you want to squat in the 700-900 range, you must learn to use your core muscles.
All the power in the lower body is transferred to the barbell through the core muscles. If the core is not solid, all the power will be “lost” and will not reach the bar. While I don't agree with the frequent use of a belt in training, I do believe in using a belt to teach a person to use their abs in squats. The belt helps in competition, meaning you must learn to use it to your full advantage.
Phase II
So, after you have tensed your upper back and abs, you should remove the bar from the racks. When removing the barbell, never do so towards the racks. This will shift your center of gravity toward your toes, and you will lose stability (much like using your quads instead of your pelvis and hamstrings).
Get under the bar and push with your feet to remove it. Extend one leg, then the other. Place your legs as wide as possible while maintaining tension. I believe in a wide stance because it reduces the distance the bar has to travel and places the stress on the glutes, pelvis, hamstrings and lower back. I've learned over time that the quads aren't that important for max squats. Instead of them - the pelvis, lower back and thigh biceps. If the quads really did all the work, then why can't you squat as much as you can shrug with your legs? So, we take a broad stance.
Squeeze your shoulder blades together and breathe into your belly as much air as you can. Try to tighten your upper back and abs even more. Spread your knees out to the sides. You will know that you are doing everything right by the feeling of tension in your pelvis. This will engage the pelvic muscles and increase the lifting force at the bottom. Keeping your knees, shins, shoulders and hip joints in line will provide greater mechanical advantage. Thanks to it, you can squat a quarter of the amplitude much more than the full amplitude.
Press into the sides of your shoes. Never push yourself to the bottom. “Push” the floor with your feet. This will connect the pelvic muscles even more. By the way, the best shoes for squats are Converse Chuck Taylors. They have a flat sole and reinforced sides. Most other tennis shoes will slip and don't have strong sides.
The back should be as arched as possible. Head position is vital to ensure the correct trajectory. You must press your head against the bar. This does not mean looking up; you must look forward. You should look forward for several reasons. Firstly, at competitions you must see the referee's signal. Secondly, you should see the overall reaction after the lift is completed. I don’t know about you, but I want to see fear in the eyes of my opponents after a successful attempt.
In addition, if you look down, there is a high probability that you will begin to fall forward about halfway up and will miss the attempt.
Pressing your head against the bar should feel like you are lying on the floor and pressing your head against it. In terms of toe position, lighter guys should usually point their toes straight ahead. Heavier ones, often due to a lack of flexibility, can cause the toes to spread slightly to the sides. Now you are ready to start squatting.
Phase III
Start squatting from your hips, not your knees. If the knees bend first, the load shifts forward. Remember, you must move the bar in a straight line. Move your pelvis back. Remember: “Sit back.” Most people sit on the toilet with better form than squats because they have to sit backwards. When you sit back, you should feel tension in your hamstrings. This causes a stretching effect at the bottom point. Explosive launch is another determining factor in maximal squats.
Sit back until you are sitting on the box. The box should be 1" below parallel, although I sometimes recommend that less experienced lifters use a box 1" above parallel. (Note: I can't recommend a factory crate because I just haven't found any good ones. All of the crates at Westside are homemade. When choosing a crate, most people want one that's 12-14 inches tall. Also, choose a crate that's sized appropriately your butt. Some people use a bench press as a box. However, they rarely achieve the required height, and the bench may be too narrow for some).
Parallel is achieved when the hip line is level with the top of the knee. Remember, most people have weak hamstrings and pelvis to squat properly. If they try to sit down without the box, they will simply fall back. The box is the best tool for learning technique and strengthening weak areas. Box squats break the eccentric/concentric chain. This is one of the best ways to develop explosive power.
Box squats allow you to squat from a static contraction to a dynamic concentric contraction, which is also very effective at developing explosive power.
When you reach the box, you want to sit down and relax your hip flexors. But you also don't want to fall on the box and spring back from it. You sit back at the same speed as you squat. Pause on the box for a split second and stand up explosively. No pushback! The knees should be apart and the abdominal muscles, upper back and arms should be tense. And the back should remain arched. When you are on the box, it is important that your shins are perpendicular to the floor. This transfers the entire load to the muscles involved.
Phase IV
After pausing on the box, you should stand up explosively. When you begin to squat (during the eccentric phase), the pelvis moves first, then the head. In contrast to this (during the concentric phase), the head moves first, then the pelvis. If you do not start from the upper back, the bar will begin to move forward. If the bar moves forward before your pelvis begins to move, you will fall forward. As you stand up, maintain tension, press your upper back and head toward the bar, keep your knees and feet apart, bring your elbows forward, squeeze your shoulder blades together, and hold your breath. Having done all this, all you can do is listen to the cheers from the crowd.
That's all. And they say that squats are not a technical movement! You decide. Do you want to stand at the platform and watch others lift heavy weights or do you want to do it yourself? You decide.
< Back
Lead-up exercises
Only a few athletes can immediately perform a squat on one leg without support. The vast majority of people, even if they can sit down, will certainly not be able to stand up. And the point is not always the weakness of your muscles, but mostly the unfamiliarity of the load.
So, what exercises can you do to prepare your muscles for performing pistols:
- Stand with your feet shoulder-width apart. Raise your straight leg until it is parallel to the floor and try to stand in this position for at least 30 seconds. This is not the easiest task.
- Next, practice squatting on one leg without raising the other in front of you. To do this, you will need a sturdy stand or box. Place the box near a wall or other support. Holding the support with your hands, squat on one leg, freely lowering the other down.
- The next step is to perform pistols while holding the support with your hands. That is, we squat on one leg, bringing the other forward, but at the same time supporting ourselves with one or two hands. In particular, you can perform the exercise by opening the door and holding its handles on both sides with your hands. When squatting, the door is located between the legs. The main thing is that the door fastening is strong enough.
- Make it more difficult. Now you squat without holding it with your hands, but simply touching the support with your shoulder. Stretch your arms forward. The benefit of such touching the support is rather psychological. In fact, this is already a full squat on one leg.
In addition to the above exercises, classic squats with a barbell, dumbbells or other weight will help you gain overall leg strength. You can perform single-leg squats on a Smith machine. In this case, there is no need to maintain balance, which simplifies the task.
With strict adherence to these recommendations and regular training, you will receive well-developed leg muscles and toned buttocks as a reward for your efforts. The main thing is to remember about the impact on your knees, and if the slightest discomfort occurs, reduce the load.
are a very effective formative exercise that allows you to correct imbalances in the development of leg muscles, as well as improve your strength in many basic exercises. The bottom line is that each person has one leg that pushes, so it always takes on most of the load, as a result of which the hypertrophy of muscle tissue in this leg occurs faster. Accordingly, the “lagging” leg must be additionally loaded separately. This does not mean that single-leg squats should be done only on the lagging leg, although if one leg is not working properly and you want to add additional load only to it, then this exercise will help you do it.
Squats on one leg will not be superfluous for the “pushing” leg, since, most likely, some heads of the quadriceps are better developed on the left leg, and some on the right. As a result, there is a need to separately work out both legs, which will help level out any imbalances. Also, such exercises will allow you to increase your strength indicators, since for this purpose it is most effective to work out what is lagging behind. It is best to place such squats at the end of the workout, so that those muscle segments that usually take on the entire load are already tired, as a result of which less strong, but fresher muscle areas can be more confidently involved in the work.
Lunges in place: how to do them
From a technical point of view, standing lunges are probably the simplest lunge variation. This exercise is suitable for all levels of training, and can be safely included in the program even for beginners. At the same time, lunges in place can be easily complicated if you perform them with weights in the form of dumbbells and a barbell.
Standing lunges (scissor squats) are one of the most effective exercises for the quadriceps and glutes, which will benefit both men and women.
Technique for performing lunges in place
- Stand straight, feet shoulder-width apart, palms placed on your waist or folded together near your chest.
- Take a long step forward with one leg. The front foot should be completely on the floor, and the back foot should be on the toe.
- As you inhale, you need to smoothly lower yourself into a squat. The thigh of the front leg is parallel to the floor, a right angle is formed between the thigh and lower leg. The knee does not go forward of the toe.
- The heel and knee of the back leg are in line, while the knee is not in contact with the floor surface.
- Do not lean your body forward, your back is straight, your shoulders are down. Do not look at your feet, look forward.
- Do not rotate your pelvis; it remains stable. The pelvic bones look forward.
- As you exhale, perform a sharp lift of the pelvis. The body support is fixed on the heel of the front foot.
- As you lift, tighten your buttocks and abdominal muscles. This will make it easier for you to maintain your balance.
- Repeat the exercise on the other leg. After resting for about one minute, you can perform another 2-3 approaches on each leg.
Girls often include lunges in place in their workouts, since it is optimal for the formation of slender legs and toned buttocks. But this exercise will also be very useful for men to increase muscle mass, because scissor squats are great for pumping up the quadriceps.
Lunges in place with dumbbells
Standing lunges with dumbbells are performed similarly to lunges without weights. Take dumbbells, arms straight along the body, dumbbells should be held on the sides of the hips. As you inhale, lower into a lunge until your front thigh is parallel to the floor. The knee of the front leg does not go forward of the toe, the knee of the back leg drops low, but does not touch the floor. Keep your back straight and do not lean your body forward.
What weight of dumbbells should beginners take for lunges:
- Men can start with a pair of 5-6 kg dumbbells. Gradually increase the weight of the dumbbells as your fitness increases. Don't go straight for the heavy dumbbells, as performing lunges in place requires good balance and confident execution. For strength training, it is recommended to perform lunges in place for 10-12 repetitions in two to three sets on each leg.
- Women can start with a pair of 2-3 kg dumbbells. If you want to work on burning fat, then increase not only the weight of the dumbbells, but also the number of repetitions and sets. To lose weight and lightly tone muscles, you can safely perform 15-17 repetitions in one approach. If you want to enlarge your buttocks and improve the definition of your legs, then increase the weight of the dumbbells and do no more than 12 repetitions.
If you compare lunges with dumbbells and lunges with a barbell , it is important to note the following:
- Lunges with dumbbells are great for home workouts, since this equipment is the most popular and convenient for working out at home.
- When performing scissor squats, you need to maintain balance, and this is easier to do with dumbbells than with a barbell. If you fall to the side when performing lunges with a barbell, then do lunges with dumbbells to improve coordination.
- Lunges with a barbell put a lot of stress on the spine (albeit less than squats with a barbell), so they are not recommended for people with bad backs or untrained beginners.
- If you want to work on muscle mass in your legs or enlarge your butt, barbell training will be more effective because you can lift more weight.
- If you have little training experience, then start doing lunges with a barbell on a Smith machine.
Lunges in place with dumbbells are suitable for men who are working on mass or relief, and girls who want to get slender legs and toned buttocks.
Lunges with a barbell
If you can easily perform lunges with dumbbells without losing your balance or feeling pain in your knees, then you can move on to performing scissor squats with a barbell. Don't immediately lift too much weight on the barbell. You can start with an empty bar and gradually increase the load.
- Place the barbell on your shoulders, just below your neck. Align the bar with your trapezius muscles.
- If you work out in the gym, then it is easier to take equipment from racks that are suitable for your height.
- Place your feet in a comfortable position, shoulder-width apart. Take a wide step forward with one leg.
- As you inhale, bend your knees to a right angle. The knee of the back leg does not touch the floor.
- With effort, as you exhale, you need to return to a vertical position.
- Once completed, you can place your feet together and remove the barbell from your shoulders.
If you work out in the gym, you can do scissor squats in a Smith machine, which eliminates the need to control the vertical position of the body. This method is preferable at the stage of mastering the correct mechanics of movement.
We emphasize once again that scissor squats with a barbell create an axial load on the spine, so it is not recommended for people who have back problems.
What to pay attention to when performing lunges?
1. The thigh and shin of the front leg should form a right angle. The knee of the front leg does not go forward of the toe.
2. Try to go as low as possible, but do not touch the floor with your back knee. Even a slight touch of the floor during an awkward movement can strike the knee and injure it.
3. The body remains straight, do not lean forward when lunging. There is a slight arch in the lower back. The gaze is directed forward, do not look at your feet.
4. The further the back leg is abducted, the stronger the gluteal muscles work. The closer the feet are to each other, the greater the load on the quadriceps.
5. Do not place your feet on the same line; in this position it will be difficult for you to maintain balance. There should be a small distance between the feet.
6. Lunges are considered a coordination-challenging exercise, so you need a little practice to maintain balance. At first, you can hold on to a wall or a chair.
How to squat correctly
You can't squat 100 in one set. The total number of squats must be divided into 3-4 approaches. By performing 25-35 squats at a time, you get the optimal load.
Just starting training with squats, you should limit yourself to three sets of 15 squats with an amplitude of 30°. Over time, you should increase the depth of the squat and the number of repetitions. A person who can do 100 deep squats in 3 sets is considered sufficiently resilient.
—
—
Like and subscribe ️ to the channel if you liked the article. You will find even more interesting materials on our website vashsport.com .
The article was first published on March 30, 2019 on . When copying text, a link to the original source is required!
Exercises #6: abduction + rotation
- Squats with a tourniquet on the legs,
- With legs spread with a tourniquet in a jump,
- Bridge with a tourniquet on the legs,
- Steps to the side with a tourniquet with bent legs (in a squat),
- Walking with a tourniquet on your legs,
- Pelvic lift while lying on your side,
“Pistol” swings[edit | edit code]
This exercise develops the coordination necessary to maintain balance at the bottom of the pistol. If you can't complete even one repetition, this exercise is for you.
Lower yourself into a deep squat with your knees wide apart and extend one leg forward, immediately leaning on the same hand. In this case, you need to stretch the opposite hand forward and try to reach it with your toe. At this moment, your position corresponds to the one you take at the bottom point of the “pistol.” with only one difference - part of the weight is transferred to the supporting hand. Now return to the starting position and repeat the exercise with the other leg.
Over time, you can begin to work on raising your supporting arm while your leg is extended forward: this will help you maintain your balance at the bottom of the pistol. Extend both arms in front of you. simultaneously straining your abdominal muscles and extending your leg forward. You may have to bend your back quite a bit at first to avoid falling backwards. Don't forget about that. that it is necessary to bend the ankle of the supporting leg with all your might, but do not let its heel rise up.
Rule of thirds
In 1/3 of the exercises (for the gluteal muscles), the load vectors should be horizontal, in 1/3 – vertical, and in the remaining 1/3 – lateral/rotational movements. The working weights in 1/3 of the exercises should be quite high, and the number of repetitions should be low; 1/3 – moderate weights for the average range of repetitions; 1/3 – high repetitions with light weights. Intensity: 1/3 of the working sets should be taken (almost) to failure, 1/3 should be difficult, but there are a couple of repetitions to failure in stock, the remaining 1/3 should not be failure.
Bret suggests dividing everything into 3 parts: by the amount of load, by the effort in each approach, by the nature of the movement - and devoting a third of time and attention to each type.
Please note that the thirds in terms of weight and force do not have to coincide at all, on the contrary: with a large weight (and in “big” exercises) it is more useful not to work to failure, and you can and should kill yourself with high-repetition isolation - approx. translator
Here's what you get by applying these principles:
1. Full development of the Gluteus Maximus (the largest muscle in the body), including the upper and lower sections.
2. Development of fast- and slow-twitch muscle fibers.
3. Development of all motor patterns, which is positively transferred to any kind of sport.
4. Increase not only maximum strength, but also muscle endurance for prolonged work.
Now let's break this down a little more.
Advantages and disadvantages
| pros | Minuses |
|
|
Motion vectors
By this we mean the directions of the movements performed (relative to our body). The angles of development of the pelvic girdle and the number of recruited motor units in different parts of the gluteal complex depend on these vectors.
“Vertical” exercises are the hardest for the entire body and place more stress on the top of the glutes than the bottom. “Horizontal” ones are easier, they activate both the top and the bottom. Lateral (lateral) movements target the top, and rotational movements target both the top and the bottom.
And, if this is not enough for you, we will add exercises that combine movements in several directions.
If your goal is the full development of the largest muscles of the body (we are still talking about the gluteal muscles), then you need to include all types of exercises in the program.
Below, Brett provides a catalog of exercises for the fifth point, divided into 7 blocks (according to the nature of the movements). You can choose only those 1-2-3 exercises that you feel passionate about (from different types of movement) and periodically replace them, remembering the rule of thirds.
Basic mistakes and useful tips
To avoid injury, it is necessary to eliminate common mistakes made when performing pistol training:
- sudden movements during squatting and lifting;
- breathing failure;
- the knee goes beyond the toe;
- failure to warm up and stretch.
To avoid the mistakes listed above, you should follow these tips:
- It is best to do this in shoes with laces and hard soles so that the surface is as stable as possible.
- The heel cannot be lifted off the floor, otherwise the knee joint will be overloaded, which will lead to a disastrous outcome.
- Watch your back, it should be straight.
- You need to sit down slowly to avoid injury.
- You can maintain balance by stretching your arms and body slightly forward.
Find out the benefits of squats for men and women, as well as how to properly do squats for the buttocks and sumo squats.
Correct implementation and strict adherence to all of these recommendations will bring you a reward in the form of superbly developed leg muscles and toned buttocks. Let your legs be slender, strong and spectacular. Don't be afraid to experiment and develop your physical strength.
You just don't need to train too often.
After a hard leg workout, it is advisable to give the quadriceps, hamstrings, and other leg muscles a full opportunity to recover. And this will be the main driving factor when it comes to being able to squat heavier weights.
Fully rested legs become stronger. Often, the only thing stopping guys and girls from really increasing their barbell squats (bench press, military press, deadlift, etc.) is that they simply try to train too often.
Get more rest.
Become stronger.
This is a great way to achieve better results.
increase your results with deadlifts Think for a minute about barbell squats.
Safety
Be very careful with your knees
. In pistol squats, it is easier than in classic squats to fall forward and thus overload your knees. Remember, the load is the same as a bodyweight barbell squat. It’s good if you weigh 60 kg, but what if your weight exceeds ninety? This is very dangerous for articular cartilage and ligaments.
It is also better that when performing the exercise you have support in close proximity or a partner to back you up. If you are just learning it, the chance of falling is especially high, but then you may suddenly have an attack of hypoglycemia or simply weakness due to too intense training.
You need to squat less often
Maximize Your Barbell Performance When it comes to gaining muscle mass and increasing strength, the saying best applies: “less is more.”
There is a common belief that in order to become stronger at a particular exercise, you need to do it as often as possible.
This seems quite logical.
And honestly, for some, this may be the right decision.
But for most of us this principle does not work.
The truth is, if you want to squat really heavy weights, training often is usually the wrong way to go. In this case, more does not mean better.
Many experienced athletes often do heavy squats with a barbell (only!) once every 2 weeks.
Yes, this is not a mistake, you read it correctly.
But the intensity of their training is so great that the body really needs that much time to recover. The principle here is the same as in deadlift training. Trying to do heavy deadlifts every week can be detrimental to your results. At the same time, some guys do it twice a week and wonder why the hell they can't get stronger?
Although the back squat is not as heavy an exercise as the deadlift, most people still do it too often.
This doesn't mean you have to squat (just!) once every two weeks, but you should try.
This will allow for at least one assisted leg workout (more on this below) between squat days.
This approach often pays dividends.
Shrimp squats[edit | edit code]
If you think the pistol is the pinnacle of what bodyweight exercises have to offer in terms of leg training, you might want to think again. This exercise will seem difficult even to the most confident pistol pilots.
Stand up straight and bend one note so that you can grab it with your ankle (as if you were stretching your quadriceps). Squat down so that the knee of your bent leg touches the heel of your supporting leg. Try to perform the exercise as smoothly as possible, but at first you... You'll likely fall to your knee as you approach the bottom (so it makes sense to practice on a soft surface). If this is too difficult for you, you can try starting from the bottom and only lifting. Once you reach several repetitions, begin to work on a smooth lowering.
Make sure that the foot of the supporting leg does not leave the ground, as in the case of the pistol, and also do not forget to extend your free arm in front of you to maintain balance. Push your chest out to avoid falling during the ascent.
Having mastered the standard version of the exercise, you can move on to the advanced one: to perform it you need to hold on to your ankle with both hands. This is much more difficult, and you will lose the ability to balance with your outstretched arm. To perform this exercise you need very strong legs, but they are not enough: the abdominal muscles are no less important.
Deep squats
People can't perform deep squats for a variety of reasons. Remember that a mobility problem at one joint may be located above or below that joint along the kinetic chain of motion. So, if you are experiencing knee pain, you should pay attention to your ankle and hip mobility. And if you suffer from lower back pain, then you must pay attention to the pelvic area and upper back.
The three main reasons why people experience great effort when trying to perform full deep squats are:
Reason #1: Tight ankles from wearing hard shoes all day at work, or during team games on the weekend. Stiff ankles force the shins to remain vertical and tip the athlete forward or backward, potentially causing hip mobility issues . Ankle mobility training will help restore proper squat mechanics . The most common movement is to face a wall approximately one foot (30 cm) away. Keeping your feet horizontal to the ground, lift and drive your knee (track along your toes) toward the wall.
Reason #2: An ineffective pelvis can also limit your ability to fully perform deep squats. Tight and limited hip flexors, tight hamstrings, poor pelvic alignment, and weak glutes are just a few of the problems you get from sitting at a computer all day and then crashing on your bed. To target tight hip muscles, we include foot raises with hip flexor stretches in our lower body workout. In this case, wide forward lunges, called striders , can be useful for improving hip mobility and dynamically stretching your hamstrings.
Striders are performed in the starting position of a prone position, then extend your right leg a little further than your right arm. Hold an arc on your right leg and lower your torso as low as possible for a dynamic hip stretch. Repeat the procedure with your left leg. In addition, we activate our glutes to make them nut-like firm again by incorporating supine pelvic raises and lunges into the program. Combining these simple movements will also help you work your pelvic area and strengthen your posture.
Reason #3: Perfect execution creates a perfect figure, that's the key. Sometimes the problem is not physiological dysfunction, but neurology and understanding. Many athletes have simply never been shown proper squat technique . Instructions and simple exercises used by the trainer ensure proper full squat depth and technique. Sometimes this helps fix the problem instantly.
Errors
The most common mistake is not maintaining the correct stance. Beginners are often afraid to move their leg far back, being sure that this will lead to a fall. As a result, some can only lift their leg slightly off the ground. Breathing errors are also common. Although in this case correct breathing is not as fundamentally important as in many other movements, it should not go astray
While tilting the body, you need to inhale and exhale when moving back.
It is important to do the exercise at a moderate pace so that the body can better maintain balance. Also, people often place the projectiles at the wrong height, which leads to a decrease in the efficiency of movement. We remind you that the dumbbells/barbell should lie at a height of 20 centimeters from the ground surface
This height is optimal. You should not use dumbbells that are too heavy, since at first it is very important to perform deadlifts correctly. To prevent the body from “leaning” forward too much, it is recommended for beginners to use light dumbbells. They will provide an opportunity to correctly work out the technique of this type of Romanian deadlift.
Pistol exercise technique
Before starting the lesson, do the following, then move on to basic practice. At first
The option of squats on one leg with support is suitable. For those who have difficulty with technique, the limb placed forward is placed on a bench. The higher it is, the easier it is to master the biomechanics of movements.
- Feet are placed at shoulder level, arms extended in front of you.
- One limb is lifted off the floor and pushed forward in a straight line.
- At the same time, the second one is slowly bent at the knee, the pelvis is pulled back, the body is moved forward to maintain balance and squats.
- At the lowest point, they hold their breath for a couple of moments, and through the tension of the calf muscles and biceps, the thighs move into the positive phase.
- After overcoming the middle section of the climb, exhale.
- Straighten the body, stand on both legs and start all over again.
"Pistol" is performed at the initial stage whenever possible. Main
, maintain the same number of repetitions for both sides.
If you increase the number of times to 10
, the practice will replace a full-body workout.
Average standards
for squats on one leg for the buttocks:
- beginners
–
4 times for the left and right sides; - “intermediate”
–
8 x 2 approaches; - advanced
–
30 x 2.
How to avoid errors
Although the single-leg squat technique is designed for people with strong muscles, sometimes minor mistakes reduce the effect. Shift of weight from heel to toe and lifting of the heel tubercle from the floor are unacceptable
If it is not possible to fix the supporting foot in a static position, place a thin block under the heel. When lowering the pelvis, it is important not to transfer your body weight forward. This will lead to overstrain of the calf muscles and the formation of an acute angle in the knee, which can lead to injury. If the pistol exercise is performed by an athlete with a large body weight, it is better to bandage the knees
For joint mobility, it is mandatory to include leg stretching practices. Squats with support will help prepare them for the exercise. They stand opposite the open door, clasp the handles on both sides, and then follow the classic pattern.
Squats with weights and can help strengthen your lower body.
Smith single leg squats with barbell
If squats without support for the buttocks are difficult, a frame helps maintain balance. Not having to control your balance helps you focus on your quads. When working in Smith, there is no need to take a lot of weight. The depth of lowering the pelvis in a squat is the same as in classic squats.
- Adjust the height and weight of the load.
- The shoulders are brought under the bar so that the bar is above.
- Grasp the base with your palms facing forward.
- With emphasis on the dominant leg, they begin to squat smoothly, bringing the other limb forward.
- The pelvis is lowered with a sigh until the thighs are parallel to the floor. If the movements are correct, the toes and knees align themselves on the same straight line.
- On exhalation, they return to IP.
After mastering the technique at home
- men
pick up
15-20 kg
; - girls no more than 10 kg
.
With sufficient preparation, leg weights are used. By following the recommendations and sports regimen, you can get toned buttocks and beautiful leg contours.
Single-leg squats or pistol squats are a complex and rather controversial exercise. Many people are familiar with it from school physical education lessons, but in adulthood only a few athletes can perform it at least a couple of times. Let's figure out in order what is the peculiarity of such squats, what are the benefits of doing them and possible contraindications, as well as how to learn how to do a pistol correctly.
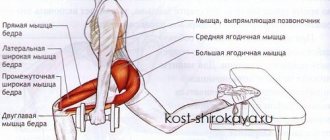
What muscles work
With this exercise, the main workload goes to the quadriceps, the medial bundle is especially worked out, because it is very difficult to develop, which many athletes are not able to do. The gluteus maximus muscles are significantly loaded. The auxiliary load goes directly to the hamstrings and gluteal muscles; the triceps surae muscle is actively involved in the work.
The exercise is difficult, because you actually need to support your weight with just one leg. The abs and back are not involved and do not receive stress, since the athlete does not make his workout heavier.
It is also necessary to have, in addition to endurance, good physical strength and excellent coordination. The exercise will be easier to perform if you have good joint flexibility and ligament elasticity.
Important! The second limb, which does not take part in the movement, is also loaded. It stabilizes the weight of the entire body
The quadriceps, sartorius and pectineus muscles take part in its work.
It is in this area that problems often arise among the older generation, because at a young age the body weight is definitely less than at a mature age, so in order to avoid sprains and joint diseases, it is necessary to consult a specialist.
Exercise for strong and healthy
Practice purposefully pumps the sartorius, pectineus, and calf muscles. The function of stabilizers is performed by the biceps of the thighs, back, abdominal, and hip adductors.
Known as pistol squats, squats are challenging to coordinate. For flawless execution, flexibility of the joints, plasticity of the ligaments of the knees and ankles are important.
The knees suffer the most from the load. During deep pistol squats, when the buttocks almost touch the shins, an acute angle is formed. Considering that the center of gravity and body weight shift to one side, it is not difficult to assume that with injured knees and talocalcaneal bones, the exercise is contraindicated.
Balance of power[edit | edit code]
Of course, maintaining balance while doing a pistol is not that easy, but the two main reasons for not being able to do this exercise are insufficient strength and/or stretching. Often one or the other may be lacking (although guys often blame insufficient stretching when in fact they lack strength). You can check whether you are able to perform a repetition with a full range of motion by grabbing something with your hands (a pole, a door frame, gymnastic rings, etc.) and trying to squat down. If you succeed, then you have sufficient stretch.
The “pistol” is effective due to the even distribution of effort across different muscle groups: the more you strain one, the more you have to strain the other to compensate. If you overexert your leg or abdominal muscles, you won’t be able to use the pistol. Those who think their only problem is not stretching enough are missing the whole picture. Often the reason for the inability to perform the pistol and bridge is the same: excessive tension. To keep the other leg extended forward, the quadriceps and hip flexors must be strong enough to compensate for the tightness of the Achilles tendon and psoas muscles. It is not necessary to keep your leg parallel to the ground the entire time, but the heel of the other leg should not touch the ground during the exercise. To do this, you also need to have strong abdominal and pelvic muscles.
Theoretically, a person who is able to perform a full range of barbell squats with a weight equal to his own body weight should be able to do a pistol squat. In reality, everything is different: the pistol requires strong abdominal muscles and good coordination, as well as the habit of performing this particular type of squats. Therefore, being able to squat with your own weight on your shoulders does not guarantee that you will be able to perform a pistol. I, like anyone else, had to spend a lot of time to understand exactly how to do this exercise. If, when you look at me, it seems to you that the “pistol” is simple, it is only because I have been practicing it for more than ten years.
The key to successful bodyweight training is using the muscles of your entire body to perform any exercise, and especially the pistol. Here you will need to tense literally every muscle.
As a rule, when beginners try to do a pistol, they are unable to properly extend their other leg in front of them. This is normal: try to squeeze as much as possible out of the quadriceps of your extended leg, helping yourself with your body muscles. In order to tighten them more, you can stretch your arms in front of you and squeeze your palms nested into each other (it is not necessary to fold them in the shape of a pistol). However, some may find it more convenient to squat with their arms spread out. One way or another, when rising from the bottom point, tighten your abs like this. as if you were preparing to take a blow to the stomach.
BENEFITS OF BOX SQUATS
- Using a box will allow you to lower yourself to a point where your shins remain perpendicular to the floor. This puts a strain on all the muscles involved (hips, buttocks, lower back and hamstrings). As you increase the load on these muscles and decrease the load on your quads, you will see your weights increase.
- Recovery is another important benefit of box squats. You can train more often and recover faster than with a regular squat. According to Louis Simmons, members of the original Westside in Culver City, California, used to box squat 3 times a week. Currently at Westside we train box squats every Friday in dynamic training and sometimes in MU training on Monday. If you are new to box squats, I suggest doing them once a week.
- When performing box squats, you won't have to guess how deep you've squatted. The depth will always be the same. Think about it: when most people add weight to a barbell, their squat gets higher and higher each time. This can be seen in any gym. They are good at squatting with light weights, but as they add more weight they begin to squat to a quarter range. When doing box squats, you will always sit quite low.
- Box squats improve your squat technique. Many athletes with weak hamstrings fall back when lowering. It takes several months to teach these athletes how to squat correctly. A squat cannot be performed correctly without strong thighs and buttocks. Why wait 2 or 3 months? Place the box and you will teach them to sit down correctly in 5 minutes. Over the course of a month, your hamstrings will get used to the increased load from box squats.
Exercise is completely contraindicated
A special prohibition applies to knee injuries. These joints are subject to maximum load and in case of any damage, there is no need to aggravate the problem. Replace this exercise with others. There is a sad example of passing the pistol standard with an old knee injury, which was forgotten due to the statute of limitations. If you have previously fallen to your knees, which was accompanied by joint pain and bruising, you need to be very careful when performing this exercise. There have been cases when, after an old injury, people tore off their knee menisci while performing a pistol exercise. This is due to the fact that there is a need for a deep squat - the knee turns out to be an acute angle between the calf and thigh muscles.
After this, it was necessary to operate on the knee to remove fragments of cartilage. After recovery, women are prohibited from wearing heels higher than 5-7 cm. This risks the fact that the knee at the site of injury may jam and will have to be operated on again. Athletes with a meniscus injury are advised to be very careful when performing any squats and are not advised to run on the gym treadmill.
Uses, features and advantages
Like any exercise, single leg squats have pros and cons. The negative aspects of training and contraindications to it will be described further in the text. Now we want to describe the advantages and benefits that an athlete who performs this element receives.
Squats on one leg provide the following advantages:
- coordination of movements, stability, flexibility, endurance, concentration increases, neuromuscular connections improve;
- muscles and ligaments that are not used in other exercises are worked out;
- the load on the back muscles is reduced, since the main “impact” falls on the legs;
- the main load falls on the quadriceps;
- The ligaments are strengthened, the strength and volume of the leg muscles, especially the thighs, increases.
An additional advantage of this exercise is its versatility. If you successfully squat without using supports, you can do it in the gym, at home, on the street, in the subway, even while standing at a bus stop.
Precautionary measures
When starting to exercise on one leg, you must consider the following recommendations that will protect you from injuries or falls when performing the exercise:
- be sure to do a warm-up with intensive exercises to warm up and stretch your leg muscles;
- move smoothly. There is no need to make sudden falls or rapid ascents - this way you will get injured;
- breathe evenly and calmly;
- You need to carefully perform the exercise if you are overweight, as in this case the load on the joints increases significantly;
- you need to rise from your back, as if you were “pulling” it up, then rise on your leg;
- use your heel as your center of gravity. If the support goes to your fingers, you will fall.
- keep your back straight and look ahead.
For people with a sedentary lifestyle or poor physical fitness, this exercise is contraindicated. To perform it, you need to learn how to do regular squats and balance on one leg for a long time. After this, you can try squatting on one leg with support, gradually making the task more difficult.
Partial squats (partial squats)
This type of squats has several significant positive aspects.
When performing partial squats, the load on the back and knee joints is reduced (since the angle between the hips and calves is greater).
I also saw how powerlifters used this type of squats to break through their so-called. "psycho-emotional ceiling" That moment when you are afraid to take on new weight, because... you think you can't stand it.
These squats, in such cases, come in handy.
It is best to perform them either in a Smith machine (in a power rack).
Or in regular squat racks, but with high-mounted stops that will serve as support. If something goes wrong.
Partial squat technique
It’s no different from regular squats, the only difference being that you squat not to parallel, but a little higher.
Partial squats can be performed either classic style (a little more dangerous) or sumo style (less dangerous).
How to learn to pistol squat
In order to begin the full exercise, you need to master the skill of classic squats on two limbs, and perform 25-30 repetitions in one approach. After this, you should use the so-called lead-in exercises:
- Partial squat - the execution technique corresponds to full squats, with the exception of the following point: the working leg should be bent until its thigh is parallel to the floor. If you can’t sit down on your own, use a support - a wall, a wall bars, or a jumping pedestal.
- Uneven-high squats - the peculiarity is that the straightened shin is on an object that plays a supporting role. It could be a basketball, a parapet, a gymnastic brick. The shin, located, for example, on a basketball, will not be unduly strained, which will help you focus on the technique.
Also among the leading exercises are squats on a stand, squats with the body tilted forward. But, according to sports experts, the most effective and correct is the supported squat.
httpv://www.youtube.com/watch?v=embed/KrC1fBlQKjU
Execution technique
Initial position
- Stand on the platform of the machine in a stance that is comfortable for a regular squat. It should be possible to move your knees in alignment with your toes to the sides and lower your pelvis if you squat, pressing your back to the back;
- Next, the back is positioned against the back, the levers rest on the shoulders. It is necessary to activate the press, pulling it inward a little, but not completely removing the natural deflection of the spine;
- The head rests on the pillow with the back of the head, the shoulders are under the levers, and the restraints are removed by hand.
Movement
- It is necessary to begin to lower by bending the knee joint;
- The movement continues as long as it is possible to bend the knee and the feeling is comfortable;
- Some people squat parallel, others lower, it depends on the condition of the hip and knee joints. If there is no discomfort in them, the heels do not come off during movement, there is no reason not to squat to full amplitude;
- During movement, the hands hold the handles;
- From the bottom point, you should smoothly straighten your legs at the knee and hip joints, and then stand in the starting position;
- The number of repetitions is determined by the plan; if possible, the athlete should perform all repetitions using the same technique.
httpv://www.youtube.com/watch?v=embed/MBOkwJT56Gw
Attention
Amplitude and technique are highly dependent on the athlete's anthropometry. People with a long thigh and short lower leg are not recommended to squat on a back-to-back hack machine. They can do this facing the back, strongly moving the pelvis back to avoid injury to the knee joint. These people should ideally have their barbell squat technique established before they perform any bodybuilding variations. Requires the ability to control the body with muscles, and completely avoid overloading the spine; You can train your feet in different ways, but all this is for those who use relatively light weights in training and a reasonable approach. Any positioning of the feet will affect the knee ligaments and may contribute to their injury if this positioning is not natural for the person
It’s easy to determine what’s natural - you need to jump off a support or from a bench and look; It is also important how an athlete can squat with a barbell. If the amplitude in the joints does not allow you to sit with the mobile apparatus so that the pelvis is below the knees, perhaps this movement should not be performed at all. It is not recommended to lift your back from the back of the machine; You should not bend your lower back too much; It will be better if the heels also do not move and come off during the exercise.