If you have ever thought about how to make crawl swimming clearer, easier, more beautiful and faster, then we invite you to work with us to understand what the freestyle swimming technique consists of, what stages and phases it consists of. It is necessary to know the theoretical part in order to understand what you are doing correctly and what you should pay more attention to. Next, you will learn how to swim the front crawl correctly, what elements the front crawl consists of, what mistakes can be made and how to correct them.
Further:
How to swim correctly - a general description for beginners
Breast crawl is a method of movement in water in which the limbs work perpendicular to its plane, which allows one to minimize the resistance of its molecules and also develop good speed.
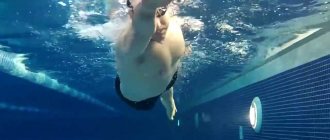
This is what crawl swimming looks like from the outside:
This technique in full coordination can be described as follows :
- The swimmer continuously works with his arms and legs: his arms make alternating strokes, and his legs make kicks . This makes crawl very different from breaststroke (read more about the differences between crawl and breaststroke here).
- slight turns during strokes
- To breathe, while extending the arm, the chest, followed by the head, turns and takes a sharp breath.
The face is turned down while swimming or to the side when breathing.
When using the crawl, the muscles of the back, shoulders and legs are maximized. So if you are interested in strengthening your back muscles, treating or preventing spinal problems, then this style will definitely suit you.
Let's consider the question of how to swim crawl, analyzing the technique step by step - arms, legs, breathing, body movement.
Crawl swimming technique - training video
For a visual example, we suggest you watch a video with a freestyle swimming lesson, thanks to which you will learn how to float on the water, and also master all the rules of front crawl swimming technique.
To summarize, it is worth noting that crawl swimming is not at all difficult, and the swimming technique is suitable for absolutely everyone. It will be an excellent assistant in the process of losing weight, helping to tone your body and keep yourself in great shape and in a good mood.
Have you tried the effectiveness of this type of swimming like crawl? What attracted you to this style? Did it help you lose weight? Share your plans, results and general impressions in the comments.
Hand work - main phases step by step
Main article: Freestyle stroke: detailed analysis of technique
During swimming, the arms almost continuously make strokes, which are the main “engine” - it is due to them that the athlete receives effective acceleration. Because of this, crawl is sometimes also called swing swimming.
While one hand makes a stroke, the second at this time moves above the surface of the water, and so on in turn.
The whole process can be divided into five phases , shown in this illustration:
- Water capture. The arm bends slightly, as if you want to grab onto the water.
- Push (shoulder adduction). The hand makes a stroke, passes under the body and is carried out to the pelvis; the closer to the end of the movement, the more the elbow rises.
Important: maximum work for the movement is done by the shoulders, then by the forearms and palms (mainly for smoothness of the process and correction of direction). - Hand coming out of the water. First we take out the elbow, then the hand. The hand itself is relaxed at this moment.
- Carrying. We move our hand in a relaxed state so that we can then place it in the water.
- Nesting. We slightly bend our arm at the elbow and put it into the water, trying to slide after it.
The hand itself follows a zigzag path , shown in this illustration:
An analysis of hand work can be seen in this video:
To learn these movements, you can swim using only one working hand, while the second one is in the starting position - in an extended forward position. In this case, it will not be possible to develop high speeds, but this method is useful for honing the swimming mechanism. This is discussed in more detail in our article about crawl swimming exercises.
We look at hand techniques in more detail in a separate article..
Breathing secrets that will help you swim the crawl correctly
Inhalation occurs through the mouth, while your head is oriented towards the hand located under the surface of the water. Inhalation is carried out simultaneously with the beginning of the swing movement, when a triangle is formed between the surface of the water, the shoulder part and the forearm. This moment is very convenient for inhaling, since at this time a gap of air appears in the water (in the head area). Exhalation is carried out through the mouth and nose, only then a new inhalation begins.
The recommended frequency of a new breath is the third stroke, as soon as the hand is above the surface of the water, in the direction of the stroke. Note that the inhalation side will change each time.
Correct footwork
Main articles:
- Footwork technique when swimming crawl
- What is the difference between two-, four- and six-beat crawl?
general description
The legs do not set the same pace for the process as the arms, and one of the functions of moving them is balancing the body .
The movement of the legs when swimming crawl occurs alternately and continuously: when one goes up, the other goes down.
The ideal starting position for crawling: a straight line with the lower part of the body slightly lowered into the water (keeping the whole body afloat requires a lot of energy, 20 centimeters is the average depth for comfortable swimming).
In order to work your legs correctly when swimming crawl, it is important to understand that the movements are carried out with almost straight legs : at the beginning of the cycle, the knee of the working leg bends slightly, and then sharply straightens, as if kicking, after which it returns to its original position.
This video shows the footwork slowly:
Basic moments:
- The movement comes from the hip , and not by bending the knees (we make whip-like movements from the hip).
- The legs do not bend much, the bend angle is in the range of 140-160 degrees .
- The feet are extended away from you.
- The feet move close to each other - to the point that the big toes can touch.
We talk in more detail about how to use your legs correctly and what mistakes should be avoided in this article.
You can also watch a good analysis of footwork techniques in this video:
Number of hits: two, four or six
For 2 arm strokes, swimmers usually make 2, 4, or 6 kicks - this is called a two-, four- and six-beat crawl, respectively. As a rule, the six-stroke version is most often used - this way you can swim faster with the crawl, it is suitable for increasing speed, while the two-stroke version is used for long distances to save strength.
You can read more about the number of kicks in this article.
Common mistakes
During crawl swimming, athletes make the following mistakes:
- The head is raised too much above the water: as a result of this mistake, fatigue of the neck muscles occurs too quickly. Only the top of the head should be visible above the water, and the face should be completely below it.
- Turning your head too much when inhaling: this error leads to loss of balance and, as a result, a significant decrease in speed.
- Insufficient rotation of the head and body when inhaling: in this case, the swimmer experiences difficulty in inhaling.
- Simultaneous inhalation and a stroke with the leading hand also entail a decrease in speed and loss of balance.
- Untimely exhalation. This mistake occurs among both beginners and professional athletes. As a result, the speed of movement decreases.
In conclusion, I would like to note that crawl is one of those sports that require good physical preparation from the athlete. If a novice swimmer is not yet comfortable with this style of swimming, then it is recommended to train in a less energy-consuming one, such as butterfly or breaststroke. If at the beginning of training the swimmer has sufficient skills and preparation, then you can safely begin mastering the crawl.
Similar articles:
- Independent swimming lessons
- Teaching children to swim: benefits and exercises
- Underwater swimming: technique overview
Breathing pattern
Main article: How to breathe correctly in the crawl
Breathing is the most important element of this style of swimming technique.
During swimming, a person's face is in the water about half the time; when the stroke begins, the swimmer looks down, the water line is approximately in the middle of his forehead.
The air must be inhaled sharply through the mouth , the head turns to the right or left when the corresponding hand is in the phase of carrying over the water. By the time you lower your hand into the water, you need to return your head to its original position.
Exhalation is done after lowering the head into the water - through the nose , or simultaneously through both the nose and mouth , depending on the intensity of swimming (during high-speed swimming, breathing occurs more often, and you may not have time to exhale completely through one nose).
Exhaling through the nose is also useful because in this way you can create a kind of air buffer and get rid of water in the nose.
You can inhale on each stroke, but athletes always breathe after several strokes - usually after 3 or 5 (in order to swim fast crawl, it is advisable to take fewer breaths).
It is also possible to inhale through an even number of strokes, that is, always through one side, but if you want to learn balancing, it is better to inhale from both sides in turn. The main thing in this process is to keep the rhythm and keep your breathing even.
You can read more about breathing here; we also recommend watching this video:
Breath
Proper breathing while swimming is the basis of both sports and recreational activities in the water. Experienced specialists teach this skill in the very first training sessions. Learning to breathe properly while swimming crawl can be divided into the following stages:
- Breathing training on the spot
- Breathing training while swimming with a plank
Breathing training on the spot
This stage begins with attempts to exhale into the water using the mouth, first immersing only the face, and with successful attempts, the entire head under water. Inhalation must always be done using the mouth (since if you inhale through the nose, you can also draw in water in addition to air).
If you successfully try to exhale through your mouth, you can switch to exhaling through your nose. Here, in addition to the uniformity of breathing, another goal is pursued - using air to displace water that could potentially penetrate the nose.
During the learning process, you need to reduce the inhalation time as much as possible and lengthen the exhalation time. When you achieve the rhythm “inhale for one count, exhale for three,” you can move on to the next stage - learning to breathe in motion, in particular when swimming with a board.
If you are a beginner swimmer
Body position
The ideal starting position for crawling: a straight line with the lower part of the body slightly lowered into the water (keeping the whole body afloat requires a lot of energy, 20 centimeters is the average depth for comfortable swimming).
During swimming, a person spends most of the time not on his stomach, but in a half-turn, since the style requires constant rotation of the body for maximum effective acceleration and streamlining.
The rotation is simple to perform - the body seems to follow the working hand, leaning on the second one rowing under water, and turns to one side during entry , after which, simultaneously with lowering the hand and exhaling, it takes a straight position.
Rabbit is easy
The only difficulty in mastering this method may lie in the high speed, as well as the need to remember every detail and the correct sequence in movement (a certain breathing rhythm, coordinated actions of the arms, legs and head). Of course, similar skills are needed in other swimming disciplines, such as butterfly, breaststroke, etc. A certain set of exercises will give you confidence in this matter, which will help you master all the subtleties of a particular style. The developed preparation algorithm helps to record all movements subconsciously and reproduce them automatically, the actions become more refined, and your speed in the water also increases. In order to master the crawl, you need to be patient and persistent, and most importantly, have perseverance.
Errors when swimming on the front
There are some common problems that can greatly slow down the learning process and cause discomfort:
- carrying a straight and tense arm over the water . This only tires the muscles, overloads the shoulder and wastes more strength. A correct freestyle stroke involves carrying a relaxed arm;
- too late inhalation , when turning the head may be difficult due to the position of the hand, or the swimmer has too little time to take in a comfortable amount of air;
- incorrect position of the legs - too high or low;
- incorrect position of the face - for example, raising it above the water level. This is fraught with neck tension and rapid fatigue;
- minimal body rotation . This makes breathing difficult; in addition, the shoulder exposed from the water further reduces the resistance of the water. Proper crawl technique, as stated above, requires your body to be in rotation.
- incorrect position of the foot - it is perpendicular to the shin, while the toe should be extended away from itself as much as possible.
Crawl swimming technique - advantages
The crawl is a fairly common technique among athletes, as it allows you to achieve maximum swimming speed. It is also no less popular among amateurs, as it has a number of advantages:
- increases endurance;
- helps cope with nervous tension;
- the respiratory system is trained, due to which the cells are better saturated with oxygen;
- You can exercise even if you have problems with your back and joints;
- Great for helping you lose weight;
- helps improve skin condition;
- suitable even for beginners.
The crawl swimming technique allows you to train many muscle groups , namely:
- arm biceps;
- abdominal muscles;
- back muscles;
- muscles of the legs and thighs.
When exercising in water, more effort is required to perform the exercises, but at the same time, water reduces the load on the spine and joints. When swimming, for variety, you can alternate the crawl, for example, with butterfly or breaststroke swimming styles.
You can learn more about one of these techniques by reading the article “Butterfly Swimming Techniques”, and you can study the breaststroke swimming technique in our article “Breaststroke Swimming Techniques”.
Cultivation - advanced level
Main article: How to swim crawl faster
After you have mastered all the basic elements, at some point you will stop developing - and then the question will arise about further improving the crawl technique .
Here you will need to contact a trainer or film yourself on video (which can also be shown to the trainer, at least via the Internet remotely) and then work on correcting the shortcomings. Read our article about what points you should especially pay attention to.
Theoretical and practical aspects of swimming
Learning to swim crawl style is quite simple. And at any age. The main thing is to cast aside all fears. A person gets a lot of benefits from swimming. Both from a physical point of view and from a spiritual one.
We can say that swimming is not just a pleasant activity and an opportunity to have a good time, but also:
- improves the functioning of the heart and vascular system;
- trains muscles and lungs;
- has a positive effect on metabolic processes;
- stimulates the functioning of the nervous system;
- has a strengthening effect on the immune system.
It is best to learn to swim under the supervision of a swimmer with decent experience
How to swim crawl? To start learning, you need to choose water with a shallow depth: a pool for beginners or a lake. The main thing to remember is that you must have a good sense of the surface under your feet and stand firmly in place, and your shoulders and head should be above the water level.
It is best to learn to swim under the supervision of a swimmer with decent experience. This will provide the necessary security and your peace of mind. Of course, you can learn on your own, but the most effective option is to seek help from a trainer.
How to avoid getting tired while swimming
As a rule, freestyle swimmers (as, in general, other styles) set themselves either the task of swimming as quickly as possible - this can be realized primarily over short distances, or the task of swimming as long as possible without getting tired.
In the first case, when speed is important, you need the “classic” crawl, which was described above and is discussed in more detail in the linked articles. In order not to get tired, you need to create good physical shape - aerobic endurance and muscle base.
If the task is to swim as far as possible without getting tired, then we recommend paying attention to the “Total Immersion” technique.
Its basic principles are discussed in these videos:
Balance in water:
Sliding and long body:
Body position:
Points:
You can also read more about this technique here.
Legs in crawl
As mentioned earlier, the leg technique consists of performing up and down movements alternately. The movements are smooth from the hips, the knees bend only to create a slight wave-like movement of the leg. The sock is always pulled away from you.
The amplitude of the swing should be approximately a quarter of the swimmer's height. When moving correctly, only your heels are visible from the water.
It is very difficult to swim with very submerged legs. If your feet are drowning, there can be two reasons:
- the body in the water is not elongated enough;
- low frequency of leg movements or too large amplitude.
Exercises to improve crawl leg technique. The necessary equipment is a swimming board, desirable - fins and weights.
- We lie down on the water, rest our hands on the side or rope, and when working with our feet there should be a small fountain. If successful, move on to the second or third exercise.
- Swimming with fins allows you to understand the correct amplitude of leg movement (“it’s difficult to swing your fins too much—you get tired quickly”). You need to swim about 800 meters per workout.
- Swimming with a board in your arms outstretched forward and making sure your legs don’t sink is a little fountain. The minimum distance is 400 meters, but 600 in 45 minutes is better. You can rest for 2-3 minutes every 50 meters. The face rises only to inhale - exhale into the water.
- For advanced exercisers, you can use 0.5 kg weights on each leg (purchased at a sports store) - it effectively develops leg strength. You need to swim 100 meters with them in the middle of the workout.
How to swim 800 meters and other long distance freestyles
Swimming long distances with crawl while maintaining high speed both in the pool and in open water has the following features :
- Breathe every second stroke. Over long distances, the body requires more energy. Accordingly, in order for the muscles to receive a sufficient amount of energy and oxygen, it is recommended to breathe every second time. However, if you are in good shape, breathing every third stroke is also normal practice.
- Movements should be made less intense compared to sprint distances - so that you have enough strength. More attention needs to be paid to gliding and technique.
- You need to try to distribute your strength so that the second half of the distance is no slower than the first - that is, you don’t need to burn all your strength at the very beginning . At the same time, in the end, on the contrary, you need to give your best.
How to swim?
Now let's look at how to swim correctly. The technique is divided into several aspects:
- Body position . During the movement, the swimmer's torso is horizontal, the shoulders are slightly above the level of the pelvic region. The angle is not fixed and varies depending on the individual characteristics of the person and the speed of movement in the range of 0-10 degrees. The higher the speed of movement, the lower the degree. It is worth highlighting one more pattern here. The more actively the athlete works with his hands, the more horizontal the body.
- Breath. Few beginners know how to breathe correctly. The technique here is elementary. In practice, the following options are distinguished:
- inhalation is done under one of the hands (under the left or right);
inhale once for three to four strokes;
- inhale once for five strokes.
- Hand position. The following stages are highlighted here:
- Putting your hand under water. At the moment of lowering, watch your palm - it should lower at an acute angle and be facing down. In addition, the fingers must be combined with each other, which guarantees the greatest speed of movement. The immersion process occurs according to the following algorithm - palm, forearm, shoulder. As soon as the hand gets deep into the water, the gripping process begins. The limb should pass as close as possible to the longitudinal axis of the torso. At the moment of contact with water, the angle of the brush is 12-15 degrees, and when leaving the water it is close to 0.
- Capture process. First, the hand moves forward and goes down. At this stage, it will be correct to bend the limb at the elbow. Afterwards, you should continue bending and change direction to a downward and inward position.
- Pull-up. This stage begins by rotating the arm inward and bending the forearm area through hand pressure. This cycle is where the body accelerates, so you should pay the most attention to it. It is necessary to gently press your hand, overcoming the resistance of the water.
- Repulsion. The peculiarity is the emphasis on the sharpness of movement. At this stage, the hand moves with the obligatory increase in pressure. The process of maximum pressure on water occurs in the abdominal area. The arm gradually extends at the elbow. The more strength a swimmer has and the higher his experience, the greater the speed he is able to develop in the process of work. The last phase is to move the hand upward and slightly backward. It is produced through the forearm area. At the final phase of the cycle, the body turns slightly on its side.
- Removing your hand from under the water. This stage begins immediately after turning the torso at an angle to the surface. As soon as the hand reaches the thigh, the active efforts of the muscles, the purpose of which is to push the torso forward, stop working. In this case, the elbow part rises above the water. Next, the hand, forearm and shoulder rise. The hand part should be brought out of the water behind the line of the pelvic area near the hip.
- Moving your hand over the water. Here the hand, in a slightly bent state, should sweep over the water along a short path and enter it. At this stage, you need to keep an eye on your elbow, which should “look” up and be as high as possible. In this case, you should not lift the brush - it is above the surface. This technique guarantees maximum efficiency.
- Leg movement . As already mentioned, professional swimmers have the right to choose any of the existing performance techniques - with two, four or six strokes. The fastest crawl is considered to be the 6-beat crawl, where one cycle is accompanied by movements of the left and right arms, as well as six movements of the legs. Swimming in this style involves a rhythmic change in the position of the legs, which, in the process of movement, bend and unbend in the pelvic region, knee and ankle. The most effective blow is the one performed from the femoral part. In this case, the movement of the hip should be carried out with some advance in relation to the foot and lower leg. You also need to keep the distance between your feet under control, which should reach 35-40 cm. When moving your toes, you should pull them out as much as possible and turn them inward so that your big toes actually touch each other. As the speed of movement increases, the legs bend more strongly at the knee joints, the swing increases, and the foot comes out of the water.
When swimming short distances (50 meters), the athlete does not take a single breath - the entire distance is covered on one supply of air. The breathing technique is not difficult. Air is collected when the head emerges from under the water, when the hand sweeps over the body. Afterwards, the face is lowered again and a long exhalation is made through the nose or mouth. As soon as the head turns around and comes out from under the water, inhale again. In this case, the duration of exhalation is longer than inhalation.
The process of coordinating movements with each other depends on a number of factors - the constitution of the athlete’s body and the duration of the distance. So, the crawl with six kicks and a long stroke is used at a distance of 50-200 meters. If the movement occurs at a medium distance, then a less active style with four or two strikes is chosen.
What you should pay attention to
To breathe correctly when swimming crawl, you need to use two more important skills: bilateral breathing
and
the principle of inhalation from an air pocket
. The first term means alternating breathing through each side, because amateur swimmers often use one-sided breathing, inhaling only from the right (or only from the left).
Bilateral breathing technique when swimming front crawl
There are several options for bilateral breathing:
- A change in head rotation and inhalation occurs on every even or odd (third) stroke. Professional swimmers also use the option on every fifth, especially skilled swimmers - on the seventh.
- Swim 20-50 meters, turning your head in one direction, and then the same amount in the other. This option is good for beginners who still find it difficult to set up the coordinated operation of the general movement mechanism.
- Combined breathing patterns that improve breathing on both sides: for example, two breaths on one side, three strokes and changing the rotation of the head to the other. It is considered a complex technique in freestyle and is therefore not used often.
Air pocket breathing (or bag breathing, as some call it) is a method of inhaling from the air space that forms between the top of the swimmer's head and a small wave near it, which is formed by water from the movement and goes back on the sides of the head in different directions. This curvature of the water level is called an “air bag”, from which it is very convenient to inhale without fear of scooping up water with your mouth.
The importance of bilateral breathing
Despite the fact that this principle of breathing is difficult for a beginner, in the future it is important to master it, since it is necessary not only for high-quality gliding in the water, but also for the health of the swimmer. “One-sided” movement of the head will eventually lead to the appearance of asymmetric movement in the water - this can be easily seen along the edge of a large pool: you can notice that it becomes closer in the process of swimming with one-sided crawl or the swimmer “crawls out” into the oncoming lane. Also, when breathing on one side, when swimming for a long period of time, the swimmer may experience “lameness” of the arm, caused by inflammation of the shoulder ligaments due to uneven load by turning the head and “one-sided” stoop.
One of the pleasant advantages of breathing in crawl on two sides is the ability to keep both sides in sight, and in case of too bright sun or a big wave, change to the other side, which is not available to those who have mastered only the one-sided option.
Note to parents: teaching children to breathe correctly in the crawl is difficult, because it is difficult for a child to maintain concentration on several objects for a long time. Therefore, it is recommended to begin training no earlier than six years of age.
Simple but useful tips for beginner swimmers
I suggest you familiarize yourself with a number of recommendations to help you master the crawl:
- Realize that in order to move quickly in the water, it is important to pay equal attention to all aspects - breathing, arm and leg function, as well as monitoring the position of the body.
- Some athletes forget to exhale in the water, holding the air until the next time they bring their heads to the surface. Such an oversight greatly reduces breathing, negatively affecting the overall results of the swim. What to do? Blow some bubbles, guys! This is the main feature of the rabbit! Learn to control yourself in this action in order to achieve your cherished goals in the world of sports.
- Many experts recommend initially mastering the crawl swimming technique on land, systematically repeating the sequence of actions on a yoga mat or other comfortable mat. Such exercises will help the athlete feel more confident in the water by developing mechanical and reflex memory.
- To make things easier for yourself, start practicing in the pool using fins. They help you hit more evenly, covering larger areas of water. When you have mastered this swimming technique perfectly, you can discard the auxiliary accessory.
I tried to include in the above list the simplest and most effective recommendations that all subscribers to our blog can use in practice.
Why invent a bicycle if it already exists? Everything is much simpler - the main thing is to follow the simple tips.
There is no need to stress yourself out that learning the crawl is an incredibly difficult process. Of course, you will have to put in quite a lot of effort, but the effort will be equal to the result - I guarantee you that, guys!
Useful advice from Start-health: “Friends, to make it easier for you to assimilate the information you read, I additionally post photos and video materials in addition to the descriptions. Having visually studied the features of this technique, it is much easier to learn how to perform a set of movements of the crawl swimming technique.
If among your friends there are professional swimmers, then do not miss the opportunity to see the master class with your own eyes. Ask a friend to “work” with you, enlisting the support and competent recommendations of a specialist.”
Perhaps among our readers there are professional athletes who master crawl swimming techniques? We will be happy to get acquainted with the opinions of masters who can share practical advice and other useful information.
If you still have questions after reading the article, be sure to ask them in the comments. We are always happy to communicate with like-minded people, because we are on the same path - to a healthy lifestyle!
All the best to you guys! ? Learn and master new skills with our blog! Bye-bye everyone!
The effect of crawl swimming on the human body
Crawl swimming has the greatest impact on the back muscles. Swimmers do not have problems with the spine and do not know what joint pain is. Regular swimming classes relieve pain in the lower back, shoulder blades and neck. With proper movement and regular exercise, you can easily forget about back pain.
For those who have breathing problems, swimming provides an excellent opportunity to restore it. Breathing plays an important role while swimming. If it is not carried out correctly, then you can very quickly leave the race. Therefore, during training, they teach not only how to swim, but also how to breathe correctly.
The crawl has a positive effect on the musculoskeletal system. Swimming is very useful for people who have injuries to their legs, arms, and spine. Swimming provides an opportunity to recover from injuries and improve the functioning of the musculoskeletal system.
There are no contraindications for crawl training. You should be very careful about swimming if you have had infectious diseases, colds or digestive system disorders. After such illnesses, it is not recommended to go swimming for a month.
