Vertical handstand push-ups are on the list of training exercises that effectively develop the shoulder girdle. They are often used by athletes, dancers and acrobats, but everyone can learn how to perform them, of course, with some training. Let's figure out why this exercise is useful, and how a beginner can achieve mastery of the vertical push-up technique against a wall.
- What are the benefits of vertical push-ups and what muscles do they work?
- Contraindications and harm
- How to learn A set of preparatory exercises
- Execution technique
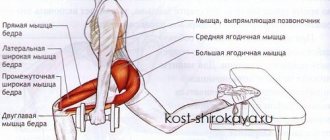
What muscles are used during vertical push-ups?
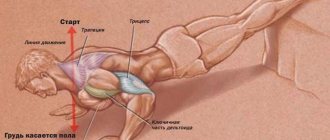
Unlike classic push-ups, head-down push-ups involve almost all the muscles of the body, since the athlete needs to constantly maintain balance, and the target muscle group is not the chest, but the shoulders , which are affected by the weight of the whole body.
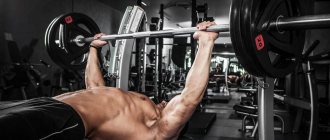
In a sense, upside down hand push-ups can be compared to a standing military barbell press.
Legs on support
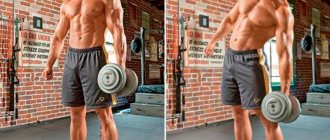
When the legs are higher than the head, the weight of the body is mainly on the arms, and the arms are known to be smaller and weaker than the legs. Therefore, this type of push-up is a complicated variation of the classic exercise. You should include such push-ups in your training program if you have already mastered the basic push-ups to perfection.
In fact, the leg-up push-up is an inverted version of the bench press with a positive incline. At the same time, the upper part of the chest is emphasized. More specifically, the load distribution looks like this:
- pectoral muscles (emphasis on the upper part);
- deltoid muscles (anterior bundles);
- triceps;
- the abs and back muscles work statically.
The wider we place our hands, the more actively the chest works, especially the outer part; the narrower we place it, the greater the load on the triceps. With a narrow position of the arms, the load, which still goes to the chest, is shifted to their inner part.
Also, the higher you place your legs, the more your deltoids are activated. If we continue to lift our legs and get to the handstand push-up, it is actually a shoulder exercise.
The optimal inclination of the body for developing the upper chest is 30–45 degrees at the lowest point (chest near the floor). That is, in the starting position, it is enough to place your legs on a bench or fitball. With the latter option, the body is also actively working.
Pros and cons of the exercise
Vertical push-ups, as mentioned above, have a comprehensive effect on the athlete’s entire body, so they will be useful for representatives of any strength and acrobatic sports. Among the main advantages of this exercise are:
- Powerful, rounded shoulders, since the main load falls on them;
- Strong, functional triceps. Yes, functional ones, because in this exercise they not only push the athlete’s body upward, but also play a vital role in maintaining balance;
- Well-rounded core muscles. Like the triceps, the core muscles help control the position of the athlete’s body in space, constantly being under an unusual load for the body.
However, due to the difficulty of performing, handstand push-ups also have several disadvantages:
- Load on the vestibular apparatus. People who have any problems with it need to approach this exercise with caution;
- Increased load on the elbow joints and shoulders;
- Risk of injury if you are unable to control your body in space.
What muscles are involved in upside down push-ups?
Today we will talk about two options for performing this movement. The first of them is the most difficult and the athlete’s body should be positioned almost vertically. The second option is easier, since the body has an inclination angle of 40–50 degrees.
Whatever type of movement is performed, the main load falls on the arm muscles. When the body is positioned at an angle, part of the load falls on the upper pectoral muscles. If the angle is close to 90 degrees, then the anterior and middle sections of the deltas will be actively involved.
This is a very effective movement, as it perfectly pumps up the muscles of the shoulder body, on which the strength of the entire upper body largely depends. In addition to the already mentioned muscles of the shoulder girdle, the movement involves the triceps and biceps.
Every athlete wants to have a powerful shoulder girdle. The movement will be especially useful for acrobats, break dancers, gymnasts, etc. Very often this exercise allows you to overcome a plateau due to the high load on the muscles. It can also be performed at home and will be useful for people who practice at home.
Lead-up exercises
Obviously, even an experienced athlete is unlikely to be able to perform at least 1-2 push-ups while standing on his hands the first time. Therefore, it is necessary to gradually approach this exercise, having completed several lead-in exercises before doing so.
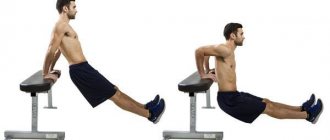
Simplified push-ups upside down
Here we are essentially talking about classic push-ups, in which the legs are on some elevation (bench, chair, edge of the sofa, etc.). In this version of push-ups, the load falls more on the upper segment of the pectoral muscles and the anterior deltoids. This exercise is often found among gym goers and street athletes.
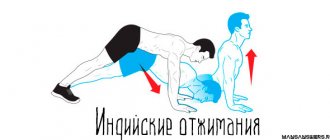
Push-ups "House"
“House” is a push-up in which the person’s torso forms not a straight line, but an angle of approximately 90 degrees.
It is necessary to perform 3-4 sets of 15-20 repetitions.
House push-ups from a hill
A more complex version of the “House”, in which the torso also forms an angle of 90 degrees, but the legs, unlike the previous exercise, are not located on the floor, but on a hill (pedestal, chair).
It is recommended to gradually increase the height of the support.
To make this exercise even more effective, the stand can be replaced with loops or rope, thereby depriving the body of solid support. This will help you learn to control your body in space.
You need to perform 3-4 sets of 12-15 repetitions.
Army press
It was previously said that vertical push-ups are similar in their biomechanics to the military press, so it is logical to use this exercise in preparation for handstand push-ups.
It is necessary to perform 3-4 sets of 15-20 repetitions, using not too much weight on the barbell.
Handstand push-ups against the wall
The final exercise prepares the athlete for vertical push-ups. In this exercise, the wall acts as the only support, that is, the torso is already in a vertical position.
The degree of difficulty of this exercise is regulated by the distance from the hands to the wall: the closer the hands are to the wall, the more difficult it is to maintain balance and perform push-ups.
Despite the fact that this is only a preliminary exercise, when performing it, it is recommended to resort to the help of a partner who will insure the athlete. There are often cases when an athlete loses his balance and falls unsuccessfully, getting injured.
How to learn
To learn such push-ups, you will need to undergo a little training in the form of performing lightweight versions of the exercise, and also bring to automaticity the skill of correctly standing on your hands with your back to the wall, provided that you do not know how to do this or have not tried to do it before.
Set of preparatory exercises
Preparatory exercises should be performed sequentially, moving from simple to complex stages. It is especially important for beginners to complete all stages of preparation, even if the exercises seem simple at first glance: this way you can feel your readiness and understand the technique of movement.
Learn how to master the headstand technique.
First, you need to learn how to do classic push-ups. In this case, the arms should not be spread too far to the sides, the position of the head at the top point should be between the arms.
For training, 4 sets of 8 repetitions are performed. An exercise is considered mastered when you can do it 15–20 times in a row without difficulty.
Elevated knee push-ups
The essence of the exercise is a more complicated form of classic push-ups. At the same time, the body rises even further from the floor, continues to remain vertical, and the knees are placed on a hill. As a height, you can choose a solid box, a cabinet, a high bench, or something similar and stable.
For training, 4 sets of 8 repetitions are performed. An exercise is considered mastered if you do it freely 15–20 times in a row.
Pay attention to 5 effective exercises for fast handstands.
Elevated Leg Push-Ups
The next stage is even more difficult than the previous one: we stand on a hill not with our knees, but with our feet, i.e. we repeat the push-up position on the floor, but with our feet resting on the stand. The exercise technique is as follows:
- Keep the body vertical.
- Perform push-ups by lowering your head slightly in front of your hands.
- When bending, try not to spread your arms to the sides, but point your elbows forward.
- In the upper position, move your head between your hands.
For training, perform 4 sets of 5 repetitions.
The test is similar - 15–20 free push-ups in a row. Learn how to do wall push-ups correctly.
Walking with your feet on the wall
Take an emphasis lying perpendicular to the wall, resting your feet on it. Start “walking” your hands toward the wall while simultaneously walking your feet up it. Continue lifting until your legs are vertical and your arms reach 20–30 cm from the wall.
Important! The exercise is dangerous, so perform it slowly and gradually increase the height of the “approach” to the wall.
Holding a handstand
A couple of steps away from the wall, stand facing it. Take a step forward and lower your hands to the floor. Do it quickly. Throw up the leg that you did not take a step, then pull the other one up to it.
Your palms should be located about 20 cm from the wall. Keep your body strictly upright as much as you can at the beginning. When the duration of the free hold of the rack is 60 seconds, you can proceed to the next stage.
"Negative" repetitions
“Negative” reps aren’t quite the push-ups you’re aiming for, but they’re almost there.
It’s interesting to know: what are the benefits of push-ups for men?
- Take the starting position - a handstand near the wall.
- Slowly begin to lower your body down until the top of your head touches the floor.
- Carefully step down from this position to the floor.
If you can repeat 12 approaches in a row, the task of this stage of preparation is completed.
Vertical push-ups with partial amplitude
The exercise helps to concentrate on personal sensations and maintain balance. Starting position: handstand near the wall. Bend your elbows at a slight angle and straighten. 12 repetitions in a row without tension will determine whether you are ready for full vertical push-ups.
Find out which exercises are cyclic.
Approaches can be made more difficult by increasing the amplitude of elbow bending; in this case, it is worth building a small “platform” under the head, for example, from a small mat or hard pillow. As soon as the top of your head touches the hill, press your body up.
Execution technique
If you have successfully completed the preparatory set of exercises and have gained movement practice, you can move on to the final stage:
- Go to the wall, place your palms on the floor at a distance of 25–30 cm from it. Arms are spread shoulder-width apart or slightly wider.
- Take a handstand: the body and arms are straight, breathing is free, no parts of the body touch the walls - only the heels.
- Begin to bend your elbows under control and lower yourself down toward the floor until your head touches it lightly with the top of your head.
- Pause for a second at the bottom of the trajectory.
- Extend your arms, pressing your palms into the floor, and rise up to the starting position.
Important! For the safety of your health, try to barely touch the floor with your head and control your every movement.
Increase the number of repetitions to 8–12. To develop the muscles of such approaches, it is worth performing 3 approaches at a time. When you realize that you have completely mastered the exercise, push-ups can be further complicated by using additional load in the form of weight. This way, you will increase the amplitude of arm bending and strength load.
How to learn to do handstand push-ups: video
Execution technique
Having prepared your body for vertical push-ups, you can proceed directly to performing this technically complex exercise.
As in the previous exercise, it is recommended to resort to the help of a belay partner , at least in the first attempts at handstand push-ups.
Technique:
- Stand on your hands with your palms shoulder-width apart or slightly wider;
- Body weight is evenly distributed over the entire surface of the palms;
- The spine is slightly bent in the lumbar region, the pelvis is moved slightly forward;
- As you inhale, bend your elbows, “stick” your shoulders a little and squeeze your shoulder blades together, thereby changing the angle between the chest and the floor, controlling this movement by increasing the deflection in the lower back, which compensates for the shift in the center of gravity;
- As you exhale, straighten your elbows, return your shoulders, shoulder blades and chest to their original position, also adjusting the shift of the center of gravity by changing the deflection in the lower back.
Important! During the negative phase of vertical push-ups, you should never touch your head to the floor. Even a second of relaxation in this position can lead to loss of balance, falling on your head and, as a result, injury to the cervical spine.
Also, in the initial stages, it is recommended to place a small pillow or a couple of folded towels under your head to soften the impact of a possible fall.
Errors
- During push-ups upside down, your head should never touch the floor. When you move downwards, you can injure your cervical vertebrae.
- If you can't do full push-ups upside down, start with partials. Do several repetitions with partial amplitude until you can go to full amplitude.
- The wider your legs are, the more difficult it is to maintain balance. Therefore, try to bring them together.
- During the downward movement, you need to slightly arch your lower back and make sure that your chest acquires a more vertical position and your head moves slightly towards the wall. You yourself will feel the need for this due to the shift in the center of gravity.
deltoiddeltsexercise at homePush-upsfront deltoidmiddle delta
Variations of vertical push-ups
Vertical push-ups are a challenging exercise in themselves and do not require any modifications. Therefore, the only option to complicate it is to change the position of the legs. Depending on whether the legs are spread apart or not, the position of the center of gravity changes , thereby changing the degree of load on the arms and shoulders.
You can also use special push-up supports. In this case, in addition to the muscles listed earlier, the forearms and wrist joints will receive additional load.
Handstand push-ups are a great, albeit technically challenging exercise that can take your training to a whole new level.
Benefits of exercise
The main goal of almost any sports exercise is to increase strength, endurance and muscle size.
When you perform vertical push-ups, the main load falls on the shoulder muscles, and more specifically, on the middle deltoid muscles. Traps and triceps also work. You can imagine doing overhead presses, but in an inverted position.
Upside down push-ups are beneficial for the following reasons:
- You can conduct intensive shoulder training without additional equipment. The weight you have to lift is your own body. How much do you weigh? Deltas will appreciate this load!
- The biceps and triceps also get a good workout.
- No compression load on the spine. This point is relevant only with the correct technique for performing the exercise and, what is extremely important, completely forgetting about kipping. What kipping is will be discussed below.
- By turning upside down, you give your circulatory system a jolt, which is simply invaluable when working at a sedentary position. Congestion in the pelvic area is prevented and nutrition of the cerebral vessels is improved.
- Due to the weight of the head, a gentle pulling effect is exerted on the neck muscles and vertebrae.
- A sense of balance develops and coordination is trained. The fear of an inverted body position goes away.
In other words, the exercise not only develops the shoulders and arms, but also has a beneficial effect on the cardiovascular system and spine.
The Whyda system is based on six basic movements. The handstand push-up is one of the Big Six movements. All of the Big Six movement programs can be performed individually to train the major muscle groups being worked, as an addition to your program, or as elements of a comprehensive program.
Broad shoulders are an undoubted sign of strength and physical superiority, regardless of other external qualities. The main working muscle of the shoulders—the deltoid, or delta—takes on all the load on the main muscles of the torso and redistributes it to the arms in all power movements.
Therefore, if the shoulders are weak, then the entire upper body is defective by default. Sounds good. But there is one problem with modern shoulder training methods. And this problem is quite deep. Shoulder injuries have always accompanied strength training. Pain and shoulders are almost synonymous.
Many weightlifters say that the only way to overcome shoulder pain is to learn to live with it.
Paul Wide says that if all bodybuilders based their programs on the natural movements of the human body, there would be no injuries or pain.
Therefore, by forcing the body to move in an unnatural way, we deprive ourselves and our muscular system of the opportunity to develop. It’s no wonder why, after such torture to which we subject our bodies during training, all we can do is put up with the pain.
The solution is to switch to a natural, time-tested strength exercise - handstand push-ups.
In addition, movements that twist the shoulder joint and cause painful sensations in the rotator cuff are, in principle, impossible with a handstand press. In this position, you cannot bend your elbows and put your shoulders on the floor simply because your head is in the way.
Even advanced athletes who are able to touch their chin to the floor cannot get down to the point where the rotator cuff experiences significant stress. In addition, the “flat” position of the hands in this position is safer than the grip in the barbell press, because the body weight is evenly distributed on the arms and shoulders, providing a harmonious load.
In addition, bench press provokes diseases of the forearms and elbows, for example, tennis elbow syndrome. Handstand push-ups, performed with proper technique, are completely safe. Due to its effectiveness and safety, handstand push-ups are probably one of the most important exercises in bodyweight training.
It gives much more than one might expect. When it comes to strength, handstand push-ups lift virtually your full body weight. Reaching this level of barbell lifting takes many years of training, often with injury, if the athlete even manages to reach that level of proficiency.
For those who train with their own weight, it only takes a few months to master the handstand push-up technique. As a result, they get incredibly strong, muscular shoulders in a relatively short time. Among other things, handstands develop coordination.
Maintaining balance in an inverted position trains the vestibular apparatus, part of the inner ear. The sense of balance and motor perception develops, regardless of what movements you make during the day—standing upside down or not.
The inverted state itself has a lot of benefits. Blood flow changes, veins and arteries, working hard against gravity, become healthier and stronger. The same applies to the digestive organs. When you stand upside down, fresh blood flows to it, which tones the brain, and you feel fresh and completely rested after completing all the exercises.
Wide offers some technical tips to help you master this challenging push-up technique: • Handstand push-ups can be performed with or without support. Unsupported exercises are aimed at both developing strength and maintaining balance.
Since this system is mainly aimed at developing muscle mass and strength, preference is given to wall-based exercises. If you definitely want to learn how to do the option without support, you must first carefully work through all the exercises with support on the wall, which will prepare the muscles for performing more complex variations.
• At the first levels, the body and brain gradually adapt to the inverted position. You will learn how to properly stand up on your hands and return to a normal position. Do not try to skip the preparatory exercises - without them it is impossible to master the technique of push-ups while standing on your hands. • Don't place your hands too close to the wall when throwing your legs up.
15-17 cm from the wall or a little further is more than enough to safely perform push-ups. Hands should be approximately shoulder width apart. Those who have been lifting barbells for a long time will probably try to place their hands wider, but this position of the hands will only make your position unstable and the movement ineffective.
• During push-ups, do not try to move your elbows to the sides, as in a military press. The elbows will naturally bend forward, toward or away from the rib cage on a diagonal. And this will be the most correct move. Don't resist your instincts! • Don't try to keep your body straight. The legs will probably go back a little.
Due to the natural position of the center of gravity in an inverted position of the body, such a deviation is an acceptable norm. Do not arch your back, do not make unnecessary efforts, trying to keep your body in an even position. Natural curves are normal. • At the very beginning, the body will tend to lie completely on the wall. Try not to give in to temptation.
You won't learn anything that way. Only your heels should touch the wall. If you follow the logic of the previous points, when the hands are positioned at the required distance from the wall and the natural curves of the body are preserved without much effort, then only the heels will automatically fall on the wall. Do not arch your back in this position.
• Over time, the heels will only lightly touch the wall, purely to maintain balance. Try to gradually lift your heels off the wall, moving on to push-ups without support, if, of course, you have a desire to learn them.
Handstand push-ups are a truly high-level game that can delight and inspire those around you. But don’t think that you can do everything just like that, right off the bat. The inverted push-up technique is quite difficult, especially for those who have had shoulder injuries.
The push-up series begins with simple exercises that will teach you how to get into and out of the position on your hands. The second level teaches you how to properly distribute weight and maintain balance. The next levels are strength exercises.
Beginner level 1 series of 5 repetitions (both sides) Intermediate level 2 series of 8 repetitions (both sides) Advanced level 2 series of 10 repetitions (both sides) 8 Level - Partial push-ups on one arm Training norm: Beginner level 1 series of 4 repetitions (both sides) Intermediate level 2 series of 6 repetitions (both sides) Advanced level 2 series of 8 repetitions (both sides) Level 9 - One-arm push-ups with supportTraining rate:
Beginner level 1 series of 3 repetitions (both sides) Intermediate level 2 series of 4 repetitions (both sides) Advanced level 2 series of 6 repetitions (both sides) Level 10 - One-arm push-ups against a wall Training norm: Beginner level 1 series of 1 repetition (both sides) Intermediate level 2 series of 2 repetitions (both sides) Elite level 2 series of 5 repetitions (both sides)
How to properly perform head-up push-ups
Ecology of life. As the saying goes: “If there is a desire, the opportunity will appear.” Therefore, I suggest not looking for any excuses and starting training at home.
Everyone wants to have a slim and fit figure, but not everyone has the opportunity to go to expensive fitness centers and work out with personal trainers. What can I say, many people do not even have the opportunity to go to a simple gym and work out on their own. However, this is not a reason to give up everything and not go towards your goal, train and improve your physical condition.
As they say: “If there is a desire, the opportunity will appear.” Therefore, I suggest not looking for any excuses and starting training at home.
In this article we will look at one of the variations of a very popular exercise that is used both at home and in a specially equipped gym, namely push-ups. We are talking about a fairly popular variation of this exercise – push-ups with your head up.
In this version, when the head is higher than the body, there is practically nothing to talk about, because the exercise is quite easy, it has no more complex analogues, and the technique is quite simple.
This exercise is perfect for beginner athletes, especially for those who do not know how to do push-ups. This is like a lighter version of classic push-ups, where the body weight is significantly shifted to the legs, while the load on the arms and chest becomes very small. This is an ideal exercise for girls and guys who don't know how to do push-ups.
Unfortunately, in our society, with the development of computer technology and a wide variety of games, a person can practically not leave the room. Almost everything can be done remotely, sitting at home. Because of this, people have become very lazy and you won’t believe it, but for many, 10-15 times head up is very difficult. That is, in essence, the muscles atrophy, the person simply dries up without moving.
After all, people are the fruit of millions of years of evolution and you cannot simply be weak. Don't be shy about starting small. Believe me, it all started somewhere. Also, Arnold Schwarzenegger was not immediately so huge and strong. He worked out every day, did push-ups, and then equipped himself with a gym. Everything had a beginning, so take care of yourself, start small, then gradually increase the load and you will succeed. Now, after a little philosophical thought, let's look at the exercise itself.
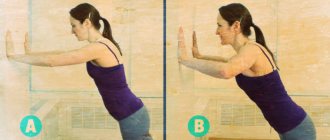
TECHNIQUE FOR PERFORMING THE EXERCISE “UPWARD PUSH-UPS”
As you understand, the difficulty level of this exercise is minimal, that is, if assessed on a 10-point scale, then approximately 1-3 points. It depends on your physical fitness. For some, even doing push-ups from a bench is difficult. In general, be that as it may, let’s take a closer look at the technique of this type of push-up.
Prepare a bench and lean on it with both hands. Use a standard distance between your hands, approximately slightly wider than shoulder width. You can lean your feet against the wall for greater stability and to prevent your feet from slipping. The back is straight, the legs are straight. The torso and legs should form one straight line. This will be your starting position.
Quick Tip: If you want to make head-up push-ups even more effective, you can use push-up supports instead of a bench to increase the range of motion during the exercise and improve the effectiveness of home workouts.
Take a deep breath and lower yourself down, keeping your body straight, without lifting your butt up or lowering your pelvis down. Then, as you exhale, rise to the starting position.
The main advantage of this exercise is that it allows you to load the lower part of the pectoral muscles. Of course, such a load is not enough to properly pump up the chest, but for training at home for beginners, the exercise is quite suitable.
CONCLUSIONS
In general, if you are a beginner athlete and are training at home, head-up push-ups are a great workout. Also, this exercise can be performed by experienced athletes who have been training in the gym for several years. It allows you to warm up before performing any basic exercise. This kind of warm-up is done in order to keep the joints healthy.
Train smart and stay healthy. published
PS And remember, just by changing your consumption, we are changing the world together! © econet
Join us on Facebook, VKontakte, Odnoklassniki
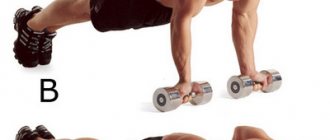
Push-up technique “legs above head”
Take a lying position, as for classic push-ups. Your palms are under your chest; choose the distance between them based on your training goals. If you want to maximally load your chest, place your arms wider, if you are working on developing your triceps, or if you are specifically interested in the inner part of your chest, use a narrow palm position.
- Place your feet on a raised platform - a bench, sofa, fitball. The body must be absolutely straight, without bending in the lower back. The abs and back are in static tension.
- As you inhale, bend your elbows and lower your chest down almost to the floor. Do not arch your back.
- As you exhale, push yourself up using the target muscle group (chest or triceps).
Repeat the exercise the required number of times, for example, 10–15, rest and do another 2–3 approaches.
Close-grip push-ups from the floor
To build a strong and developed core, push-ups are one of the main exercises. There are a large number of options for performing this exercise, depending on the placement of the arms and legs, the angle of inclination, the weight used and some other factors.
Today we will talk about push-ups with narrow hand placement.
What muscles is the exercise aimed at?
- The triceps (the muscles on the back of the forearm) receive the greatest load.
- The anterior deltoids and pectoralis major muscle are worked out quite well.
- The abdominal muscles, quadriceps, glutes and biceps are used to stabilize and control the position.
- In addition, one cannot fail to note the work of the joints and ligaments of the shoulders and elbows, which are worked out and strengthened during the performance of this exercise
When doing push-ups with a narrow arm position, the greatest emphasis is placed on the triceps. I also actively work the deltoids and pectorals.
What are the benefits of push-ups with a narrow hand position?
- First of all, the triceps are included in the work, so the strength of these muscles increases. This is important because the triceps account for about 70% of arm volume.
- The triceps muscles of the shoulder are strengthened and increased in size.
- Hands become toned, flabbiness is removed. This is especially true for women whose forearm is a problem area.
- The joints of the elbow and shoulders are strengthened.
- The core muscles develop.
- During active training, push-ups with a narrow grip help you lose weight and tighten your stomach.
- And of course, the main advantage of this exercise is that it can be performed anywhere and anytime, and a large number of variations will allow you to diversify push-ups with a narrow hand position and use more muscle groups.