Many street athletes begin their journey with a barbell lift or, in other words, with a rack. There is an opinion that learning how to do kneeling exercises on a horizontal bar is very difficult, but this is not the case.
Even those who do not know how to do pull-ups can learn how to do a kip-up correctly. And all because riveting is a purely technical element, the implementation of which does not require any special skills. In today's article we will talk about how to learn how to make a rivet on a horizontal bar.
Digression from the topic: if you don’t know which exercise to choose for training your shoulders, dumbbell raises to the sides are the best way to train your deltoid muscles!
Introduction
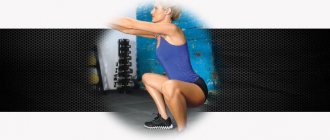
For some, the abdominal muscles are an indicator of an athletic physique; for others, the cult of the abs turns their life into continuous twisting and leg lifts. Indeed, clearly defined abs look very impressive, but with a thin physique, bringing them to this state is not at all difficult, since due to the low level of body fat, even not particularly developed abdominal muscles will be visible quite clearly. Try to gain 70, 80, 90 kg of muscle mass and have clearly defined abs. I'm sure this will be an elusive goal for many, if not all. And only the most effective abdominal exercises will help you achieve this result.
The abdominal muscles are divided into the rectus abdominis, internal obliques and external obliques. At the same time, the rectus abdominis muscle is usually divided into upper and lower sections. All these muscles and sections are usually trained with various types of twists, turns, leg and body lifts. It is these exercises that will be discussed in this article.
A chair on a horizontal bar: a detailed tutorial to quickly learn how to do the element
A chair on a horizontal bar is one of the first exercises that workout beginners master. Then more complex elements will come, such as the officer’s exit, etc.
So, let's figure out what a stool on a horizontal bar is and how to do this trick correctly. This is not a strength element, but it requires a certain dexterity and good coordination of movements - all this can be developed.
If you are starting to do workout from scratch, then your best assistant will be the horizontal bar video school taught by Mikhail Baratov.
He explains in great detail and clearly how to perform this or that element; This is an excellent tutorial for both beginners and even quite advanced workout athletes when mastering more complex tricks.
So, how to make a high chair? Let's take the easiest option to perform - the chair back. This is a technical element, so it requires execution in series.
Leg raises
This exercise for the press involves the lower part of the abdomen, as well as the rectus femoris muscle. This is a basic exercise used to develop strength and strengthen the lower abdomen. Recommended for everyone, from beginner to experienced athlete, when starting an ab workout.
Exercise technique
1. Sit on the leg raise machine, grab the handles and press your back firmly against the machine pad. The legs are straightened and hang freely. 2. Inhale and hold your breath, raise your legs as high as possible. At the top, try to keep your legs parallel to the floor or slightly higher. 3. You can exhale after overcoming the most difficult section of the amplitude. Then slowly return your legs to the starting position. 4. At the lowest point you need to leave a small angle in the hip joint. Don’t linger at the bottom, take a breath and continue the exercise.
Technique tips
- To achieve maximum contraction of the abdominal muscles, raise your legs as high as possible, since in the lower part of the amplitude, most of the work falls on the thigh muscles.
- At the lowest point of the amplitude, do not move your legs too far back and do not relax your abs. This will transfer a significant portion of the load to the thigh muscles.
- Under no circumstances should you swing your legs or throw them up by inertia. This almost completely removes the load from the abdominal muscles.
- Start learning the exercise with knee raises. This is an easier variation of leg raises. Then, as your abdominal muscles develop, straighten your legs.
- If you can handle straight leg raises quite easily, wear weights on your legs. This will increase the load on the abdominal muscles.
- If your hip flexibility allows you to lift your legs high enough, try to lift them to the level of your head or even higher.
- To achieve maximum contraction of the abdominal muscles, at the top point, take a short pause for 1-2 seconds and tighten your abdominal muscles as much as possible.
- To make the exercise even more difficult, perform it in partial amplitude, lowering your legs literally to an angle of 45 degrees relative to the floor.
- Do not lift your back from the exercise pad. By tilting your body forward, you prevent your abdominal muscles from stretching at the bottom, which reduces the effectiveness of the exercise.
Execution technique
The exercise includes several elements. Here's how to properly make a rivet on a horizontal bar:
- Vis. The legs are parallel to the ground, the grip is straight and narrow (arms are spaced narrower than shoulder width). The reverse option, in which the palms are turned inward, is difficult for beginners.
- Rocking. This is nothing more than a deviation of the body back and forth with a gradual increase in angle. The amplitude increases due to alternate work of the legs and shoulder muscles. At this stage, rhythm is very important; jerking should be avoided.
- Leg lift. You need to reach your toes towards the bar. The release is done at the peak, at the moment when the body is at the highest point.
- Kip-up. It is accomplished due to inertia. The athlete straightens up, as a result of which he rushes upward under his own weight. There is an emphasis on both hands, and then a return to the starting position.
There is a version of the exercise with a deflection in the lumbar area. With this type of execution, at the second stage of riveting, the body swings due to arching of the torso, and not due to the purposeful throwing of the legs. The deflection is done when the body moves forward. The most protruding part in the starting position is the chest, the legs are only directed in the desired direction.
Hanging Leg Raises
This abdominal exercise involves the lower part of the abdomen, as well as the rectus femoris muscle. This is a basic exercise used to develop strength and strengthen the lower abs. Recommended for advanced and more experienced athletes at the beginning of abdominal training.
Exercise technique
1. Jump onto the bar and take a grip slightly wider than shoulder-width apart so that your body is fully straightened and your feet do not touch the floor. 2. Inhale and, holding your breath, lift your legs as high as possible with a powerful movement. At the top, your legs should be parallel to the floor. 3. You can exhale after overcoming the most difficult section of the amplitude. Then slowly return your legs to the starting position. 4. At the bottom point, the legs should not be completely straightened, but remain slightly at an angle. Inhale and continue the exercise.
Technique tips
- Do not bend your legs throughout the entire approach. Keep them completely straight or maintain a slight bend in your knees.
- To achieve maximum contraction of the abdominal muscles, raise your legs as high as possible, since in the lower part of the amplitude, most of the work falls on the thigh muscles.
- To engage the maximum number of abdominal muscle fibers, lift your pelvis when your legs cross the horizontal level and go higher.
- Do not move your legs too far back, this will cause the body to sway and throw your legs up due to inertia, which will significantly reduce the effectiveness of the exercise.
- If the grip strength of your hands is not strong enough to hold your body throughout the entire approach, use gymnastic or athletic straps.
- Holding your breath during the exercise allows you to stabilize the position of the spine and develop a powerful effort to raise your legs higher.
- Start learning the exercise with knee raises. This is an easier variation of leg raises. Then, as your abdominal muscles develop, straighten your legs.
- A variation of knee lifts or straight legs while hanging on the Swedish wall is possible. In this position, the back and pelvis will be fixed, which will greatly facilitate the exercise.
- If you can handle straight leg raises quite easily, wear weights on your legs. This will increase the load on the abdominal muscles.
- If your hip flexibility allows, raise your legs as high as possible. Master level involves lifting your legs until they touch the bar above your head.
- To achieve maximum contraction of the abdominal muscles, at the top point, take a short pause for 1-2 seconds and tighten your abdominal muscles as much as possible.
- To make the exercise even more difficult, perform it in partial amplitude, lowering your legs literally to an angle of 45 degrees relative to the floor.
Leg slimming exercises
Often the figure deteriorates precisely because of the fullness or unaesthetic shape of the legs. Performing a set of exercises will help eliminate this problem. Effective exercises:
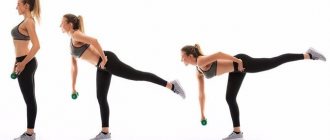
- The easiest and most effective exercise is swings. At first, it can be difficult to maintain balance, so it is advisable to use a chair or wall as support. For each leg, perform the same number of mosses. Raise your legs forward, backward and to the sides. To eliminate the possibility of injury, you first need to warm up for all muscle groups, and there should be no sharp objects at the training location.
- An effective method for losing weight and building muscle at the same time is to do an exercise similar to walking up stairs. A little elevation is needed. You can use a stool or similar stable object. For 10 minutes, you need to place one or the other leg on a hill, constantly changing the supporting leg.
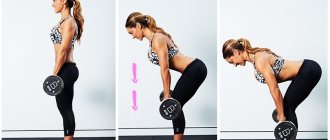
- An excellent exercise is provided for a good workout of the hips and buttocks area. To get into the starting position, lie on your side, bend your lower arm at the elbow and lean on it while performing the exercise. The second hand is also the supporting hand. You need to place it next to your stomach on the floor. Lift your buttocks, leaving your arms and legs elevated. The back and upper legs should be in the same plane. Weight loss occurs in the abdominal area, and the muscles of the whole body are developed. You need to perform it while constantly changing position, leaning on different sides.
- Lie on your side. Place your lower hand under your head. Place the second one at your waist. As you exhale, lift your outer leg all the way up, remember to keep it absolutely straight. Perform 19 swings for each side.
- Sit in a comfortable position and lean on your hands behind you. Bend your legs and move them left and right, trying to touch your knees to the floor.
- To eliminate excess fat in the calves and tighten these areas, it is necessary to move the body weight from heels to toes in an even position and vice versa.
- Stand on either leg, lift the other one and move it back. Roll onto your toes and lower yourself. If you cannot maintain your balance, first grab a support.
Straight crunches
This exercise for the abdominal muscles uses the upper part of the abdominal muscles. This is a basic exercise used to develop strength and strengthen the upper abdominal muscles. Recommended for everyone, from beginner to experienced athlete at the very beginning of abdominal training.
Exercise technique
1. Lie on the floor perpendicular to the bench. Legs together, knees bent at right angles, calves lying on the bench. Hands behind your head, straight back, gaze at the ceiling. 2. Inhale, holding your breath and without lifting your lower back from the floor, round your back, raising your head and shoulder blades as high as possible. At the top point the head looks forward. 3. You can exhale after overcoming the most difficult section of the amplitude. Then immediately, slowly return to the starting position and straighten your back. 4. At the lowest point of the exercise, the back is straight, the shoulder blades are straightened, the elbows are spread to the sides. Inhale and continue the exercise.
Technique tips
- The cornerstone of the exercise is rounding the back. At the top point it should not be flat. Tighten your abdominal muscles and slowly lift your shoulder blades off the floor.
- By lifting your back off the floor at the top point, you eliminate the moment of twisting. This greatly relieves the stress on the upper abdominal muscles.
- Holding your breath in the exercise helps keep your lower back and spine in a fixed position and allows you to develop a much more powerful force.
- It is advisable to bring your elbows together at the top point. The closer you bring them together, the more you can spread your shoulder blades and increase the amplitude of rounding your back.
- At the lowest point, the elbows should be spread as far apart as possible. The back must be straightened until the head and shoulder blades touch the floor.
- Try not to make unnecessary movements or tilt your body or shoulders to the sides. By bending the spine in this way, you overload the intervertebral discs.
- Throughout the entire approach, the head looks exclusively in front of itself and is fixed in this position as a single unit with the shoulders.
- During the exercise, do not pull yourself up by your neck under any circumstances. By bending your neck, you overload the cervical spine.
- To achieve maximum contraction of the abdominal muscles, at the top point, take a short pause for 1-2 seconds and tighten your abdominal muscles as much as possible.
- To further increase the load on the abdominal muscles, variations with legs resting against a wall are suitable, or, what is even more difficult, with legs suspended, maintaining an angle of 90 degrees.
- You can also complicate the exercise by different variations of the position of your hands: crossed on your chest, extended above your head, or aimed at your knees.
- For more advanced athletes, it is recommended to use additional weights that can be held on the chest, behind the head, or on outstretched arms.
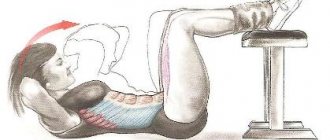
Reverse crunches
This abdominal exercise involves the lower part of the abdomen, as well as the oblique abdominal muscles. This is a basic exercise used to develop strength and strengthen the lower abs. Recommended for everyone, from beginner to experienced athlete at the beginning of an ab workout.
Exercise technique
1. Lie on a horizontal bench with your head close to the edge. With your hands, grab the bench above your head. Bend your legs at the knees and keep them suspended, bent at a right angle. 2. Inhale and hold your breath, pull your knees towards your chest. At the top point, the pelvis is suspended, the back should be rounded, the knees should be as close to the chest as possible. 3. You can exhale after overcoming the most difficult section of the amplitude. Then immediately, slowly, return your legs and back to their original position. 4. At the bottom point, the legs remain above the bench, knees bent 90 degrees. Lowering your legs, inhale and continue doing the exercise.
Technique tips
- To achieve maximum contraction of the abdominal muscles, at the top point of the amplitude it is necessary to lift the pelvis off the bench.
- To achieve maximum contraction of the lower back muscles, try to pull your knees not towards your chest, but towards your head. This will also increase the flexibility of the lumbar region.
- Try not to twist too much or raise your knees further than your head. This will shift the center of gravity to the cervical spine, and you risk injury.
- At the top point of the amplitude, try not to straighten your legs. This way you will round your back by inertia, which will reduce the effectiveness of the exercise.
- At the lowest point of the amplitude, never lower your feet onto the bench. As soon as the legs are placed on the bench, the load from the abdominal muscles is removed, and the thigh muscles are included in the work.
- Fix the position of your legs for the entire approach and do not turn them. Excessive leg movements will bend the spine, which can injure the intervertebral discs.
- Holding your breath allows you to stabilize your body position on the bench and develop a much more powerful force while lifting your legs.
- An easier version of the exercise is lying on the floor. You place your arms along your body, which will significantly increase body stability and reduce the likelihood of unnecessary movements.
- The floor variation allows you to make the exercise more challenging by slightly raising your head and shoulders. This will force you to keep your abs contracted for the rest of the set.
- To make the exercise more challenging, try doing it with your legs fully extended. This will put even more stress on your lower abs.
Tabata Workout Example
We have prepared a suitable example of a Tabata training session especially for you. You can use it for your own purposes, subsequently changing the exercises as desired.
Exercise No. 1
— Burpee (20 seconds)
Rest
(10 Seconds)
Exercise No. 2
— Jump squats (20 seconds)
Rest
(10 Seconds)
Exercise #3
— Jumping lunges (20 seconds)
Rest
(10 Seconds)
Exercise #4
— Lying arm and leg raises (20 seconds)
Rest
(10 Seconds)
Exercise #5
— Jumping up, knees to chest (20 seconds)
Rest
(10 Seconds)
Exercise #6
— Push-ups with clap (20 seconds)
Rest
(10 Seconds)
Exercise No. 7
— Change of legs in a jump (wide-narrow) (20 seconds)
Rest
(10 Seconds)
Exercise #8
— Rivet on the floor (knees touch chest) (20 seconds)
Over time, you can use dumbbells to increase the load. The more intensely you perform all the assigned exercises, the greater the effect you will achieve.
A popular element on the horizontal bar, performed largely through technique, is the kipping lift, also called the rivet. It is performed by swinging, swinging the legs and shoulders to fixate on straight arms over the bar. Despite the apparent simplicity of the element, most will need time to master the technique.
Before performing the exercise, do not forget about this - a mandatory condition before any training. Before riveting, you especially need to warm up your shoulder joints, lower back and hands.
Hyperextension crunches
This abdominal exercise uses the upper part of the abdomen. A formative exercise designed to develop strength and sharpen the shape of the abs. Recommended for advanced and more experienced athletes in the middle of an ab workout.
Exercise technique
1. Sit on the hyperextension so that your pelvis sits directly on the pads of the machine. Place your legs so that the roller rests on the bottom of your shins, in front of your toes. 2. In the starting position, the legs are straightened, the body is vertical. Hands can be held either along the body or behind the head. The head looks ahead. 3. Take a deep breath and, holding your breath, lower your body to a horizontal position. This position of the body “in weight” must be fixed throughout the approach. 4. Roll forward, rounding your back but not lifting your body. At the top point, the body still remains suspended, the lower back remains in a horizontal position. 5. You can exhale after overcoming the most difficult section of the amplitude. Then return your back, shoulders and head to the starting position. The body remains suspended. 6. At the lowest point, the body is elongated in one line. Hold in this position, take a breath and continue doing the exercise.
Technique tips
- At the lowest point of the exercise, your back can be bent slightly below hip level, but not significantly. This will help stretch your abdominal muscles more.
- At the same time, do not overdo it and arch your back too much. This significantly increases the likelihood of intervertebral disc injury.
- The pace of the exercise should be moderate or slow. By swinging on the exercise machine due to inertia, you risk injuring your spine.
- If you want to focus on the upper abdominal muscles in the exercise, you must definitely round your back and leave your lower back in a horizontal position.
- If you want to focus the exercise on the lower abdominal muscles, you do not need to round your back, and at the top point your torso should be in a vertical position.
- If you want to pump up your upper abs and at the same time lift your body completely, know that you are doing the exercise incorrectly. The same goes for the opposite.
- In the starting position, the pelvis should “sit” on the bench. By pushing the pelvis beyond its limits, the thigh muscles will take the load and the effectiveness of the exercise will decrease.
- To achieve maximum contraction of the abdominal muscles, at the top point, take a short pause for 1-2 seconds and tighten your abdominal muscles as much as possible.
- You can make the exercise more difficult by varying the position of your arms: crossed over your chest, extended above your head, or holding your waist.
- For more advanced athletes, it is recommended to use additional weights that can be held on the chest, behind the head, or on outstretched arms.
- At the same time, keep in mind that too much weight will force the thigh muscles to work and will take the load off the abs, which will only reduce the effect of the exercise.
- Also keep in mind that additional weight forces you to arch your back even more at the bottom, which significantly increases the risk of spinal injury.
- Hyperextension is primarily a lumbar extension machine. Therefore, only advanced athletes should perform abdominal exercises.
Beautiful belly
For girls, lower abdominal exercises should not include heavy approaches. The female figure does not need a six-pack or high strength. In addition, it can negatively affect reproductive function. Therefore, they need a flat and firm stomach.
To maintain abdominal tone and get rid of fat folds, you need to do active aerobic exercises.
Thanks to their regular implementation, energy consumption increases, burning excess calories, the cardiovascular system is strengthened and metabolism is normalized.
It is advisable to pay attention to the following exercises:
- Bike. Lying on your back, alternately reach your elbow towards the opposite knee.
- Scissors. Raising your legs off the floor, begin to make small, versatile swings up and down. The exercise can be modified by performing horizontal movements.
- Hold. Raising your legs to an angle of 30 degrees, try to hold them in this position with your lower abdominal muscles for a minute.
Bench crunches
This exercise for the abs involves the upper part of the abdomen, as well as the rectus femoris muscle. A formative exercise, used to develop strength and sharpen the shape of the abs. Recommended for advanced and more experienced athletes in the middle of an ab workout.
Exercise technique
1. Set the inclination angle of the press bench to 40 degrees relative to the horizontal. Sit on the bench, put your feet behind the bolsters and lie down. 2. In the starting position, your back, shoulders and head lie on the bench. Hands are crossed on the chest or clasped behind the head. 3. Inhale and hold your breath and twist your back. At the top point, the body should be perpendicular to the bench, but not vertical. 4. You can exhale after overcoming the most difficult section of the amplitude. Do not linger at the top point, and slowly return down. 5. At the lowest point, the body should remain suspended. There is no need to lie down on the bench. In this position, inhale and continue the exercise.
Technique tips
- If you are just starting to learn this exercise, start with small inclination angles and then, with experience, move on to more complex angles.
- It is recommended only for experienced athletes to increase the inclination angle above 45 degrees, since this angle significantly increases the flow of blood to the head.
- Fixing the legs in this exercise involves the thigh muscles, but you should not be afraid of this, as it increases the stability of the body and focuses the load on the abs.
- If you want to focus on the upper abdominal muscles in the exercise, you must definitely round your back and leave your lower back motionless.
- If you want to focus the exercise on the lower abdominal muscles, you don’t need to round your back, but your torso should be straight at the top.
- However, remember that this exercise uses the entire abs. The position of the back only allows you to shift the emphasis of the load to the upper or lower section.
- Holding your breath during the exercise allows you to maintain a fixed position of the spine and develop significantly greater force.
- While holding your hands behind your head, under no circumstances pull yourself up with your hands. This will cause you to flex your neck and increase your risk of cervical spine injury.
- To achieve maximum contraction of the abdominal muscles, at the top point, take a short pause for 1-2 seconds and tighten your abdominal muscles as much as possible.
- A variation of the exercise is possible, in which at the lowest point you lie down and straighten your back and shoulders. This embodiment is considered lightweight.
- You can complicate the exercise with various variations of the position of the hands: crossed on the chest, clasped behind the head, extended above the head or aimed at the knees.
- For more advanced athletes, it is recommended to use additional weights that can be held on the chest, behind the head, or on outstretched arms.
Common mistakes and useful tips
To fully understand the principles of the horizontal bar riveting technique, it is important to find out what problems beginner athletes face. Possible reasons for failure:
- failure to warm up (a body unprepared for loads is unable to react correctly to the rivet, hence dislocations, falls, sprains);
- breathing problems (long delays, intermittency due to jerky movements disrupt breathing, as a result of which the body begins to receive less oxygen; you should breathe according to the standard pattern: ascent - inhale, descent - exhale);
- untimely raising of legs - premature or late;
- lack of rhythm, impetuosity of movements (each jerk takes an unacceptable amount of strength and causes an imbalanced load on the muscles);
- incorrectly selected horizontal bar (you should start from a low one);
- weakness of the preparatory push of the legs to perform the exercise;
- full straightening of the elbows (the exercise eliminates this position while lowering the body);
- shifting the emphasis from the arms and back muscles to the legs (ideally, lifting is carried out only by the upper extremities, and the lower ones do not participate in the process);
- muscle weakness.
Correct execution requires not only knowledge of the technique, but also minimal physical training. If a person has studied the theory, but is not able to not only pull himself up, but simply hang for a while, then he will not be able to perform a pull-up on the horizontal bar. Difficulties can also arise due to a complete misunderstanding of your body. Doing a bridge will help you learn about the characteristics and capabilities of your body. After mastering the exercise, you should move on to push-ups from the indicated position.
Riveting is an exercise that hones strength skills and flexibility. To perform correctly, it will require studying the principles, minimal physical preparation and pre-warming. By following these rules, the benefits of training are significantly increased and possible risks are reduced.
To avoid dislocations, falls or sprains, you should definitely warm up before performing the rivet. A common mistake for beginners is untimely raising of the legs (premature or late)
Ideally, lifting the body is carried out only by the upper limbs, but the legs do not participate in the process
Rivet lying down
This abdominal exercise works the lower part of the abdomen, as well as the obliques and rectus femoris. A formative exercise, used to develop strength and sharpen the shape of the abs. Recommended for everyone, from beginner to experienced athlete in the middle of an ab workout.
Exercise technique
1. Lie down on the floor and extend your arms along your torso. Raise your torso and legs so that your fulcrum is exclusively on the gluteal muscles. 2. In the starting position, the body is extended in one line, the torso and legs are suspended. The back is straight, the legs are slightly bent at the knees. The head looks at the toes. 3. Inhale and hold your breath, stretch your hands to your toes. At the top point of the amplitude, the hands should be as close to them as possible. 4. You can exhale after overcoming the most difficult section of the amplitude. Then immediately, slowly, return your back and legs to their original position. 5. At the bottom point, the torso and legs still remain suspended. Without delay, immediately inhale and continue the exercise.
Technique tips
- At the lowest point of the amplitude, do not lie with your whole body on the floor. Also, do not place your body or legs on the floor separately, as this will immediately remove the load from the abdominal muscles.
- At the top point of the amplitude, try not to bend your knees. From the starting position, reach for your toes exclusively by lifting your back and legs together.
- To achieve maximum contraction of the abdominal muscles, try to fold as much as possible, literally until the moment when you can touch your toes with your toes.
- To achieve maximum contraction of the abdominal muscles, at the top point, take a short pause for 1-2 seconds and tighten your abdominal muscles as much as possible.
- Throughout the entire approach, keep your fulcrum exclusively on the gluteal muscles. Do not place your center of gravity on your lower back, as this can lead to injury.
- Fix the position of your legs for the entire approach and do not turn them. Excessive leg movements will bend the spine, which can injure the intervertebral discs.
- Holding your breath allows you to stabilize your body position on the bench and develop a much more powerful force while lifting your legs.
- You can make the exercise more difficult by wearing weights on your ankles. But since this variation shifts the center of gravity towards the legs, it is recommended only for experienced athletes.
Riveting presses
Based on the type of energy used, riveting presses are divided into pneumatic lever, pneumatic, hydraulic and pneumohydraulic.
The principle of operation of the riveting press is to press the rivet rod between two dies, one of which (fixed in the bracket) is a support, and the other, movable, acts as a crimp. Unlike pneumatic riveting hammers, which act on the rivet with frequent, sharp blows of low force, on riveting machines and presses the rivet head is upset and shaped with a smooth movement, gradually developing pressure of significant force.
Based on the nature of the installation, riveting presses are divided into two types: stationary and portable. Stationary riveting presses are installed and fixed motionlessly on a special foundation. Portable riveting presses can be suspended on a portal, cantilever or special riveting crane in three positions: top, bottom and side.
Riveting presses are characterized by the dimensions of the reach and jaw of the staple. The reach of the bracket determines the maximum possible distance of the rivet seam from the edge of the parts being riveted. The jaw of the bracket determines the possibility of installation and ease of supply during riveting of parts with protrusions. Riveting presses are manufactured for both single and group riveting.
In Fig. 116 shows the KP-204M pneumatic lever press, designed for single riveting of parts with steel rivets (steel 15) with a diameter of up to 5 mm and rivets made of aluminum alloys (duralumin D1, D6) with a diameter of 6 mm.
Rice. 116. Pneumatic lever stationary press KP-204M for single riveting
The main components of the KP-204M pneumatic lever press are: power unit 1, bracket 2, stand 8, portable housing 9, control pedal, filter 12 with automatic oiler 11. The power unit consists of two main parts: an air distribution device and a lever system. The air distribution device allows compressed air to be supplied in a certain sequence to various chambers of pneumatic cylinders to ensure working and return strokes with automatic switching. By means of a lever system, a force is created on the plunger sufficient to rivet rivets of the specified sizes. The force developed by the press plunger at a compressed air pressure of 5 kg/cm2 is 5000 kg.
Compressed air enters from the air line to the automatic oiler 11 and, passing through the filter 12, is cleaned of the impurities present in it, which are removed from the filter through the drain valve located at the bottom of the filter.
The press is set up for riveting parts of various thicknesses, as well as for riveting parts with rivets of a different diameter by axial movement of the stop 5, carried out by the handle 7. To avoid accidental rotation of the stop during operation, the latter is locked with a lock nut 6. The crimps 3 and 4 used when riveting on the press must ensure that the closing head of the rivet is of the correct shape and that the parts being riveted are compressed. The press is put into operation by pressing the foot on the control pedal 10.
Thanks to the large reach and jaw of the staple, parts of various sizes can be riveted on the press. The bracket and pedestal of this press are made in such a way that the first relative to the second can occupy different positions. For the convenience of riveting flat parts of large dimensions, the press bracket can be placed vertically, and then the plunger will move in a horizontal plane. If it is necessary to perform riveting with pre-set rivets, the bracket is installed in a position in which the power head will be located at the bottom of the bracket, and the plunger will move from bottom to top.
For single riveting, hand-held, portable pneumatic presses are widely used. In Fig. 117 shows a manual pneumatic press PRP5-2. It consists of a pneumatic cylinder and a wedge mechanism that converts the movement of the piston into the working movement of the crimpers. This press is used to rivet parts with a total thickness of up to 4 mm using steel rivets with a maximum diameter of 4 mm from 5 mm duralumin. Bracket extension 30 mm. The greatest force developed by the press is 4000 kg. Air consumption per rivet is 0.006 m3. Press weight 6 kg. The press allows you to perform work in hard-to-reach places, its productivity is five times higher compared to pneumatic hammers.
Rice. 117. Manual portable pneumatic press PRP5-2 for single riveting
Group riveting is performed on riveting presses KP-403, KP-405, KP-501M, etc. In Fig.
118, and shows the semi-automatic press KP-403M, designed for group riveting of parts with rivets made of steel 15 with a diameter of up to 8 mm and duralumin rivets with a diameter of up to 10 mm. In table 25 indicates the number of simultaneously riveted rivets on this press. Table 25. Number of simultaneously riveted rivets on the KP-403M press
| Rivet material | Number of rivets per rivet diameter, mm | ||||||
| 3 | 3,5 | 4 | 5 | 6 | 8 | 10 | |
| Steel 15A | 9 | 8 | 4 | 3 | 2 | 1 | — |
| Steel 20GA | 4 | 4 | 2 | 1 | 1 | — | — |
| Duralumin | 12 | 9 | 6 | 4 | 3 | 1 | 1 |
The press is controlled by a portable foot trigger. The semi-automatic working cycle of the press occurs in the following sequence: the upper die (Fig. 118.6) lowers until it comes into contact with the parts to be riveted and stops, then the lower die quickly approaches the parts, compresses the parts, forms closing rivet heads, and the lower die moves away from the parts to be riveted and the upper die moving away from the parts being riveted.
Rice. 118. Semi-automatic press KP-403M for group riveting: a - general view of the press, b - stamp for group riveting
The press cycle can be stopped at any point by removing your foot from the pedal. When the pedal is turned on again, the cycle will continue.
The number of double strokes per minute is from 6 to 20. The press bracket has a reach of 750 mm and a mouth of 1010 mm. The maximum working stroke of the plunger is 16 mm. The mechanism for obtaining a given height of the closing head of the rivet ensures a constant height of the head, regardless of pressure fluctuations in the air network. When working on this press, various supporting devices are used. The maximum force developed by the press at a compressed air pressure of 5 kg/cm2 is 12,000/kg.
Oblique crunches
This abdominal exercise works the obliques. A formative exercise, used to shape the waist and strengthen the abdominal muscles. Recommended for advanced and more experienced athletes to complete their abdominal workout.
Exercise technique
1. Lie on the floor and bend your knees. Turn onto your side so that one knee faces the ceiling and the other touches the floor. Cross your arms behind your head. 2. Inhale, holding your breath and without lifting your lower back from the floor, round your back, raising your head and shoulder blades as high as possible in the direction of the “vertical” knee. At the top point the head looks forward. 3. You can exhale after overcoming the most difficult section of the amplitude. Then immediately, slowly return to the starting position and straighten your back. 4. At the lowest point of the exercise, the back is straight, the shoulder blades are straightened, the elbows are spread to the sides. Inhale and continue the exercise. 5. Once you complete the required number of repetitions on one side, turn to the other side and immediately perform the same steps on the other side.
Technique tips
- Don't try to lift your head and shoulders off the floor too much. In a position where the spine is twisted, you can injure the spinal discs.
- If the flexibility of the hip joint does not allow you to keep your pelvis rotated 90 degrees, refrain from this exercise.
- Holding your breath during the exercise will stabilize the spine and allow you to develop more powerful force while lifting your shoulders.
- Flexion of the body occurs exclusively in the thoracic region. The lower back always remains on the floor. By lifting your back, you take the stress off your oblique muscles.
- Keep your head straight throughout the entire approach. Do not turn or tilt it to the sides. This further twists and loads the spine.
- During the exercise, do not pull yourself up by your neck under any circumstances. By bending your neck, you overload the cervical spine.
- To achieve maximum contraction of the abdominal muscles, at the top point, take a short pause for 1-2 seconds and tighten your abdominal muscles as much as possible.
Knee crunches in the simulator
This exercise for the abdominal muscles uses the upper part of the abdominal muscles and the oblique muscles of the abdomen. The exercise is isolating and is used to form the volume of the upper abs. Recommended for advanced and more experienced athletes to complete their abdominal workout.
Exercise technique
1. Set the required weight on the machine. Attach a rope handle to the cable of the upper block, grab it with a parallel grip and lower yourself to your knees. 2. In the starting position, the back is straight, the angle at the knees is about 45 degrees and is fixed. Hands hold the rope in front of you or on your collarbones. The head looks straight. 3. Inhale and hold your breath, bend over, rounding your back. At the bottom, try to pull your elbows as close to your knees as possible. 4. You can exhale after overcoming the most difficult section of the amplitude. At the top point, the back and shoulders are straightened, the cable is in a tense position. 5. You shouldn’t linger at the top point. As soon as you rise to the starting position, inhale and continue the exercise.
Technique tips
- Throughout the entire approach, the hips, arms and shoulders should be fixed motionless. As soon as you start bending them, the load on your abs decreases.
- The main task in this exercise is to round your back. By bending down with a straight back, you significantly reduce the effectiveness of the exercise.
- Perform the exercise at a moderate pace. Sudden movements or swaying of the body will also significantly reduce the effectiveness of the exercise.
- Choose the right weight for the exercise. It must be sufficient to provide significant resistance to torsion of the housing.
- At the same time, excessive weight in the exercise is undesirable. It will prevent you from bending low enough and will force your knees to leave the floor.
- Start learning this exercise with light weights. Then, over time, honing your technique, gradually build them up.
- Another feature of the exercise is that it is formative, and the large number of repetitions plays a decisive role in it.
- At the top, do not arch your back too much. This significantly increases the risk of intervertebral disc injury.
- To achieve maximum contraction of the abdominal muscles, at the top point, take a short pause for 1-2 seconds and tighten your abdominal muscles as much as possible.
- A variation of the exercise is possible with an emphasis on the oblique abdominal muscles. In this case, it is necessary to move the left elbow to the right knee and vice versa while moving to the bottom point.
How to learn to do pull-ups
Before you learn how to do pull-ups, take into account that you need to exercise regularly, otherwise you won’t be able to train the desired muscle group and lose weight! A beginner will need to use auxiliary equipment in the form of a chair or a small ladder. The essence of the method is that a beginner needs to secure himself on the crossbar, as if he had already pulled himself up, and then slowly lower himself down. To begin with, you need to do at least 5-7 such repetitions. The next two approaches need to be reduced by 1 and 2 times.
Another way involves the help of a partner. To begin, hang on the crossbar/horizontal bar, after which your partner should help you with the exercise. The main difference between such negative repetitions and ordinary ones is that you go down on your own, and go up only with the help of a partner. Many beginners make the huge mistake of completely relying on the strength of their assistant.
Plank
This exercise for the abdominal muscles involves the rectus abdominis, oblique and transverse abdominal muscles, as well as many stabilizer muscles. The formative exercise is used for isometric work of the abdominal muscles by everyone, from beginner to master, at the end of the abdominal workout.
Exercise technique
1. Get down on the floor and take a lying position. 2. In the starting position, the body is extended in one line. The legs are straightened, the back is straight, the head looks ahead. Support on your palms or elbows, shoulder-width apart. 3. Maintaining a stable position of the whole body, you need to hold out for a given period of time.
Technique tips
- In the starting position, maintain the natural curve of the spine. Don't lower your pelvis to the floor or hunch your back. Keep your body extended in one line until the end of the approach.
- There is no need to hold your breath while performing the exercise. Breathe calmly and measuredly, inhaling deeply and exhaling naturally.
- Depending on your fitness level, start doing planks for a time period of 10 seconds, gradually increasing the hold time to 1 minute or more.
- Start learning the exercise with the simplest classic plank, which excludes any movements of the body, arms or legs.
- As you progress, complicate the exercise with different placements of your arms and legs. For example, standing on one hand, or on one leg.
- In the future, you can further complicate the exercise by adding pelvic lifts, body turns, lateral emphasis on the elbow, alternately bringing the knees to the stomach and more.
- Holding various types of planks at intervals of 10 seconds for at least 1 minute will significantly complicate the exercise and significantly increase its effectiveness.
- You can also complicate the exercise by asking your partner to place a barbell disc on his back. After standing like this for a minute, your partner removes the disc, and you stand for another minute.
- The hardest option is to do planks in your ab workout between sets instead of resting. This way you will alternate dynamic loads with isometric ones.
- The plank is well suited as a final exercise in abdominal training, and as an independent exercise for literally every day.
What are the features of exercises for the lower abs?
Fitness is not a new movement and for over a hundred years men and women have been using exercise to develop their muscles. This results in a lot of information and notes about the lessons.
There are several hundred different programs, which, depending on the goal pursued, differ in large and small details.
Almost every muscle group has special characteristics that need to be adjusted to achieve the best results.
The abdominal muscles have some features that can be used to save strength and training time.
Before pumping up your lower abs, it is advisable to decide on the purpose of the exercise. It can be a harmoniously developed belly, a shield strong as steel, or a relief and aesthetic appearance.
The training process is created based on the desired fruits that the training should bring.
Afterword
The purpose of this article was to review and describe a set of exercises for the press. The set goal can be considered fully achieved, since we have presented perhaps the most effective exercises for the press in the gym. Of course, training the abdominal muscles is not limited to these exercises, because the use of various approaches to training and all kinds of equipment significantly expands the arsenal of exercises. However, the exercises we have proposed for developing the abdominal muscles are exactly the basis, or rather the foundation on which you can build almost any training program, regardless of your goals. And finally, remember that the rectus abdominis muscle always works fully. The upper or lower abs are not separate muscles, but only parts of one large rectus abdominis muscle.
The benefits of pumping up the press
“Pumping up your abs” doesn’t just mean acquiring a beautiful, sexy appearance. A toned male belly, protected by a relief corset of powerful muscles, is an indicator of health.
The development of abdominal muscles activates blood circulation in the gastrointestinal tract, accelerating metabolism.
Intestinal motility and the functioning of all internal organs are normalized. Immunity increases.
Hormonal levels stabilize. Systematic loads in the gastrointestinal tract promote the production of testosterone.
A developed abdominal press supports and relieves stress on the spine.
Often it is a powerful press that helps to avoid serious injuries to the spine during physical overload or accidents.
Therefore, the question of how to pump up abs for a man is, first of all, a matter of health.