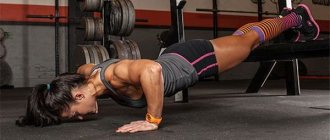
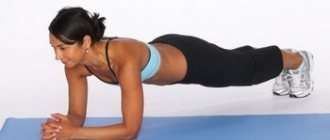
The handstand is just a spectacular trick
Many may think that the point of handstands comes down solely to demonstrating good physical shape, as well as the desire to impress others. But in fact, both guys and girls will benefit from this exercise in the following ways:
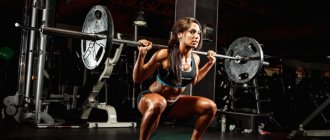
- gives a good load on the muscles of the body, toning them;
- develops strength in the shoulder girdle, arms and body;
- improves coordination, sense of balance, teaches you to control your body;
- improves blood circulation in the head, saturating the brain with oxygen.
As you can see, the ability to stand on your hands allows you to develop muscle strength, learn to feel them, and also improve your ability to maintain balance. Therefore, standing is not only a spectacular trick, but also a useful skill.
Exercises for stretching your arms.
Stretching the arm muscles, like stretching the upper body, is very useful for improving posture, increasing blood circulation and preventing stiffness. After all, a person looks very stooped if his shoulder muscles are weak. We present to you a set of exercises for stretching the arm muscles.
Exercise 1. Starting position: stand straight, feet shoulder-width apart, arms raised palm to palm. Performing the exercise: stretch upward, pointing your fingers also upward. Hold at the maximum point, rocking back and forth.
Exercise 2. Starting position: stand straight, arms raised above your head, grab your left elbow with your right hand. Performing the exercise: apply slight pressure with your right hand to your left and place your elbow behind your head. You should feel a slight stretch in the deltoid and triceps muscles. Repeat the same with the other hand.
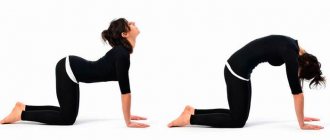
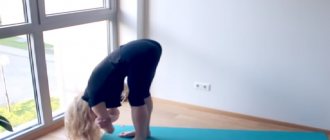
Exercise 3. Starting position: kneel down. Performing the exercise: you need to lean forward and touch the floor with your hands. Then, pressing your palms to the floor, move back. This shoulder and arm stretch is also a great upper back workout.
Exercise 4. Starting position: stand straight, bend your knees slightly. Performing the exercise: With your right hand, grab the outer surface of your left arm just above the elbow. Move your left hand to the side, overcoming the resistance of your right hand. Hold your hand like this for 3-4 seconds, then relax for a couple of seconds. Now gently pull your left hand towards your right shoulder until you feel a pleasant stretch in the outer shoulder and right half of the shoulder girdle. Hold for 10 seconds, then repeat the exercise for the other hand.
Exercise 5. Starting position: stand straight, feet shoulder-width apart, arms raised up. Performing the exercise: clasp your hands so that your thumbs point forward and stretch upward, arching your back slightly back.
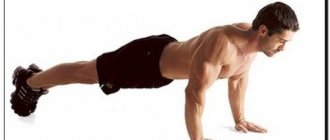
How to train at home: training exercises
Of course, such a skill cannot be mastered in 5 minutes - some skill is required. It can be developed with the help of special preparatory exercises, which you need to learn to do perfectly before attempting a handstand.
Let's see what exercises are needed. And we will start with developing stability or maintaining a sense of balance in space. The complex is built from simple to complex. Having mastered the first exercise, you can proceed to the next one and at the end an amazing result awaits you. Believe me!
Shoulder stretching exercises.
We recommend that you perform shoulder muscle stretches after a full strength training session on the shoulder girdle. Make sure that all exercises for stretching the shoulder girdle are performed correctly and accurately. At the maximum point, you must linger for at least 10 seconds, gradually increasing this figure to 1 minute.
Exercise 1. Starting position: stand straight, feet shoulder-width apart. Performing the exercise: This is a popular upper body stretch called the lock. You need to bend both arms at the elbow, place one behind your back, and the other behind your head. Your task is to join your hands in a lock.
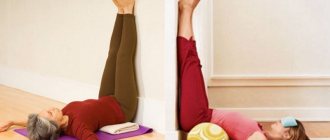
Exercise 2. Starting position: sit on the floor, clasp your hands behind your back and lower them to the floor. Performing the exercise: stretch your legs forward so that the muscles of the shoulder joint stretch.
Exercises 3: Starting position: stand straight, bend one arm at the elbow and place it behind your back, your hand should be on your lower back. Performing the exercise: with the other hand, supporting the elbow, pull the first hand forward. In this case, you can turn the body in the other direction. Repeat the same with the other hand.
Exercise 4. Starting position: stand straight and bend your elbows, raising your arms to chest level perpendicular to the floor. Performing the exercise: place your left elbow on the front surface of the upper part of your right arm near the elbow joint and move your left hand back to the left, and your right hand back to the right. In this way, the palms will be facing each other, and the thumb of the left hand will be connected to the little finger of the right hand. Stay in this position for as long as possible and repeat the same with the other hand.
Exercise 5: Starting position: stand straight, feet shoulder-width apart. Performing the exercise: place one hand behind your back, and with the other, fix your first hand on your elbow. Now try to place your hand behind your back as much as possible, putting pressure on it. Repeat the same with the other hand.
Managing the energy flow
It is better not to treat complex diseases, especially acute ones. For example:
- heart attacks,
- strokes,
- appendicitis.
You can only make the situation worse. But it’s not difficult to calm headaches, toothaches, joint pains, or cure burns.
Healing with God's Help
First you need to learn to concentrate energy in your hands - in the center of your palm and at your fingertips. Visualize the flow of your energy from the top of your head into your head, then into your throat, then imagine that it moves to your hands and fills them. Feel how they get heavier.
Focus on this feeling for a couple of minutes, shake your brushes. Then imagine the same flow, but coming from below, from your feet to your stomach, hips, chest, and then to your arms.
Repeat both exercises five times, whisper before each one:
“I will give all the strength to my hands, I will set myself up for a good deed. May they deliver God's servant (name) from pain! So!"
Practice this exercise before each healing session. It is very important that your energy is clean. For at least three days, endure a non-strict fast, and on the day of treatment, do not let envy enter your soul, do not judge anyone, be grateful to life for everything.
With this method, the healer gives away his energy.
Healing using the Reiki method (help from the Cosmos)
But there is another one - the Japanese system of “reiki”, which means “life force energy of the universe”. The healer here is just a conductor of the energy of the Cosmos.
This is a complex method. But you can ask for help from the Cosmos before you begin treatment. Imagine that a hollow pipe comes out of the top of your head and disappears into the sky.
The visualization is this: energy comes from the Universe into this pipe, which then seeps into your head, throat, shoulders and arms. At the same time say:
“The energy of the stars, the Sun and the Moon gives me. Universe, charge!”
Accounting for results.
To do this, I created the following sign in my Bullet Journal:
I celebrated and was inspired every day. I think if you don’t keep a diary, it would be useful to hang something like this on the refrigerator.
My progress.
But, as I noted above, flexibility changes greatly during the day, depending on many factors, and for me it is certainly higher in the evening. Therefore, there was an option to mark the best result achieved during the day or the result obtained at some more or less stable control point. The idea with the best result seemed to me less stable, less reflective of the general trend. A good warm-up, stretching, myofascial release (I didn’t write about this because I actually did it only a couple of times), high ambient temperature can lead to a good result. But potentially disposable.
Therefore, I noted the result achieved in the day's approach on the second attempt. In the evening, it could have been better.
Depression, or There and Back Again
Reach the floor with your hands. The final. Personal experience.
“Work takes up all the time allotted for it.” And this is good. It’s good that I didn’t set myself the goal of reaching the floor with my hands in, say, 5 days. This would be quite possible, but I would hardly be able to understand anything about myself and my body in such a period of time; Yes, and I could simply get injured.
So what did I want to achieve (besides gender? :))) Here's what I wrote in my diary:
Reach the floor with your hands. For what?
- This is interesting. There is a challenge in this. And this will help me do uninteresting morning exercises. (Helped)
- I want to learn to feel my body. Understand its capabilities. Manage it. Seeing how it changes can be a lot of joy. (Understanding is still a long way off. But I have taken a big step in this direction)
- This will allow me to improve my athletic performance (there are still few statistics, but there are some results. Plus, stretching won’t hurt in any sport)
- Should I take the GTO test? That would be cool! (At the same time, I’ll cover the gestalt - in the second grade I was given a silver GTO badge. And for some - gold! And if I remember this, it’s not because I have a good memory...)
- Depression is also a bodily reaction to life. Stiffness in the lower back, in particular, is said to indicate low self-esteem, guilt, shame, etc. depressing things. (I am absolutely sure that emotions and experiences affect the body. But the fact that low self-esteem, for example, is the lower back, and fear causes tension in the neck, is not so much.)
- Hmm. I prefer not to sit on a chair, but rather recline. It just happens that way. I think it's not very beautiful and not very beneficial for the spine. (the ability to reach the floor with your hands in itself did not affect this)
Reach the floor with your hands. Day 14.
There is progress. And - significant. Although the speed of approaching the target expectedly slowed down.
There are 4 centimeters left and I am sure that I will pass them. Especially if I’m not in a hurry and try to do it right now. (physically this is possible, but in stretching, I think it’s unsafe to rush)
Success fuels motivation. This 30-day stretching challenge comes naturally without requiring any willpower on my part. Moreover, it seems that he does not consume the volitional resource, and sharing it - the morning exercises, which I did through force (and every other time), have now become more meaningful and collected.
But the point, I think, is not the success of the first days. I realized that the experience of this project, in general, reminds me of a journey. Hike.
Anticipation, expectation, some (joyful) troubles and trials. And also because on a good journey you find, first of all, yourself...
Reach the floor with your hands. Day five.
The reasons why someone cannot reach the floor with their hands have long been known. Physiotherapists have already sorted everything out, put everything into beautiful tables and prepared schemes for self-testing. I found several such diagrams (in English) and was looking forward to figuring out exactly I couldn’t reach my toes.
I was getting ready to understand what I was missing, what my limitations were, what exercises I needed to do in my case. I waited, with a ruler in my hand, step by step, to explore, mark, perform testing exercises in order to get to the bottom of some secret truth...
I got to the bottom of it. Reality hit me on the nose once again - the very first test showed that I had no need (at least for now) to find out where my “bottleneck” place was - I just had to stupidly try to reach the floor with my hands, three times a day, 10 times.
Well, it’s as if life is once again telling me: “Act!” Just do it - that's the best strategy.
And I “just do it.” The result of the fifth day is 8 cm left to the floor. (the result of the first one was more than 20)
Reaching Your Toes Tracker in Bullet Journal
Reach your toes. The first day.
I'm used to thinking of myself as inflexible.
I have never been one - I didn’t know how to sit cross-legged, especially in a lotus, I couldn’t reach my toes - neither standing, nor sitting, in any way. Even at school, when the mustachioed physical education teacher said during warm-ups that loss of flexibility is the first sign of approaching old age, I only bent my knees or spread my legs wider.
I've long convinced myself that I can't do this - by comparing myself to others, studying the theory of the issue (thin and tall people are statistically less flexible) and observing how every year it becomes more and more difficult to cut my toenails.
Not given... My mind knows this very well. And I know what a arrogant liar he can be sometimes.
Banishing pain from the body
Wash your hands before the session. Rub your palms together until warm, do exercises to concentrate your energy. Let the patient take a position that is comfortable for him, but allows you to contact the affected organ.
There are two ways to heal. Let's look at both.
Method of healing with hands No. 1
Place your palms at a distance of 10 cm from the sore spot. Feel how the active hand emits a stream of energy directly into the patient's body. Imagine that the sore area is filled with blue or golden light emanating from your palm.
Place your other hand on the opposite side of the sore spot; it will retain healing energy in the body. Gradually, the palms can be brought closer to the body at a distance of up to 2 cm, then moved away again. The session lasts 10 minutes.
Then you need to lower the brushes and make shaking movements. Imagine that the negativity flying from your hands falls into a blazing fire - negative energy does not accumulate in the room, but “burns out”.
Healing with hands, method No. 2
Imagine that the energy of your hands, like a magnet, draws pain from the affected area. All this is done by the active palm, and the passive one “pushes” the pain on the other side. After 10 min. also shake off your brushes.
In both versions, during this movement you need to say:
“May the servant of God (name) be healed - all illnesses will be gone from him! Amen".
You can also treat yourself. Only you need to hold both palms over the sore spot: directly above the sore - the active one, and place the passive one on it. At the same time say: “From hands - light. From hands - love. I can do without doctors!” Wash your hands after treatment.