Regular yoga practice can greatly improve your flexibility and balance. The first is necessary for the beauty of the body, and the second is for control over it. A beautiful gait, confident movements, the ability to perform any exercise - all this gives a good sense of balance. Balance asanas from our selection will help you develop it.
Benefits of asanas for balance
The advantage of such exercises is that they are accessible even to an untrained practitioner, while in order to hold your body in arm balances, very good preparation is required. At the same time, balances allow you to use many deep muscles that are difficult to work with conventional exercises.
In addition, yoga aims to achieve balance between body and mind, internal emotional balance. Through the need to focus one's attention on the body and movements, the practitioner develops these aspects as well.
Balance asanas help:
- reduce or completely eliminate imbalances in muscle development and flexibility;
- improve concentration and attentiveness;
- calm the mind and clear it of vain thoughts;
- cope with negative emotions such as anger, impatience, and, in principle, reduce emotionality;
- improve posture;
- gain confidence in your abilities.
Balance poses cannot be held by someone who has chaos going on inside, so if you are faced with some difficulties, are under stress or cannot find yourself, then you should add a little more balance asanas to your practice.
In addition, in some cases, performing balance poses is not only recommended, but necessary. Such cases include various neurotic disorders, depression, multiple sclerosis, cerebral palsy, and recovery from a stroke. But, as you understand, this should be done only after a doctor’s prescription and with extreme caution.
Now let's proceed directly to the asanas.
Tree Pose (Vrikshasana)
For beginner yogis:
This asana is very often included at the beginning of practice, especially if the class is for beginners, since the position is simple enough that anyone without vestibular disorders can repeat it, but at the same time effective.
In this position, you should strive to stretch up as much as possible.
If you perform the asana regularly, then:
- you can strengthen your leg muscles;
- relieve pain in the legs due to flat feet;
- relieve arthritis pain.
Like other balance asanas, Vrikshasana is effective for people suffering from depression, it helps avoid relapse, brings emotional relief and relieves fatigue. You can practice in the evening after a hard day, this will help you fall asleep better.
However, it is not recommended to perform tree pose:
- if you have migraine attacks;
- with high or low blood pressure.
There are several options for performing this asana, some modifications simplify it, others complicate it.
Technique:
- Let's stand up straight. We begin all standing asanas with Tadasana, mountain pose.
- You need to take a stable position, straighten your whole body, calm your breathing.
- After this, bend your right leg at the knee and use your hand to comfortably place your foot on the inner thigh as close to the groin as possible.
- We try to turn the knee to the side, but it is important that the body does not turn after the leg. We look straight, the knee tends to go back.
- We are immediately considering another option: the foot can be placed on the front of the thigh, which will promote better opening of the pelvis and stretching of the ankle and the inner thigh of the right leg. However, if flexibility is poor, this option may not work.
Variation of the asana
- As soon as we were able to fix this position (at first you will most likely sway), we build the pose further.
- We try to minimize the deflection in the lower back, straighten the shoulders and move them back. We strive upward when someone pulls us by the top of our heads.
- As you inhale, you can stretch your arms to the sides, this will allow beginners to better maintain balance.
- If the sensations are comfortable, we fold our hands in Namaste in front of the chest.
We fold our arms in front of our chest if we can maintain balance.
- For more advanced practitioners, the arms can be extended above the head, also folded in Anjali Mudra (Namaste gesture). At the same time, it is important to keep your arms rigid and pull them up along with your whole body, but this does not concern your shoulders. We move our shoulders away from our ears so that no pressure is created and blood circulates normally to the brain.
- If the most difficult option is easy, close your eyes. This will make the asana more difficult.
- You can hold this position for a long time, we start from 20–30 seconds.
- Exhale, lower your arms and place your foot back on the floor.
- We do several breathing cycles and repeat on the second leg.
Video: Tree Pose
https://youtu.be/CJiTQto-F7Y
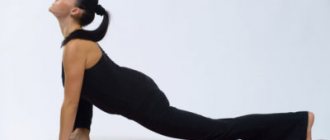
Warrior Poses: Maximum Difficulty
Virabhadrasana I
Virabhadrasana I in hatha yoga is also performed from Tadasana . You need to raise your arms up, and then clasp your palms above your head. The legs diverge by 120-130 cm, which from the outside resembles a classic lunge. The angle between the knee should be straight, and the right thigh should be parallel to the floor. The left foot can be slightly turned to the right. The face, chest and knee should be turned in the direction of the right foot. The head is thrown back and the gaze is directed upward.
Virabhadrasana I
Virabhadrasana II is very similar to variation I, but the arms are not raised upward, but are directed to the sides . From Tadasana you need to stand in a stance with your feet wider than your shoulders. Then turn your feet to the left and lower your left knee until your thigh is parallel to the floor. The body remains straight, but the gaze is directed behind the left hand - to the left. Palms face down. It is important to maintain a straight back, keep your stomach and buttocks toned.
Virabhadrasana III
Yoga also includes Virabhadrasana III, which is achieved from Virabhadrasana I. To perform the exercise, you need to lower your chest onto the thigh of your front leg so that your arms are parallel to the floor. Then gradually lift your left leg off the floor, transferring the weight to your right. The knee of the supporting leg must be slowly extended until the leg becomes straight. It is enough to hold the pose for 30 seconds. When performing warrior pose, you need to repeat the exercise on both sides.
Subtleties of Virabhadrasana
It is easier to maintain balance in the warrior pose if the weight is evenly distributed on the feet. Taking the third position, you can imagine how something stretches the body by the arms and leg, which is suspended. If lower back pain prevents you from performing the asana, then you need to practice the exercise in a lighter version, resting your hands on your knee or floor.
The warrior pose in any variation strengthens the muscles of the abdominal cavity and hips, helps to establish balance and make the lower back more resistant to stress. Joint mobility also develops, which is useful for those who are interested in different types of physical activity. Virabhadrasana strengthens the hamstring muscles and allows for faster recovery from joint injuries.
Eagle Pose (Garudasana)
The pose is named after the mythical half-human, half-bird Garuda. He had enormous power and could increase it. By practicing this asana, you will also notice how the circulation of energy in your body increases.
If shoulder pain occurs, you don’t have to intertwine your hands, but just put one on top of the other
In addition, this pose:
- strengthens the legs and thighs;
- works and improves the mobility of shoulder joints;
- perfectly develops a sense of balance;
- prevents the development of varicose veins;
- saturates the internal organs with blood, increasing the flow to them due to twisting;
- relieves the symptoms of radiculitis.
However, there are a few caveats:
- if you have had knee injuries, then it is better not to practice this pose;
- If you have problems in the lumbar region, you should perform Garudasana with caution.
The technique of the pose is quite simple, but twisting makes it more difficult to maintain balance.
Asana technique
Technique:
- Let's get into Tadasana.
- Bend your knees a little and intertwine your legs. First the left one ends up on top of the right one.
- We hook our left toes onto our right calf.
- Leave the supporting leg bent.
- When we manage to catch balance, we also intertwine our hands: we bend the right one at the elbow at a right angle, we intertwine it with the left one and join our palms.
- We try to stretch out in this position, pushing our elbows slightly upward, as far as the mobility of the shoulder joints allows. The lower abdomen is tightened.
- We stay in this position for 5–10 breathing cycles and slowly unravel first our arms, then our legs.
- You can compensate by bending backwards.
- We return to Tadasana, breathe 2-3 cycles and repeat on the other side.
Video: Eagle Pose
https://youtu.be/mCVvcyUYSmo
Three difficulty levels of Navasana
Navasana
Navasana is otherwise known as boat pose . To perform it, you need to sit with a straight back and grab your hamstrings with your hands. After this, while maintaining balance, you need to lift your feet off the floor and move your legs up so that your shins are parallel to the floor. Your arms should also be straightened next to your legs, stretching forward behind them. When it becomes easy to maintain this position, you need to lightly rest your hands on the floor and straighten your legs. It is important to ensure that the lower abdomen does not move away from the hips and that the back remains straight.
Navasana III
The third level of difficulty in Navasana involves straightening your arms until they are parallel to the floor . Balance should be maintained while performing the pose. Moreover, the support should be on the sit bones, and not the tailbone. Beginners may not raise their legs too high, but those whose body allows for a more difficult version should press their hips as much as possible into their lower abdomen, leaving their back perpendicular to the floor. After performing Navasana, you should relax your body in Sukhasana.
Crescent Moon Pose (Ardha Chandrasana)
Sometimes it is also called the crescent pose (ardha - half, chandra - moon). It not only improves balance, but also strengthens the muscles of the legs and core very well, and gives a strength effect, so it can be a little more difficult to practice than the previous two poses.
It is extremely important not only to stand on one leg, but also to maintain the correct position of the arms and legs
There are some variations of this asana such as Parivritta Ardhachandrasana (twisted crescent pose).
With regular practice you can note:
- improving the condition of the nerve connections of the lower spine;
- strengthening the muscles of the legs, knees, joints;
- significant improvement in coordination and concentration;
- normalization of the gastrointestinal tract;
- improved blood circulation in the legs.
However, for certain disorders, it is better not to practice this pose. Namely:
- headache;
- varicose veins;
- high blood pressure;
- diarrhea.
The first steps to correctly performing the asana with examples in the photo (using a wall, pouf):
For a beginner, this pose can cause some difficulties, so you can set it up near the wall as shown in the photo, this will make the practice much easier.
Start building up the asana near the wall, this will allow you to learn how to perform it correctly
If you can’t reach the floor, you can take a block or a stack of books and place your hand on it.
You can use improvised means if there is not enough stretching to place your hand on the floor
Technique:
- We start with mountain pose. While inhaling from this position, jump or step apart and spread your legs about a meter wide.
- We turn our feet to the right: the left one - a little so that it comfortably stands on the entire foot, and the right one we turn completely outward.
- We extend our arms in one line.
- Now we need to place our right hand on the floor or support. If the stretch is not enough, you can bend your right leg at the knee.
- We straighten our right leg and at the same time raise our left leg so that a right angle is formed.
- Now let's adjust the position. It is necessary that the arms are on the same line, the body is not skewed (the wall at first helps to correct this a lot), the arms and legs are rigid and tense.
- If you manage to keep your balance, turn your head to the left and look at your hand. If not, we direct our gaze to the floor.
- It is important that the weight does not transfer to the hand at all; it is only needed for balancing. The entire load falls on the supporting leg.
- Hold this position for at least 20 seconds, then slowly straighten and lower your leg.
- Repeat the same on the second side.
Video: Half Moon Pose
https://youtu.be/v9ZichF6ORw
Balances
Asana “Chair” - Utkatasana
One of the easiest balances in yoga is chair pose . While in Tadasana, you need to raise your arms above your head and then slowly lower your pelvis back, bending your knees. With your knees bent at an obtuse angle, your body should be tilted forward, reaching for your arms. This is the final part of the exercise, in which you need to stay for up to 40 seconds.
In general, yoga and balances develop a sense of balance, teach you to concentrate and relax even in poses that are uncomfortable for the body. In addition, performing balances on one leg develops muscles and helps strengthen the muscle corset. It is easiest to balance when your gaze is directed at a stationary point below. The most difficult option is to be in balance with your eyes closed. An intermediate step can be looking straight ahead.
Classic balances on one leg
Vrksasana 1
Vrikshasana, otherwise called tree pose in hatha yoga, has two variations . To perform the first, you need to take Tadasana and pull your leg bent at the knee towards your stomach. The supporting foot should point strictly forward, and the knee should remain straight. Grasping the knee of your working leg, you should maintain the pose for up to 30-40 seconds. Exercise has a beneficial effect on the knee joint, coordination and bowel function.
Vrikshasana 2
A more complex variation of Vrikshasana is performed from the same starting position . But now the working leg should be turned to the side and, lifting it up, pull the foot as close to the perineum as possible. If your leg slips off the inner thigh, you can support it with your hand. Otherwise, straight arms are raised up and palms are closed. The asana is performed on both sides. It is preferable to start with the leg that is worse at maintaining balance.
Complex balances on one leg
Utthita Hasta Padagushthasana 1
Utthita Hasta Padagushthasana begins with Tadasana . The right leg, as in Vrikshasana I, needs to be pulled towards you, clasping the big toe with your hands. As you exhale, you should gradually straighten your knee. The supporting leg should also remain straight. During execution, it is important to keep your abs tight and your back straight. But you should not round your lower back, so as not to harm your back. A detailed description of the pose allows you to perform it as correctly as possible.
Utthita Hasta Padagushthasana 2
Utthita Hasta Padagushthasana II is also performed, but before performing it, the hip joint should be opened . The leg is straightened not in front of you, but as far as possible to the side. If you can't maintain balance, you can straighten your opposite arm. If it is still difficult, then you can rest your foot against the wall, but you should raise your arms above your head. There is another problem in developing a pose - stretching does not allow you to straighten your leg. It is worth using straps, a towel to grab the foot, or hold the foot with both hands, but under the kneecap.
Balances on hands
To increase arm strength, you need to regularly perform push-ups. In hatha yoga, women often practice push-ups on their knees. After the strength of the hands is already sufficiently developed, you can begin asanas.
Bakasana - crane pose
Bakasana is known as crane pose . First you need to squat down and place your palms on the floor in front of you. Gradually shifting the weight of the body onto your arms, you should raise your pelvis, spread your knees to the sides and place your shins behind your shoulders. Then you need to carefully tear off one foot. When this becomes easy, it’s time to transfer the weight completely to your arms and lift both legs off the floor. The middle of the back needs to be pulled up, the pelvis behind the back, and the legs behind the pelvis. You can complicate the task if you try to straighten your arms at the elbows.
Chaturanga Dandasana
Chaturanga Dandasana is another easy arm balance variation that is worth doing to increase strength . The starting position is the well-known plank. Then the arms need to be bent so that the forearms are parallel to the floor and the whole body is a straight line. If it is difficult to maintain this position, the knees drop to the floor.
Extended Leg Pose I (Utthita Hasta Padangusthasana I)
This asana has two varieties, we will consider both.
Keep both legs and back straight
The pose helps:
- feel your body and muscles better;
- strengthen leg muscles;
- calm the nervous system, reduce emotionality;
- improve stretching.
However, this is not the easiest asana and you need to be careful if:
- have sprained or injured your ankles;
- lower back problems;
- sore knees.
For a beginner, using a gripping strap is ideal as this asana requires a good stretch.
- We start with mountain pose.
- As you exhale, bend your right leg at the knee and pull it towards you.
- We grab the big toe or hook the belt around the foot.
- With an inhalation, we straighten our leg and move our left arm to the side for balance.
- The right leg should be extended, while the body should remain straight.
- We hold this position, the extended leg is active, the kneecap is pulled up.
- If it works, you can try to raise your leg higher, but without losing the position.
- With a good stretch, we try to lean forward towards the right leg.
- Upon completion, we return the leg to the stomach, release it and place it on the floor.
- Repeat on the other side.
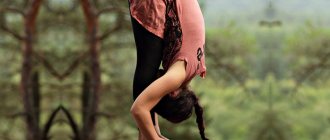
Headstand
Salamba Sirsasana
Salamba Shirshasana is performed in hatha yoga, but requires the presence of an instructor . You can also master it on your own, but only after long training and after achieving a high level of physical fitness. To begin with, you should kneel and elbows, clasping the latter with your hands. Then release your hands and interlace your fingers. Place your head on the floor and straighten your legs at the knees, resting only on your toes and elbows. Stretching your tailbone up, you need to bring your feet closer to your head, pressing your hips to your stomach.
When this position becomes easy, you can move on to the next stage - lift your legs off the floor and press them bent to your body. The shoulders go as far away from the head as possible, and the main emphasis is on the elbows. Over time, this stage also becomes more complicated - the legs can be straightened at the knees, pointing them upward. At first, it is enough to maintain this position for just a few breathing cycles. Over time, the headstand can be extended to 7-10 minutes. You can learn Salamba Shirshasana against a wall - this will greatly facilitate the process.
Extended Leg Pose II (Utthita Hasta Padangusthasana II)
We perform this asana from the previous position; it stretches the muscles of the inner thigh more. Also, performing this pose regularly will help improve the mobility of the hip joints.
Do not rotate your pelvis with your leg
To perform this, you can also use a strap, since in order to abduct the extended leg you need to have a very good stretch.
- We perform Utthita Hasta Padangusthasana I.
- We strengthen this position and, as we exhale, smoothly move our right leg to the right.
- If it is not possible to move it completely to the side, we remain in a comfortable position. The main thing is that the pelvis does not follow the leg, but remains directed forward.
- If you keep your balance comfortably, turn your head in the direction opposite to your foot.
It is worth performing these asanas together, one after another, for symmetrical and comprehensive development.
Video: Standing Extended Leg Pose I and II
https://youtu.be/JeWexoofYeg
https://youtu.be/hDW7F6iizo4