The order of movement of the arms and legs in this swimming style. How to breathe correctly. Useful exercises. Swimming front crawl is considered the fastest way to move through the water. This method has the largest number of competitive disciplines - distances of 50, 100, 200, 400 meters. In addition, there is 1.5 km for men and 800 meters for women. It is also a popular style in long distance marathon events.
Unfortunately, not all beginners are able to learn how to swim correctly. Learning occurs on the principle of “as it happens,” which leads to problems with speed and keeping the body afloat. What should the execution technique be? How to swim correctly to achieve the highest speed of movement through the water?
Swimming crawl technique
The crawl style swimming technique involves strokes with the arms along the body while simultaneously lowering the legs alternately. The front crawl swimming technique and the back crawl swimming technique have in common:
- swimmers lie on the surface of the water;
- the face or back of the head is immersed in water;
- arms and legs move alternately;
- the sweeping strokes of the arms resemble the work of the wings of a mill;
- leg movements imitate scissors;
- part of the hand movement takes place in the air, which reduces water resistance;
- inhalation is performed on the 3rd or 5th swing of the arms;
- The legs work at least 2 times more often than the arms.
The technique of swimming on the front crawl is more difficult than on the back, since the swimmer is forced to raise his head out of the water to inhale. For a beginner, the back crawl swimming technique is not difficult if he has learned to lie on his back with his legs and arms extended or spread out. The crawl style is a swimming technique, the training exercises for which are worked out to the smallest detail and allow you to achieve results.
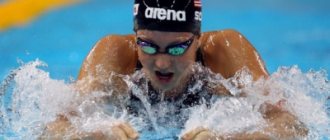
Photo 1. Front crawl swimming
The technique of crawl swimming on the stomach has a number of differences from swimming on the back, except for the position of the body. The crawl technique in both cases is similar, but has obvious differences.
- When swimming on the front, the starting speed comes from jumping from the bollard, and when swimming on the back, it comes from pushing off the wall of the pool with your legs.
- To breathe when swimming on your chest, you have to lift your head out of the water, and when swimming on your back, your mouth and nose are above the water.
- When swimming on your back, during the stroke, the arm is straight, not bent.
In addition to these basic ones, the methods have many technical differences that are taken into account during training.
Photo 2. Start from the stand at the competition
How to move your arms and legs correctly?
The quality of swimming technique largely depends on the work of the arms and legs. The hand movements are intuitive and easy for beginners to master. But you have to learn how to work your feet correctly.
You can't swim without using your legs. They help the body stay on the water and develop speed. Principles of leg movement:
- socks are always pulled out;
- when swimming crawl, leg movements should be sharp and fast;
- When swimming breaststroke, the footwork resembles the movements of a swimming frog; you can master them by swimming with a board.
Crawl swimming technique for beginners
To make it easier to master the freestyle swimming technique, beginners are offered a number of exercises that can be performed with and without special equipment. First, the exercises are done on land.
- With your legs apart at a distance equal to the width of your shoulders, move your arms, rotating them in a circle.
- From the same position, on the count of “two”, bend downwards with a turn of the body, reaching with your left hand to the right big toe, on “three” you straighten your back, after which you alternate between an arm and a leg.
- Sitting on a bench and leaning back, make a “scissors” movement with outstretched legs.
Photo 3. Cycle of movements for training
To learn crawl swimming techniques for beginners, you will need special clothing for swimmers - swimming caps, swimming trunks or one-piece swimsuits. The following techniques are practiced in water:
- swing and stroke with one arm with the other arm extended in front of the swimmer;
- performing an exercise when changing hands;
- swimming with swings of both hands alternately;
- performing speed exercises;
- practicing leg movements while holding hands on the edge of the pool;
- swimming with hands clenched into fists, rowing with the help of the forearm;
- exercise “three times three”, in which three strokes are performed in a row with each hand.
After studying individual movements, the crawl swimming technique as a whole begins to be developed.
Execution options
Before considering technology, it is worth understanding simple things. There is an opinion that crawl swimming and freestyle swimming are identical techniques. This is wrong. If we are talking about the 100-meter freestyle, then the athlete has the right to swim as he pleases. But everyone swims crawl, because it is considered the fastest.
In short, the swimming technique in this form consists of alternately changing the position of the arm and simultaneously moving the legs. At the same time, there are several options - 2, 4, 6-beat crawl . Each of them corresponds to two, four or six kicks, respectively. The option with two is popular when you need to sail long distances. This way the body gets tired more slowly. If we are talking about moving over short distances, then a six- and four-strike crawl is suitable here.
Teaching crawl swimming techniques
To practice the correct crawl swimming technique and bring the movements to automaticity, special equipment is used:
- swimming board,
- wide hand spatula,
- bun.
Children play catch using a board. One hand lies on the board, and the other performs the movement. When it “catches up” with the second hand, it begins to move, and the first one lies on the board.
Photo 4. Kolobashka
To teach crawl swimming techniques, a special device is used - a kolobaska. It is made from a buoyant material and is shaped to be pressed between the legs while practicing hand techniques so that the body lies horizontally on the water. The narrowing in the middle part of the bun with rounded edges does not fall out and does not injure the skin. With the help of a swimming board and a swing, the work of the legs and arms is improved.
The kolobaska is used to train the muscles of the upper body and improve swimming technique, transferring the main load to the arms, while the legs relax at the surface of the water. In this way, stability of body position and technique develops, and breathing rhythm improves. In addition to it, a rubber ring is used to tie the legs - so that when swimming there is no hint of kicking.
For those who forget to take their elbows out of the water, swimming with wide paddles that fit over the palms is recommended. They look like webbed plastic gloves, increase the area of the palms and contribute to the improvement and development of:
- strength,
- speed,
- front crawl swimming techniques.
Crawl is a swimming technique, exercises in which children and adults perform if they want to learn to swim profitably.
Where to begin?
To learn how to swim correctly, you should use the following tips:
- First, grab the water with one hand, and straighten the other and hold it in front of you. Imagine that your hands seem to be catching up with each other. Next, alternate limbs.
- When swimming in pairs, try to catch up with your partner, but maintain the required distance. In this case, speed is trained.
- The assistant supplies himself with a stopwatch and a whistle. Then the task is set to cover the maximum distance in ten seconds. The point is to try out different types of strokes and find one that suits you. Body position should change slightly. Having a partner is a big plus, because he will promptly check the equipment and show what mistakes were made.
- Don't forget the importance of dry land exercise. For example, a good movement is a mill.
Back crawl: swimming technique
The back crawl technique is used by professional swimmers and fans of speed swimming without immersing their face in the water. The start is carried out not from a stand, but from the water, after a push from the bottom of the reservoir or the wall of the pool.
The swimmer's body lies horizontally on the water with the head, which is immersed with the back of the head in the water, leaving only the face on the surface. The shoulders are raised, the ears are in the water, the chin is lowered towards the chest. A person moves thanks to alternate strokes of straightened arms and alternating movements of the legs from bottom to top and back.
After the end of the stroke, the hand is taken out of the water and carried back through the air, moving it along the body, immersed in the water and continuing to move.
Back crawl is a swimming technique in which it is important to regulate your breathing and coordinate it with other movements. The full cycle of movements includes:
- two hand strokes;
- one breath;
- one exhale;
- 6 leg movements.
The swimmer inhales while moving his arm, and exhales during the stroke of the same arm.
Photo 5. Back crawl
Hand movements have some features and a certain sequence:
- the straightened arm is turned with the palm outward;
- during immersion in water, the body rolls and the arm bends at the elbow joint;
- the hand moves back and goes down, initiating the sliding of the body due to repulsion from the water;
- the arm extends at the elbow and straightens with a sharp movement of the hand;
- the hand coming out of the water is accompanied by a roll to the other side;
- when reaching the surface, the palm is turned inward;
- in the process of transferring over the water, the arm is straight, and the hand turns outward to enter the water.
As one hand sweeps over the water, the other strokes.
The movement of the leg moves from the hip joint to the knee joint and to the ankle joint. The legs move rhythmically and alternately up and down and back. For a whip-like straightening, the leg is bent at the hip joint, extended at the knee and ankle, after which the foot is sharply thrown towards the surface, pushing off against the water. Proper leg movements when swimming on the back promote forward movement, increase speed and maintain a streamlined body.
They swim long distances with the crawl on their back, as it allows them to save energy when rescuing a drowning person, for relaxation and pleasure.
Hand work
Correct hand technique when swimming freestyle consists of the following phases:
- Capture or support phase;
- Pull-ups;
- Repulsions;
- Exit;
- Carrying;
- Influx.
Let's take a closer look at each of the phases of hand work.
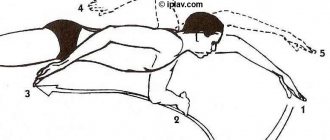
Capture phase or support phase
First of all, let's define the term “capture”. The grip is the moment of movement in which you cling to the water with your brush.
The capture phase is very short. It lasts from the moment the stroke begins until approximately the moment indicated in the photo below:
The hand in the grasping phase travels approximately 25-30 centimeters. Let's look at the sequence of movements and points to pay attention to:
- Starting position – the rowing hand lies on the water, representing a straight line of continuation of the body
- The beginning of the capture. The arm begins to bend at the elbow while grasping
- The hand remains level throughout the entire grip phase and does not bend in relation to the forearm.
- The elbow during the grip, when the forearm is already gripping, is kept as high as possible to the surface of the water
- When gripping, the hand passes close to the line of the middle of your body
During the grip phase, control of a straight hand is important. To strengthen your wrist, you can do the following exercise:
Pull-up phase
This phase of the stroke begins immediately after a few centimeters of arm movement in the catch phase.
It looks like this: imagine a swimmer lying horizontally in the water with his arms extended forward. Now this athlete begins to bend his arm at the elbow, but without bending the hand (the hand remains an even continuation of the forearm) and, very IMPORTANT , without lowering the elbow down or pressing it to the body. A small movement of the hand and forearm along the line of the middle of the body, turning into a bend of the arm with the shoulder. Let's look at the sequence of movements and the points that you need to pay attention to in the pull-up phase:
- Starting position - the rowing arm is bent 25-30 centimeters after the capture phase and is located on the line of the middle of the body
- The hand and forearm move along the line of the middle of the body towards the pelvis. The elbow remains higher than the hand
- The angle between the forearm and shoulder is 90 degrees.
Watch the video of the exercise for practicing the grip and pull-up phase with an expander and it will be easier for you to understand what exactly the points above are about (from the beginning to 36 seconds):
A couple of exercises to develop the technique of the pull-up phase.
Exercise with a rubber band expander (as in the video above)
- Attach the expander in front of you to a wall bars, or to a door handle, or to a tree. For anything in general.
- Pull back until you feel a moderate stretch.
- Lean forward so that your body is horizontal, as if you were swimming.
- Stretch your arm forward that holds the expander and imitate the grip phase. The expander creates additional resistance which helps the muscles remember the movement better. Video exercises:
Wall exercise
- Stand with your back to the wall
- Raise up the hand whose technique you will practice
- Press the elbow of this hand against the wall
- Perform the rowing motion without lifting your elbow from the wall
Repulsion phase
After pulling up, the hand continues its movement and strives for an even and parallel position relative to the body. What you should pay attention to when practicing:
- The hand is still level relative to the forearm
- The hand continues its movement along the line of the middle of the body
- In the final push-off phase, the arm is aligned at the elbow
A common mistake is to enter the swing phase early without completing the push-off phase. Only after the arm is fully straightened, when it is parallel to the body, can the push-off phase be considered complete.
In the Soviet Union, swimmers were specially smeared with brilliant green on their thighs. Those who correctly performed the push-off phase ran their hand along the thigh to emphasize the end of the movement. By the end of the training, proof of correct movement was the absence of green on the athletes’ thighs.
Video exercise for practicing the push-off phase with an expander:
Exit phase
The phase begins from the moment the hand appears above the water after the repulsion phase. The task of the exit phase is to prepare the hand for the carry.
The hand rises above the water from the elbow. First the elbow rises, and then the hand. At this time, the opposite arm lies extended and stretches forward in front of the body, which in turn creates a slight rotation of the body towards the outstretched arm. So, what to pay attention to:
- First the elbow comes out of the water, and then the hand
- At the moment the elbow comes out, the opposite hand is already reaching forward
- The body rotates towards the arm extended forward
Carrying
The sweep is performed at the same time as the other hand performs the stroke. This is a synchronized movement where the hand that carries out the sweep increases its speed from slow when the hand exits the water to fast at the moment of entry. The hand can be relaxed during the swing phase and does not need to be kept level with the forearm.
Key points of the carryover phase:
- Performed while the other hand is rowing
- The speed of the hand at the beginning of the stroke is lower than the speed of the hand at the end of the stroke
- The hand is relaxed until the hand enters the water
Rush phase
The influx occurs after the carry and before the capture begins. In this phase, the swimmer plunges the hand that completed the sweep into the water. First the hand goes in, then the elbow goes in. At the moment of immersion, the arm straightens, reaches forward, the hand tenses and becomes an extension of the forearm, preparing to begin the capture phase. At the same time, the opposite hand ends the push-off phase and the swimmer’s body performs a slight rotation towards the front hand.
Key points of the influx phase:
- First the hand enters the water, and then the elbow
- The hand reaches forward as far as possible after being completely immersed in water
- The hand tenses, becomes even in relation to the forearm
- The body makes a slight roll towards the front hand
A beginner who has mastered breathing and footwork techniques can begin to master hand techniques. If you are a beginner swimmer
Front crawl swimming technique
In the technique of swimming using the crawl method on the chest (stomach), coordination of breathing with the movements of the body, arms and legs is important, since raising the head out of the water if performed incorrectly slows down the speed of movement and interferes with breathing.
The body bends along the axis, and the shoulder rises at the moment of swinging the arm. The head turns to the side and the face appears above the surface to inhale through the mouth. Having your shoulder above the water at the moment of the stroke increases the strength of the stroke, making it easier to turn the head and move the arm. Carrying your arm through the air reduces water resistance compared to other forms of swimming. The position of the body with the face down enhances streamlining, reduces the load on the neck muscles, and makes it easier to turn the arm under water.
Photo 6. Hull sliding in water
The following phases are distinguished in the technique of crawl swimming on the stomach in the pool:
- start from the stand,
- gliding underwater up to 15 meters,
- floating on the surface
- repulsion from the opposite wall of the pool with a turn,
- sliding near the surface of the water with the help of legs,
- exit to the surface.
Since 1964, competitions have allowed a turn through a somersault, which is performed before touching the side with the legs thrown out to take off. This method allows you to make a turn faster, but it is dangerous and is recommended for professional athletes, and not for those amateurs who visit the pool in the off-season or winter.
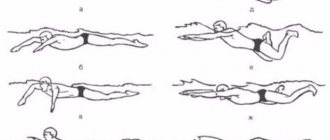
| Back crawl | Crawl on chest |
| The face is above the water most of the time | The face is in the water most of the time |
| Movement speed - average | Movement speed - high |
| Rarely used by professional athletes | Widely used among professional athletes |
Swimming style comparison chart
Note for newbie
Next, you will read in order of importance the elements of the front crawl swimming technique. Stick to this sequence.
- The very first and most important element of the technique is breathing . Don’t rush to move far without learning how to breathe correctly.
- Footwork comes second . The reason for this is that if your legs sink, trainers often use the term “heavy legs,” then the effectiveness of all other stages is reduced to almost zero. Learn to keep your body afloat and only then move on to the next stage.
- Hand work.
- Head position.
- Corps Rotation.
Correct crawl technique
To develop a sports style, it is important to position your arms and legs and develop proper breathing. The face sinks into the water along the edge of the hair.
The hand movement cycle consists of several stages:
- immersion in water with influx;
- the supporting part of the stroke;
- leaving the water;
- raising your hand above the water.
At the first stage, the arm bent at an acute angle enters the water with the hand, forearm, and shoulder. Underwater, it stretches forward, after which the body is pulled up behind it.
At the second stage, the arm is bent at the elbow until an obtuse angle is formed in its area. The stroke is carried out by further bending the elbow joint until a right angle is formed, after which the arm is straightened.
When the straightened arm reaches the body and is on the side of it, the other arm begins the dive, putting part of the shoulder out of the water on the side of the arm emerging from the water. The forearm and palm appear behind the shoulder.
At the last stage, the bent arm with the elbow looking up is raised above the water to enter a new cycle of movements. The hands are immersed in the water closer to the middle of the center line, which increases speed and reduces the force of resistance.
The legs move up and down and back again, making smooth movements from the hips. This bends the knees to create wave-like movements. The toe of the foot is pulled away from itself. When performed correctly, the feet are under the water, and the heels flicker on the surface and the splashes rise. It is more difficult to swim with submerged legs. The amplitude of the swing is ideally equal to a quarter of the swimmer’s height.
The technique of leg movement is practiced at the side or when swimming with a board, weights and fins. The legs should not sink during the exercises, but form a fountain on the surface.
Photo 7. Fins make footwork easier
You cannot learn to swim crawl if you do not master the breathing technique. First of all, it is rhythmic. Secondly, the number of breaths is sufficient to ensure high physical activity. It is recommended to do it under the third or fifth stroke of the hand. An even distribution of head rotations under the arm ensures speed and rotation of the body.
At the training stage, breathing is practiced on an even count, on the one hand and on the other. When breathing, actions are performed in a certain sequence:
- the head turns to the side towards the arm whose shoulder is raised to carry out the stroke;
- This is how they form an air pocket, with the help of which they inhale through the mouth;
- the face is lowered into the water;
- exhale through the mouth and then through the nose.
At the moment of inhalation on the right, the left arm is in front in an extended position, and the right shoulder and arm begin to move out of the water. When inhaling from the left, it’s the other way around.
Previously, it was recommended to start exhaling after holding your breath for a short time, but modern sources advise starting to exhale the air smoothly.
Photo 8. Breathing is an important element of swimming
Breathing rules
It is impossible to swim quickly, confidently and with minimal loss of strength if you do not master the inhalation-exhalation technique. Freestyle, breaststroke, butterfly or any other style cannot be fully mastered unless you learn to breathe correctly while moving.
Breathing principles:
- While above the water, take one deep breath through your mouth.
- Exhale while your face is in the water. You can exhale into the water either through your mouth or your nose. This is the first thing newbies are taught in swimming pools.
- Inhale at the optimal depth. Thanks to the air in the lungs, a swimmer can stay on the water. Moreover, the more air you managed to get into your lungs, the better the water holds a person. But you shouldn't overfill your lungs. Otherwise, you will feel discomfort while swimming.
The inhalation should be such that noise is heard. And exhalation is performed with the entire surface of the lungs. Over time, the breathing technique becomes automatic.
Side crawl swimming technique
In addition to the sport crawl, in which the swimmer lies on the surface of the water on his back or stomach (chest), there is a household method of swimming in a style similar to the crawl, in which a person swims on his side. This folk style is used for marathon swims of 42 km, when swimming in a storm, for relaxation during a long stay in the water, when swimming in clothes, when transporting objects or victims.
The transitional method between the sports crawl and swimming on the side is considered to be the crawl without removing your hands from the water during movement. Breathing is carried out in the same way as during a sports crawl, from under a raised shoulder, but the hand does not appear from the water. This style of swimming is practiced when training beginners, who are taught to stick their arms out of the water further.
Sliding on your side is a coordinated movement, but if you understand and learn how to perform it, you achieve a position of complete balance and it becomes possible to spend as much time as you like in this position in a relaxed state. As a result, the body moves in the water without leaving splashes and without requiring powerful efforts.
Photo 9. Hand movements when swimming on your side
Swim on your side using breaststroke, crawl, or a combination of both styles. Those who are used to swimming crawl also use its movements when swimming on their side. The legs work like scissors, the upper arm makes strokes, like in a crawl, above the water, and the lower one below it.
The cycle includes one (alternate) movement of the arm, one movement of the legs, one inhalation and exhalation.
The movement of the “top” hand is similar to the movements in the front crawl, but the hand is immersed in the water closer to the head, and the further stroke is made along the body and ends at the hip.
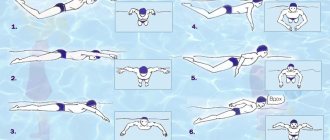
Leg workout
For beginners - holding hands on a support
The first exercise for very beginners is to grab some support and, holding on to it, work with your legs - as shown in this illustration:
Footwork while holding on to the side
In this case, you will be motionless in place, but your body should not sink, but should float.
It is recommended to immediately perform all tasks with your head lowered into the water - exhale into the water and raise your head as needed to inhale.
With board
This exercise is not only recommended for beginners - it is useful for all swimmers , it is the main way to train footwork.
Swimming with a board - bottom view
We take a swimming board and swim solely due to the work of our legs, focusing on them. As in the previous case, it is highly recommended to immediately start working with your head in the water.
Tasks:
- develop rhythmic and non-stop footwork;
- focus on working from the hip;
- make sure your legs work close to each other.
Without a board just using your legs
Two arms outstretched
Having practiced enough with the board, we stretch our arms forward in front of us (so that they form an arrow) and swim using the movements of our legs.
Pay attention to the correct hand position , which is shown in this illustration:
One hand is extended, the other is pressed
This task is performed generally similar to the previous one, but only one arm is extended forward and the other is pressed to the body.
Swimming with your hand pressed
Both hands are pressed
This is the most difficult option, in which both arms are pressed to the body. The legs need to work the hardest here so that they don’t start to sink.
It is recommended to take breaths to the side - to the right and to the left, by turning the body.
A big plus of this task is that thanks to it you can get rid of the habit of leaning on water while inhaling.
Fins – with and without board
This is one of the best ways to develop both muscle strength and overall footwork technique, including their rhythm.
The classic version of this exercise is to take a board in your hands and work only with your feet in fins; the greater the distance, the better, as a general rule.
Swimming with fins is a great way to train both leg strength and technique.
Straight legs
This is a good way to wean yourself from bending your knees too much. The goal is to swim with perfectly straight legs.
Let us remind you that in normal swimming there are still slight bends, but here we specifically make perfectly straight legs in order to develop the skill of moving precisely at the expense of the hips.
Under the water
Leg movements are felt much more strongly when the torso is completely underwater. This allows you to work out the amplitude and keep your limbs level.
Swimming underwater with arms extended forward
This movement is performed through swims over a distance of 12 to 25 meters.
You need to stretch your arms forward and move only with your legs ; to make the task easier, you can put on flippers .
Features of crawl swimming
Coordination of movements is important in freestyle swimming. On average, there are 2 leg movements per cycle of movement of one arm, but for athletes this figure exceeds these values. They make 4 or 6 movements. Depending on this, the crawl is called double, quadruple or sixfold.
At stayer (long) distances, footwork slows down, and at sprint (short) distances it speeds up. At the initial stage of training, the correct position of the head and body when inhaling is used, and the number of leg swings is reduced to 2 if fatigue or difficulty in simultaneously controlling all movements.
Photo 10. Professional swimmers use the six-time crawl
In order to enhance the sliding effect, it is important to maintain an elongated body position with tucked shoulders and reach after the outstretched hand.
When mastering the style, errors occur:
- raise their head and face high, quickly tire the swimmer;
- a strong turn of the head when inhaling turns the body on its side, as a result of which balance is lost;
- insufficient rotation makes it difficult to breathe fully;
- the stroke at the moment of inhalation reduces the speed and disrupts balance, inhale at the moment of straightening the arm;
- a foot bent at the ankle, rather than with the toe extended, increases resistance, disrupts the balance and horizontal position of the body, and reduces speed;
- late exhalation does not leave time for a full breath;
- They submerge their legs deeply, which prevents them from swimming quickly and disrupts the streamlining of the body.
Photo 11. Elongated body with tucked shoulders
The legs “sink” either due to the fact that the body is not elongated enough, the vibration frequency is low, or due to the large amplitude of movement of the legs.
When working with the legs, avoid constant tension in the thigh muscles, stiffness of the joints, bent legs at the knees, wide spread of the legs, and uneven swing of the right and left legs.
When moving your arms, you should not put your hand flat into the water; lower the elbow below the hand before the stroke; start rowing in the water without extending your arm; spread your fingers; place your hand behind the center line; remove your hand from the water until the stroke is completed.
When inhaling, avoid high or sudden raising of the head, rapid exhalation and inhalation before the end of exhalation.
Fulfilling standards or passing a swimming class will help you recognize your achievements, but in any case, a person who masters freestyle swimming feels completely safe on the water.
Photo 12. The movement of the hands with the fingers spread makes it difficult to move through the water.
Head position
Breathing technique when swimming crawl is as important as during any cyclic physical activity. It is necessary to maintain an even pace of breathing. Try not to hold your breath when swimming crawl, inhale quickly and exhale consistently. In the pool, you may have heard the phrases “breathing on 3” or “breathing on 5.” This means that you inhale every third or fifth stroke. We talk more about breathing in the article “How to breathe correctly when swimming,” but here we would like to draw attention to how you need to hold your head when swimming crawl, since the speed and comfort when inhaling depends on this.
The position of the head in all phases of the stroke should be natural. The natural position of the head is when you stand or sit straight, and your head is also level. In other words, the cervical vertebrae are not curved in relation to the thoracic ones. This situation can be simulated as follows.
- Stand with your back to the wall.
- Press your pelvis, lower back, shoulders and back of your head against the wall so that you look straight ahead
- Raise one arm straight up to ear level
This should be your position during the end of the surge phase and before the capture phase.
If you want to inhale, you need to lean a little more to the side and lean more on the opposite hand during the catch phase. Try not to turn your head in your neck at the moment of inhalation, but inhale by rotating your body.
In all other stages of swimming, try to keep your head straight without bending your neck. Lifting your head forward can sometimes be done when you need to look at potential obstacles that may lie ahead. Swimmers, even in open water, when they need to look around and orient themselves in space, lift their heads out of the water using their body, and not by bending their neck.
A beginner who has mastered the technique of breathing , footwork and hand work can begin to work on the position of the head in the water.
If you are a beginner swimmer
Benefit for health
Crawl swimming has been known for many centuries, but the style came to Europe in the middle of the 19th century, when the American Indians, who mastered this method perfectly, left the English swimmers behind. Europeans began to master the crawl gradually and carefully, towards the end of the century. Australian and American swimmers refined the style. For the second century, crawl has been considered a popular and useful form of swimming.
Crawl is a fast swimming method that has a positive effect on many body functions:
- overall health improves;
- the respiratory system is trained, which saturates the blood with oxygen faster;
- blood flow increases, normalizing blood pressure and eliminating congestion in the bloodstream;
- the load on the spine is reduced;
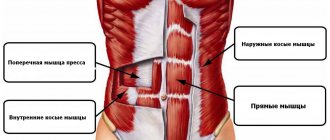
- most of the muscles are trained: abs, thighs, calves, triceps of the arms, intercostal muscles, latissimus dorsi;
- joints become stronger and more flexible;
- skin condition improves thanks to water “massage” and improved blood supply.
Photo 13. The crawl technique is beneficial for health and figure (pictured is Michael Phelps, 23-time Olympic swimming champion)
The rabbit allows you to increase endurance to stress on the body, relieves tension and stress, and improves mood. Crawl swimming promotes weight loss, as intense swimming in the water requires effort and calories. There are almost no contraindications to crawl training. It is practiced by pregnant women, children, elderly people, people with problem joints and backs.
Summary!
Remember! It is much more profitable at the initial stage of training to pay for 10-12 training sessions of a good personal swimming trainer or take training at our online school, install equipment for yourself, and then swim correctly for the rest of your life without creating health problems for yourself!
Because only the correct position of the body in the water, with the correct movements, will strengthen the health of each person during training. But a swimming board is a very quiet, gentle and insidious enemy during the initial training of a beginner. Remember this, and know your enemy by sight!
So I wish you only good productive training that will improve your health. And with that, I say goodbye, have a good weekend and see you! Bye!