Millions of people around the world are ardent followers of a game like football. This sport not only develops the ability to play in a team and adds excitement and interest to sports activities, but also helps a person become stronger, more resilient, and also develops intelligence. In order to start the game, you need to prepare your body before loading, just like professional football players train before starting. Good training of players is the key to success in this sport.
Basic principles
Football is a very dynamic sport; during the game, athletes are in constant motion. The aerobic load on the body during training is extremely high. Therefore, the main directions for the development of athletes are as follows:
- Endurance for long distance running;
- Lower body muscle strength for punching;
- Constant coordination of breathing and movement;
- Work with the core to avoid unnecessary tension in the back.
All football players begin the lesson with a warm-up. Experienced trainers advise constantly using the ball in training to develop the body’s habit of interacting with it. The total duration of training, including the game itself and loading, should not exceed one and a half to two hours a day, so as not to cause exhaustion of the body.
It is advisable to do long-distance running on days off from training and be sure to stretch your muscles afterwards. It is important to ensure that your legs do not become clogged from constant stress. All unilateral exercises must be done alternately in order to successfully control both the right and left sides of the body.
Cross-country should be alternated with training days and loading. One day a week you need to rest from physical activity. Weight training and loading exercises in the gym should be done with caution - not all of them actually develop the strength and speed necessary for a football player.
How to create your own burpee variations
By combining different types of push-ups and other exercises, you can create countless variations of burpees. Complicate burpees with the help of medicine balls, Bosu platforms, expanders, stops, weights, try difficult push-ups, change regular jumps for other exercises: medicine ball throws against the wall, various jumping overs and steps.
The number of variations is limited only by your imagination. You can change the types of burpees every day, make the task more difficult for yourself and continue to build strength and endurance.
Training
The training itself is built from several parts. It begins with a warm-up, during which you need to warm up all muscle groups and prepare the cardiovascular system for stress. Perform the following exercises:
- Running with a ball in a “square” or from wall to wall;
- Dribbling the ball with one foot, then alternately;
- Running exercises: shin sweep, running with hips high, side step.
Options for aerobic warm-up in training can be very different. Loading of muscles should occur gradually. It is necessary to include work with the ball in training already at these stages. You should allocate ten to fifteen minutes for this part. Next, you can stretch the muscles of the back and front of the thigh. Grab the toe of one leg, bend it at the knee joint and press it to the other knee - if done correctly, you will feel a stretch along the front surface. Then place your straight leg and pull your toes towards you, slowly lower yourself to your straight leg, bending the second at the knee joint. The stretch should be felt along the back surface. This stretching exercise should be done for at least two minutes on each leg. Loading ensures optimal preparation. After this, you can move on to flexibility and agility exercises:
- Exercise “mill” (with the body lowered to the feet);
- Exercise “bicycle”;
- Jumping with obstacles;
- Stand on one leg for a minute;
- Push ups.
The range of such exercises to load varies depending on the preferences of the players. Do this part of the warm-up for no more than ten minutes.
Physics exercises (without ball) for football players
An important part of training is for football players to perform general developmental exercises without the ball. These include:
- Exercises for the arms and shoulder girdle (performing flexions and extensions, rotations, swings, etc.). Such exercises must be performed both in place and in motion.
- Exercises for the neck muscles (bending and turning in different directions).
- Exercises for the torso (bends and turns, raising and lowering legs while lying down, etc.).
- Exercises for legs (performing swings, squats and lunges).
- Exercises with resistance (performing the same turns and bends of the body, but only in pairs, as well as squats with a partner and elements of wrestling in a standing position).
Exercise system
To develop professional skills, many training systems have been developed for football players. Spanish UEFA coach Gratakos offers his own version of preparing players for loading. The first important exercise in his system is the traditional square. Several players in a square area pass the ball to each other. While another participant or several are trying to take it away. The number of players may vary, depending on the development of interaction combinations. The training area should be limited. This drill helps create contact among players and develop agility with the ball.
The next exercise expands on the previous one and is called ball possession. Three teams of six people are formed from the players. Two teams receive the ball, and the third must take it back. The training area is also limited to a rectangle of twenty by thirty meters. This exercise develops team play. You need to change roles in teams, each set takes six to ten minutes, after which there is a short break in loading.
How do football players train?
Position play is also based on team principles. But here the roles of the players appear, who are placed in their positions:
- Central defender;
- Central midfielders;
- Laterals;
- “Number ten.”
This team is opposed by five forwards. The goal is possession of the ball and team loading.
The number of players can be varied. Limiting the number of participants to two or three per set allows for improved passing and ball handling. Each team is built from small pairs or trios that take the ball from each other. A free yellow player also enters the field and joins the team that won the ball. You can increase the number of free participants if mini-teams consist of more people.
Finish the training with the required football game using standard commands. The game is played in two halves of nine minutes. The goal of the game is not to win, but to improve your skills. This element of the training is educational and should consist of a large number of passes, which will improve team communication.
Classic burpee technique
https://youtu.be/NCgoXF-L18E
Perform a partial squat and lower your hands to the floor.
From this jumping position, go into a lying position.
Bend your arms and lower your body down, touching the floor with your chest. You can also touch the floor with your stomach and thighs.
Push yourself up while lying down.
Jump your feet toward your hands. Don't bend your legs too much. The angle at the knee should be as obtuse as the stretch allows. This protects the knee joint during numerous repetitions.
Jump up, straightening your body completely and stretching your arms above your head.
Workouts for children
Children can be taught to play football from a very early age. Children begin to play ball and understand the rules from the age of 3-4. You can train with a professional trainer from the age of 4-5. Both boys and girls are taken to such classes. Football training takes place all year round. In the summer in the fresh air, and in the cold periods of the year in the gym. An individual trainer will help you practice your actions with the ball. Also, constant contact with the ball will help the child feel its weight, shape and ways of interacting with it.
Swings with a kettlebell - technique
1) Stand near the weights, with your feet slightly wider than shoulder-width apart, with the weights between your legs, one foot beyond the line of your toes. 2) Sit down and lean down a little, moreover, sit down and lean down a little, and not lean down and squat a little. 3) Take the kettlebell with your working hand with a closed grip and stand up, straightening your legs slightly, while leaving your back still tilted forward. 4) When you pick the weight from the floor, it will begin to move backward by inertia, there is no need to prevent this, it is necessary to begin interacting with the projectile at the moment when it freezes before swinging to the front, this is where the athlete gives it inertia, unbending legs and back. 5) Having brought the hand with the weight to chest level, before it should go down by inertia, you must release it for a moment and take it with the other hand, and then, lowering your hand down, sit down a little and lean forward to repeat the pendulum movement again .
Kettlebell Swings - Notes
1) If it is difficult for you to grab the weight while hanging, then you should first perform swings with one hand. Then place the weight on the floor and perform the same number of repetitions with the other hand. 2) You should start performing any exercises with weights with a weak hand, so that you load both hands evenly. 3) Muscle failure should not be achieved during exercises with weights, but it is necessary to maintain a progression of loads, so try to gradually increase the number of repetitions, reduce rest time and strive to take a larger weight. 4) Perform the exercise barefoot or in shoes with flat soles, but not in flip-flops or sneakers or shoes with heels. 5) Learn to breathe correctly: as you exhale, pick the weight off the floor, inhale while it moves back by inertia, exhale when you lift it up, inhale again when you lower it down.
Anatomy
The human muscular constitution is represented by postural and superficial muscle layers, which are fundamentally distinguished by the number of fast and slow fibers. There are many more fast-twitch fibers in the superficial layers, so they allow you to perform heavy work, like barbell squats. There are more slow fibers in the deep muscle layers, since the postural muscles ensure that the skeleton is level in space and that light work is performed. That is why there are more myofibrils in fast fibers, and more mitochondria in slow fibers, since the body provides the former with energy through anaerobic glycolysis, and the latter through aerobic glycolysis.
Due to the fact that the weight has a displaced center of gravity, the body is forced to engage not only fast fibers, but also slow ones, simply in order to keep the body in an even position. It is this fact that allows you to quickly lose weight and develop strength indicators by performing exercises with weights. At the same time, precisely because of this shifted center of gravity and the simultaneous involvement of all muscle groups, you should learn to perform exercises with weights gradually, and you should start learning with swings! You should move on to more complex exercises, such as the snatch and clean and jerk, only after you learn how to control the weight and breathe correctly.
Bodybuilding Exercises
Step-by-step instruction
All you need to perform the simplest version of the exercise is a chair or bench. As you become more familiar with proper technique, you can begin to add dumbbells or kettlebells to increase the resistance.
- Stand 60cm from a chair or bench, place your feet hip-width apart, tighten your core and roll your shoulders back. The chest and eyes look straight ahead.
- Raise your right leg and place it on the bench behind you. There are two ways to do this, and it may take you a few tries before you decide which method works best for you. The first is to place your foot on the bench so that your heel is approximately level with the edge of the bench. And the second is to place only your toes on the bench, as you would do when performing a lunge. There is no best way - it all depends on your personal choice.
- Make sure your feet are hip distance apart, if not wider. You should not place your elevated leg directly behind the working leg because this will make maintaining balance almost impossible. You will have to move your front foot a little left and right to find the spot that gives you the most stability. You will have to do this many times before you find a position that allows you to do the exercise comfortably. Remember, your back leg is just there to help you maintain your balance – only your front leg does most of the work.
- Engage your core and, keeping your chest high and your gaze straight ahead, bend your left knee, allowing your right knee and heel to bend as you move towards the floor. In this phase of the exercise it is not permissible to help with the back leg. Try to keep your weight balanced on your left leg as you move down. Make sure your left knee remains directly over the end of your left foot (to prevent the knee from moving in or out). You may notice that your left knee moves forward a little, especially towards the end of the exercise. This is not necessarily bad or wrong. The position of the knee depends on your comfort and preference, as well as the flexibility of the joints. If you notice that the exercise is difficult or uncomfortable, return to the starting position and try to move your front leg forward a little before performing the next repetition. Inhale as you perform this phase of the movement, lowering yourself down until your left quadriceps is parallel to the floor.
- Now lift your body back up, pushing off with your left leg, using the quadriceps and glute of your left leg to push your body up. Exhale as you rise to a standing position.
- When you have completed the desired number of repetitions, simply remove your right leg from the bench. Make sure that the number of repetitions performed on each side of the body remains the same.
In bodybuilding
The main goal of bodybuilders is to build muscle mass and burn fat as much as possible.
Some athletes aim for a ratio of 3-4% fat to total body weight.
The main rules of strength training in bodybuilding:
- Classes should not be long. The total time for performing strength exercises takes 45-70 minutes.
- Between sets there is a short rest - up to 90 seconds.
- The best number of repetitions for gaining mass is from 8 to 12.
- Exercises should be varied. Repeating one complex will not give any result.
A set of exercises for bodybuilders
Before training, the order of performing the exercises is distributed. You can train the upper and lower torso alternately , or work large muscle groups first, and then small ones.
You can try the following set of strength exercises:
- Bench press on a horizontal bench ( 1 warm-up set; 5 sets of 5 times).
- Pull-ups on the crossbar with different grips (5 sets of 5 times).
- Bent-over barbell row (1 warm-up set; 5 sets of 5 reps).
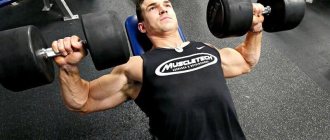
Photo 3. A man does a barbell bench press lying on a horizontal bench, strengthening the upper body.
- Farmer's walk with dumbbells (3 times all the way).
- General cool down for 3 minutes.
Important! Before performing exercises, be sure to warm up. This will minimize the risk of injury and muscle damage.
Lunges
We do them twice a week.
1. Make the first lunge straight. Arch your shoulders back and lift your chin higher. When you take a step forward you should keep your hands on your hips. Make sure your front knee doesn't go over the laces and your back knee doesn't touch the ground. Return to the starting position;
2. Take a step to the side, keep your chest and eyes straight. We return to the starting position;
3. Next comes a step back, a reverse lunge. We keep our back straight, and then return to the starting position;
4. After completing all 3 steps on one leg, repeat everything from the beginning on the other.
Start with two sets of six repetitions on each leg.