Win the war against slouching
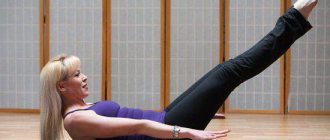
- Kitty. This is a modified exercise specifically for those who sit. The point is to stretch the lower back muscles and wake up the abs, which actually helps support the lower back. Sit upright, straighten your back and open your chest, directing it forward and upward. Now twist your back in the opposite direction - point your shoulders forward and down, tense your abs, pushing your lower back back. Additionally, point your chin towards your chest and pull your forehead towards your stomach. Repeat several times.
- Downward sloping lock. Perform the “back lock” exercise, and then tilt your body forward, placing your stomach on your thighs. At the same time, move your hands up and forward in the lock.
- Pulling. To stretch our back and relax our vertebrae, we reflexively stretch upward. Use this as an exercise - point your arms up, either free or clasped, and stretch with them as high as possible while remaining seated in the chair.
Stop hunching!
Smooth posture in 2 minutes - video. The main problem with slouching and poor posture is that it all comes unnoticed. At first you slouch at your desk, and a year later you notice that you are rounding your spine at home at the dinner table.
How does this happen?
The main cause of slouching in adults and children is poor posture. As a rule, the main reason for this is too much time on the computer. Many of us can sit like this all day without interruption. Hence the muscle imbalance.
When we slouch, our shoulders, and behind them our neck, move forward, disrupting our posture. This position contracts the pectoral muscles and weakens the back muscles (upper part), creating all the conditions for the appearance of a hump.
Getting rid of such imbalances has a number of advantages. Studies have shown that, in addition to the obvious impact on appearance, correct posture affects our mood, self-confidence and even helps overcome feelings of fear.
But is it possible to correct your posture if you are no longer at the age when your body is actively growing and is easily amenable to corrective measures? Yes. By regularly performing exercises against stooping, you can eliminate the problem, no matter how old you are. Next, we have selected for you a fairly simple workout that can be performed both at home and in the office.
As mentioned earlier, slouching can be a result of weak upper back muscles, core muscles, pectoral muscles, hamstrings, and hip flexors.
Back exercises are another way to get rid of slouching as an adult.
Perform these exercises several times a week, in addition to stretching exercises.
This type of push-up is aimed at working the muscles of the upper back, which are responsible for the correct position of the shoulders.
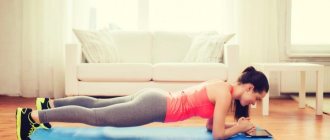
Start in a standard push-up position. Make sure your shoulders are relaxed and your body is in a straight line from head to heels.
Now bring your shoulder blades together and return to the starting position. The range of motion in this exercise, compared to classic push-ups, is quite small. However, this is a fairly effective exercise for a hunched back.
Perform 5-10 repetitions.
Wall-supported scapula raises target the muscles of the upper back and also help return the shoulders to their normal position.
Press your back against the wall. Press your tailbone, lower back, upper back and head against the wall, and move your legs slightly forward. Keep your chin straight, bend your elbows at an angle of 90 degrees and press them against the wall, as shown in the picture above.
Stay in this position for 30-60 seconds. To increase the involvement of the upper back muscles, you can move your arms slightly up and down.
Many people find this exercise difficult at first. Therefore, if you are a beginner, choose elastic bands with minimal resistance.
Wrap the elastic band around a stable object (such as a column or post) at waist level. Bend your elbows at a right angle, pull the band towards you, while bringing your shoulder blades together.
Return to the starting position. Perform 8-12 repetitions.
Now you know how not to slouch and what to do if your posture does start to deteriorate. But remember, stooping does not appear in one day and it also cannot be corrected in one day.
Be patient, do stooping exercises regularly and take breaks if possible, do not sit at the computer all day.
Healthy back. Exercises for the spine
9 golden rules for a healthy back
1. Choose comfortable shoes. If your back pain has become chronic, stop wearing high heels. They shift the body's center of gravity forward, and the spine is forced to bend back. Its “curvature” causes the back muscles to work incorrectly.
2. Try to alternate any muscle tension with relaxation. If you have to stand for a long time, distribute your body weight evenly on both legs or shift from foot to foot, if possible, place one foot on a high support.
3. Choose chairs with adjustable back support to support your spine. Any work while standing or sitting should not cause the body to bend sharply forward, as this leads to muscle strain.
4. Provide a comfortable environment for your spine while you sleep. The best option is modern orthopedic mattresses. The main function of the mattress is to provide a position in which the physiological curves of the spine and ligaments are completely relaxed, and blood circulates freely throughout the body.
5. The worst thing for your back is to sleep on your stomach. This is the most unnatural pose for the spine. It’s best to lie on your side, with your knees bent. During long walks, to reduce muscle tension in the shoulder girdle, periodically place your hands in your pockets, on your belt, or over the sides of your clothes.
6. For those who drive, the spine suffers from constant vibration. We can adjust the seat to an upright position to provide support for the back and neck, and fasten the belt to press the back against the back of the chair.
7. When working with a computer, the top of the screen should be at eye level, the screen itself should be at arm's length; keyboard - at the level of the elbows, bent at a right angle on the armrests; knees slightly higher than hips; if your feet do not reach the floor, place them on a stool so that your knees are bent at a slightly obtuse angle.
8. When working while sitting, do not slouch, change your body position more often (every 15-30 minutes), get up from your chair at least once an hour, do not cross your legs (this, by the way, is also bad for the veins).
9. As soon as your condition allows, start moving. Lack of movement does not benefit the muscles: they weaken and lose elasticity.
Pain in the spine is an almost inevitable evil that sooner or later everyone who leads a sedentary lifestyle has to face. The way out of the situation is simple - physical exercise. By popular demand, I publish asanas that will help you correct your posture and even relax and stretch tight trapezius muscles, and return the natural curve to your neck and ensure good blood circulation. At the beginning of practice, perform several cycles (from 3 to 5) of the Eye of Renaissance complex to warm up the body thoroughly so as not to injure your spine. Breathing is full. Breathe several cycles, depending on your individual well-being. This set of asanas is exclusively for beginners, so they cannot harm you. You will need some auxiliary materials: straps and light bricks (sold in esoteric and yogic stores). Or maybe you don’t need anything... This set of asanas can be performed by men, women, children, and together with children, the whole family. Tadasana (mountain pose, variation)
TADASANA (also called Samasthiti). “Tada” means mountain, “sama” means vertical, straight, motionless, “sthiti” means standing quietly, stillness. Tadasana, therefore, is a pose in which one must stand firmly and straight, like a mountain. This is the basic standing pose.
Connect two belts and place them over your shoulders. Thread the loose ends into the loop behind your back. Use your hands to pull the belt down, lowering your trapezoids. Don't arch your lower back. Lengthen and release your neck. This asana can be done several times a day and can be done in a sitting position.
People don't pay attention to proper posture. Some people stand with their body weight on only one leg or with one leg completely out to the side. Some rest only on their heels or on the outer or inner edges of their feet. This can be seen by the wear pattern of the heels and outsoles. Due to the habit of standing incorrectly, without distributing the body weight evenly over the entire foot, we acquire specific deformations that impede the flexibility of the spine. Even if you keep your feet apart, it is better to keep your toes and heels parallel rather than at an angle to each other. In this case, the hips contract, the stomach is pulled inward, and the chest moves forward. This creates a feeling of lightness in the body and the mind becomes alert. If we stand, transferring the entire weight of the body to the heels, we feel how the nature of gravity changes: the hips relax, the stomach protrudes forward, the body leans back, tension is felt in the spine, as a result we soon get tired and the mind becomes sluggish. Therefore, it is very essential to learn how to stand correctly.
Gomukhasana (cow head pose)
From the words “go” - cow and “mukha” - face. Gomukha is one whose face resembles a cow. This phrase also means the type of musical instrument - narrow at one end and wide at the other, like the muzzle of a cow.
Standing straight and level as a mountain, place your left hand behind your back and move your palm closer to your right shoulder blade. Move your left shoulder back. Then extend your right arm up and completely turn it from the inside out, looking back. Bend your right arm at the elbow and clasp your fingers behind your back. Try to do this so that your thumbs are clasped with your little fingers, your index fingers with your ring fingers, and your middle fingers with each other. If your fingers are not yet touching each other, use a belt.
The pose cures leg cramps and makes the leg muscles elastic. The chest opens well, the back becomes straight. The mobility of the shoulder joints increases, the dorsal muscles are fully involved in the action.
Uttanasana with palms supported (intense stretch pose)
The name is derived from “ut” - a particle denoting deliberate intensity, and the verb “tak” - to stretch, expand, lengthen. In this asana, the spine is subjected to intentional, intense stretching.
Spread your feet hip-width apart, turn your upper thighs inward and bend over, bending at the hip joints. Place your palms on the support. The back is straight. Pressing your palms onto the support, turn the upper parts of your arms from the inside out, move your shoulder blades towards your waist, and push your sternum forward: this will lengthen your trapezius. Uttanasana with supported elbows
Come a little closer to the support and bend over again, placing your elbows on it. Place your elbows together, shoulder-width apart. Pressing your palms against each other, turn the upper parts of your arms from the inside out. Pull your shoulder blades toward your waist and pull your sternum forward. In this variation, you can completely relax your neck by placing your head down.
This asana cures abdominal pain and tones the liver, spleen and kidneys. It also relieves menstrual pain. The heartbeat slows down and the spinal nerves become healthier. If the pose is maintained for at least two minutes, all mental depression disappears. This asana is especially useful for easily excitable people, as it calms the brain cells. After performing this asana, you feel calm and cool, your eyes begin to shine, your mind is peaceful.
Preparation for Adho Mukha Svanasana (Downward Facing Dog Pose)
From the words “adho mukha” - face down, “shvana” - dog. The pose resembles a stretching dog, with the head and front paws down and the back paws up, hence the name.
Stand facing your back, at a distance of 30-40 cm from the baseboard, feet hip-width apart, parallel to each other. Place your palms on the wall and push off the wall, lowering your shoulder blades towards your waist, lengthening your neck and pushing your sternum forward.
When a person is tired, staying in this pose for a long time relieves fatigue and returns lost energy. This pose is especially helpful for runners who are tired from a hard race. In sprinters, it develops speed and lightness in the legs. The pose helps soften salt spurs and relieves pain and stiffness in the heels. It strengthens your ankles and gives your legs a beautiful shape. The practice of this asana relieves stiffness in the shoulder blades and helps with arthritis of the shoulder joints. The abdominal muscles are pulled towards the spine and strengthened. As the diaphragm rises toward the chest cavity, the heart rate slows. This is an invigorating pose.
Marichiasana I (pose dedicated to the Sage Marichi)
This asana is dedicated to the sage Marichi, the son of the Creator - Brahma. Marichi was the grandfather of Surya (Sun God).
This is one of the sitting poses with spinal twisting.
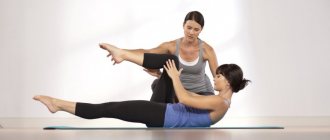
Sit upright on a support - a brick or a blanket folded several times. Bend your left leg at the knee, place your foot on the floor, as close to your pelvis as possible. Grabbing your shin, straighten your spine. Stretch your left arm up and wrap it around your left knee. Reach your right arm back and grab your wrist with your left hand with your right. As you grip your hands downward, lengthen your spine. As you exhale, turn completely to the right. This will help open the chest and free up the neck. Lean forward. Pressing your left shoulder onto your left shin, stretch along your right leg. Repeat the asana on the other leg.
Marichiasana III From Marichiasana I, return to a straight sitting position, then bend your right leg. As you inhale, place your left elbow behind your right knee and your right hand behind your back and turn to the right, pushing your left shoulder away from your right knee. As you exhale, wrap your left arm inward, braid it around your right leg and grab your right hand with your left hand. Check that the spine should be straight. You cannot sit with a crooked back - you will only aggravate the problems and damage your back. If you can’t connect your hands and your back can’t straighten, use a belt. Repeat on the other side.
With regular practice of this asana, acute pain in the back, lower back and hips quickly disappears. The liver and spleen are toned, and their lethargy is eliminated. The neck muscles gain strength, sprains of the shoulder ligaments and displacement of the shoulder joints are cured. The shoulders gain freedom of movement. Intestinal function improves, the pose helps reduce the size of the abdomen.
Sarvangasana on a chair
(Shoulderstand, variation)
This is a variation of the full version of SALAMBA SARVANGASAN
These words are “alamba” - support, support and “sa” - together, accompanied. Salamba, therefore, is supported, supported. Sarvanga - the whole body, all limbs ("sarva" - whole, whole, completely; "anga" - limb, body). In this pose, the whole body benefits from the exercise, hence the name.
For beginners, to correct the back, Sarvangasana is best done with a chair. Move your shoulders away from your head, arch your upper back, and retract your shoulder blades. Transfer your body weight to your shoulders.
With regular practice of this asana, acute pain in the back, lower back and hips quickly disappears. The liver and spleen are toned, their lethargy is eliminated. The neck muscles gain strength, sprains of the shoulder ligaments and displacement of the shoulder joints are cured. The shoulders gain freedom of movement. Intestinal function improves, the pose helps reduce the size of the abdomen.
Many asanas directly affect the endocrine glands and help them function properly. Sarvangasana, in particular, acts on the thyroid and parathyroid glands, which are located in the neck, since a strong chin lock promotes an increased supply of blood to these glands. In addition, thanks to the inverted position of the body, venous blood flows to the heart without any effort, simply as a result of gravity. This increases the circulation of healthy blood in the neck and chest area. As a result, those suffering from shortness of breath, palpitations, asthma, bronchitis and nasopharyngeal diseases receive relief. Since the head is motionless in this inverted position, and the flow of blood to it is regulated by the chin lock, the nerves calm down and headaches, even chronic ones, disappear. Long-term exercise in this asana eradicates all colds, runny nose and other diseases of the nasopharynx. The calming effect of this pose on the nervous system brings relief to people who suffer from high blood pressure, irritability, short temper, nervous attacks and insomnia. The inverted position of the body also affects the abdominal organs, intestinal motility increases, bowel movements improve and constipation is eliminated. As a result, the body is freed from toxins, health improves and energy appears.
It will not be an exaggeration to say that if a person regularly performs Sarvangasana, he will feel a surge of strength, will be happy and confident, a new life will be in full swing in him, the mind will be calm, and he will feel the joy of life . After a long illness, regular practice of this asana twice a day will restore lost health. The Sarvangasana cycle tones the abdominal organs and gives relief to people suffering from stomach and intestinal ulcers, severe abdominal pain, and colitis.
Ardha Halasana (Plow Pose, variation) See picture on the left
From the word “hala” - a plow, which the body in this pose is similar to. The asana is part of Sarvangasana I and its continuation. Ardha - “half”, that is, “half-plough”.
It is also important here that the body weight falls on the shoulders and partly on the hips, but in no case on the neck.
The effect of Halasana is the same as that of Salamba Sarvangasana I of the previous asana), but, in addition, due to compression of the abdominal area, the internal organs are rejuvenated. The spine, thanks to bending forward, receives increased blood flow, which relieves back pain. Cramps in the hands are cured by stretching the palms and interlocking the fingers. Those suffering from stiff shoulders and elbows, lumbago and arthritis of the back also receive relief. Abdominal pain from the accumulation of gases also stops, and relief is immediately felt. The asana is also useful for people with a tendency to hypertension. If Halasana is performed before Sarvangasana, then you will not feel either a rush of blood or heaviness in the head.
Setu Bandha Sarvangasana (Bridge Pose)
SETU BANDHA SARVANGASAN, otherwise UTTANA MAYURASANA. From the word “setu” - bridge; "setu bandha" - building a bridge. In this pose, the body bends in an arc, resting on the floor with the shoulders, soles and heels, and the arch of the back is supported by the hands.
waist. Another name is derived from the words “ut” - intense and “tan” - to stretch. The asana resembles a stretched out peacock (Mayura), hence the name.
Your legs should be parallel to the floor: you can rest your feet against the wall or place them on a support of a suitable height. Interlock your fingers behind the brick. Push your shoulders off the floor and bend your thoracic back as much as possible. Point your shoulder blades toward your waist. If your shoulders don't reach the floor, add blankets. With your shoulders back and trapezius released, unclasp your fingers and extend your arms along your body, palms up. Don't forget to stretch your legs well. Roll your hips inward and point them towards the floor. At the end of the practice, be sure to perform Shavasana with incense and beautiful mantras. 15 minutes - complete relaxation and absence of thoughts. Imagine that you are looking at the sky, and it is blue, blue, clear, clear, high, high.
taken from Yoga Journal
For those who do not practice yoga, you can do exercises to correct the spine.
A simple relaxation exercise:
Lie on your back on the very edge of the bed so that your head is unsupported. This position helps to stretch the neck, which in that case does not bear any load, and tilt it back. Lie in this position for several minutes, completely relaxed. This can ease tension in the neck area. As a result, the necessary vacuum is created in the space between the disks. After gently bending back so that you can see the floor, raise your head so that you can see the wall near your foot. Thanks to the vacuum, water enters the space between the discs and spreads to all parts of the neck joints, acting as a lubricant. It is necessary that this water is absorbed into the core of the intervertebral disc until it stretches and takes on its natural size, separating one vertebra from the other. Now tilt your head from side to side, try to look at the floor and walls, first on one side, then on the other.
1. We start with the neck - “load” it with smooth tilts of the head left and right until it stops. Don't help yourself with your shoulders - they are motionless. Try to reach your ears with your shoulders - it’s not at all a fact that you will succeed, but the main thing is to strive.
2. The next exercise for the neck is tilting the head back and forth. When the back of your head hits your back when you throw your head back, pull your head vertically down, trying not to change its position (“turtle pose”). And with a maximum nod, try to slide your chin down to the navel (“skis”) - again, you are unlikely to succeed, but you need to try so that the feeling “I did what I could” remains.
H. Starting position: head turned to the right. Using slow and smooth “pushes,” you twist your neck in the same direction, trying to achieve the “owl pose”—turn your head to face backwards. After 10 - 15 repetitions, smoothly turn your head to the left and again do 10 - 15 springy additional turns.
4. "Dog". Turning your head left and right around a fixed vertical axis (imaginary, of course!) passing through your own nose; the chin is first in its normal position, then lowered to the chest, then raised up to the limit. 10 - 15 repetitions for each chin position.
5. "Pumpkin". Rotate your head clockwise and counterclockwise.
The next few exercises “load” the upper thoracic region.
6. "Hedgehog". Starting position: legs apart, arms lowered in front and clasped, chin tucked to the chest. Bring your shoulders and head forward, focusing on arching your upper back (not your neck!). Then you throw your head back and perform similar movements, but in the backward direction.
7. "Libra". You lower your right shoulder to the limit, raise your left shoulder to the limit: as a result, the spine bends in the upper part of the thoracic region and remains straight in the lower part. Now forcefully pull your right arm down, trying to “distort” your shoulders even more. Then change their position - right up, left down - and pull your left hand down.
8. "Spring". Exercise to stretch and compress the thoracic spine. With your arms stretched out at your sides, raise your shoulders, trying to reach your ears with them, then lower them, trying to reach your feet with your hands (obviously, this is unattainable, but the main thing is the desire).
Now - training the middle zone of the spine, which includes the lower part of the thoracic region and lower back.
9. Starting position: legs apart, chin pressed to the chest. Springily tilt your body forward, trying to reach your navel with your nose.
10. Head thrown back, hands on hips. From this position, bend backwards, trying to reach your buttocks with the back of your head.
11. "Steam Locomotive". Circular movements of the shoulders - first with the chin pressed to the chest, then with the head thrown back.
12. "Rope". Legs apart, right arm extended up and slightly to the right, left arm down. Imagine that you have the ends of a loose rope in your palms, and try to pull it as tight as possible.
13. "Knot". Arms are extended forward and crossed. Imagine that you are being pulled in different directions by them, and “give in to the violence” by extending your right arm as far as possible to the left and your left to the right.
14. “Spinal twist.” Standing, keeping your head straight and your arms bent at the elbows at shoulder level, slowly turn first your eyes, then your entire head, then your shoulders to the right all the way. This is not the exercise itself - you just took the starting position. Now perform oscillatory movements to the right - jerkily, but not too sharply, trying to at least slightly increase the angle of rotation with each of them. Then slowly turn to the left and repeat the oscillations, but to the left.
The next few exercises are for training the lower back, but at the same time they give a good load on the sacral region.
15. “Skater.” From the starting position - standing, arms pulled back and clasped, head thrown back - perform springy bends forward.
16. "Bridge". The starting position is the same, but the elbows are as close to each other as possible. Do springy bends back.
17. Side bends. Extending your right arm straight up, bend your torso to the left. Then, on the contrary, extend your left arm and lean to the right. In the last exercise, as you will immediately feel, the entire spine is involved.
And the next two also involve all of its departments at once:
18. "Eagles". Feet shoulder-width apart, arms bent at the elbows, forming a triangle lying in the same plane as the back. First turn your eyes and head, then your shoulders, then your pelvis to the right, as if trying to see something located on the right, over your left shoulder. Then do the same to the left.
19. “Eagles”, option 2. The starting position is the same. Tilt your body forward 45 degrees, after which you perform springy turns to the right and left to the limit (and the limit is considered to be the position in which you can see the ceiling of the room - or a piece of the sky, if you are exercising in free air). Then you unbend, tilt your body back - and again springy turns to the right and left (this time trying to see the floor or the ground). Breathe freely, do not bend your knees.
20. "Tube". Starting position - sitting on the floor on your knees and heels, hands clasped behind your head. Tilt your torso forward, simultaneously “squeezing” the air out of yourself (passive exhalation) and trying to press your head to your knees. If it doesn’t work, just bring it as close as you can and freeze in this position for 5 - 10 seconds. Then slowly straighten up, “sucking” air into yourself (passive inhalation).
That's the whole cycle. It must be performed exactly in the sequence as described here, without skipping a single exercise. If you find it difficult at first, you can reduce the number of repetitions to 7 - 9. It is possible that this gymnastics will be a little painful at first - it’s okay, be patient, and soon the pain in the spine will subside, and a little later it will disappear completely. In addition, 80 percent of back diseases are caused by poor posture. Let's talk then about what correct posture is.
Basic principles of correct posture
1. The top of the head should be the highest part, the chin should neither protrude nor lower.
2. The eyes should be at the same level and looking straight.
3. The neck should be straight, not tilted in any direction and slightly elongated (released upward).
4. The shoulders are straight, slightly pulled back and down, but not tense.
5. The back is straight when viewed from the front, side, and back and retains its natural curves.
6. The hips should be at the same level.
7. The abdomen and buttocks should be tucked in to support the spine and prevent excessive lordosis (protrusion of the butt) in the lower back.
8. The kneecaps should point forward (not to the sides or inwards), and the knees should not sink in.
9. The big toes should point forward and the arch should be visible on the inside of the foot. The support should not be on the toes or heels, but on the toes.
Helping your back with herbs
To increase blood circulation in the area of the spinal cord roots: infusion of dry yarrow herb. For infusion, take 1 tablespoon of herb per 1 glass of boiling water, leave for an hour, strain. Take 1 tablespoon 3-4 times a day before meals 10 minutes.
To restore bone strength in the body. Take a dozen lemons, squeeze and pour the juice over 6 eggs. Cover the jar with gauze and place in a dark place for 5-8 days until the shell dissolves. Add 300 grams of linden honey, heat it a little (until the state of fresh milk) and pour in 150 grams of cognac. Keep the resulting mixture in the dark and take 1 dessert spoon after meals. It is useful to take while the Master is working with your spine and during an independent cycle of exercises to correct the spine.
Vedana
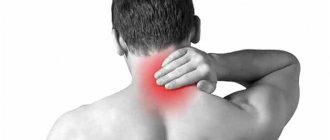
Neck and shoulders
Perhaps the very first and most common area that suffers from sedentary work. Even at school, we can “climb into the shell,” thereby disrupting blood flow to the brain. The following exercises can be used both for prevention and to correct existing congestion - they are aimed at stretching the muscles. It is important to do them smoothly, not to try to turn as far as possible, but to gradually increase the range of movements.
- Turns the head left and right. This is a simple exercise from any warm-up or exercise. Sit straight, make sure your knees are over your heels, relax and lower your shoulders down. Alternately turn your head without tension, for example, counting to 10.
- Stretching the shoulders and back. To restore mobility to your shoulder joints and stretch your muscles, raise and lower your shoulders up and down. It is important not to twist your back and completely relax your shoulders when you lower them down. You can complement this exercise with circular movements back and forth. Raise your shoulders up, point them forward, lower them down, bring them back and lift them again. Do 10 circles forward and backward.
- The castle is behind you. This universal exercise not only helps the shoulders and neck, but also stretches all the muscles of the arm, opens the chest and stretches the fingers. Which is especially important for those who type or perform small manipulations with their hands. Sit upright, bring your shoulder blades as close to each other as possible, straighten your arms behind your back and clasp your fingers. Now pull the lock away from you as far as possible. You can complicate the exercise by turning the lock outward - open your thumbs and point them down, turning your palms towards the floor.
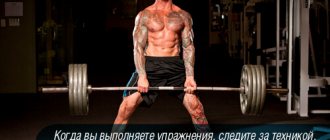
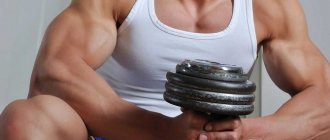
Shoulder exercises with dumbbells in the gym
Working out in the gym is the heavy artillery. Even basic exercises for the shoulder muscles for men and women, performed using professional equipment, lead to the desired result faster than home exercises.
Beginner athletes should first master one or two variations of the basic press.
We offer the following exercises to pump up the shoulder muscles.
Standing barbell press
Stand straight with your feet shoulder-width apart. Take the projectile with an overhand grip and lift it to the chest line. Raise the barbell, exhale and pause for a few seconds. As you inhale, lower the projectile to the starting position.
For tips on how to do this, watch the video:
https://youtu.be/XsqUjjgYPS8
Bench Press
Sit on a bench and bend your back slightly. Take the barbell with a wide grip, and as you exhale, lift it, straightening your arms. As you inhale, lower the projectile behind your head. Perform the exercise as smoothly as possible, avoiding jerking. To diversify the exercise, alternate lowering the projectile behind your head and towards your chest.
Stretching
Stretching exercises are the main exercises for correcting stooped posture in any person. Stretching helps release tension in the chest, hip flexors, hamstrings, and quadriceps, allowing the spine to become more upright without having to pull the body forward by hunching the back.
Try to perform each exercise for 20-30 seconds several times a day. If the situation is not as dire as it seems, then just a couple of exercises will be enough to avoid slouching.
This is one of the simplest exercises that allows you to open your pectoral muscles and stretch your shoulders. Concentrate on pulling your shoulders back and down, while keeping your neck straight, without moving it forward.
Stand straight, arms relaxed at the sides of the body. Clasp your hands behind your back. Gently move your shoulders back until you feel maximum chest opening and tension in the front of your shoulders.
Just like spasms in your chest and shoulder muscles, spasms in your hip extensors can cause your torso to move further forward. Relaxing this muscle group will help maintain your posture and counteract the tension of sitting for long periods of time.
Start in a classic lunge position: back straight, right leg bent at the knee in front, left leg extended back. Slowly lower your left knee toward the ground until you feel tension in the back of your thigh. To make the exercise more effective, tighten your calves on your left leg. Hold this position for 20-30 seconds, then do the same with your right leg.
It would seem that we are talking about stoop. How to correct slouching by paying attention to the lower body? Everything is very simple. Our body is a single organism. Since the quadriceps are located at the front of the body, poor posture causes these muscles, just like the chest muscles, to become compressed. If you spend most of your time at the computer, then doing quadriceps stretching exercises is doubly important for you.
Stand straight, bend one leg at the knee and clasp your foot with your hand. Gently pull your foot toward your buttocks until you feel a slight stretch in the front of your thigh.
Sitting at a computer for a long time can lead to stagnation in the hamstring muscles. This congestion can lead to slouching as these muscles are connected to the pelvic spine.
To perform the exercise, sit on the floor, stretch your right leg in front of you, bend your left at the knee and rest your foot on the knee of your right leg. Lean forward until your chest touches your hips, reaching with your hands towards your right foot.
Hold this position for 20-30 seconds, then repeat on the other leg.
How to Maintain Good Posture
- Do this 10-minute exercise once a day, 4-5 times a week. You can do the exercises in the morning, evening or after your main workout. You can also break these 10 exercises into two workouts of 5 exercises and alternate them on different days.
- It is very important to watch your back not only during posture training, but also in everyday life on an ongoing basis. Self-control is the key to success. Always keep your back straight, whether you are sitting, lying down or walking.
- Ask people around you to constantly remind you about your posture. This will help keep your back in the correct position.
- Don't drop your belly when you walk. Pull it in, this will help the abdominal muscles to be toned. Namely, they are the basis for the formation of a muscle corset.
- You can also use a wall to correct your posture. Lean against the wall with the back of your head, shoulder blades, buttocks, calves and heels. Move away, maintaining your position, then return to the wall. This will help you quickly correct your posture.
- You can train your posture at home by walking with a book on your head. Although this is a slightly exotic exercise, it will help you remember the correct position of your back and reduce slouching.
- Don't forget to do full body workouts for a balanced workout. This will help strengthen the muscle corset, improve the overall tone of the body and get rid of back problems.
- If girls have a stoop, it is better to avoid (or minimize) high-heeled shoes. Especially if it causes discomfort or inconvenience.
- Remember that even regular posture training will not help you eliminate slouching if you do not watch your back throughout the day. 10 minutes of exercise will not bring results if, for example, you sit hunched over for 8 hours.
- Yoga is an excellent cure for slouching and back pain. Be sure to check out our selection of yoga exercises for beginners.
Training timer: 45 sec. work / 15 sec. rest
If you are training on a timer, then do not forget that you need to do some exercises first on the right side, then on the left. In this case, you can do the exercise on one side for 45 seconds, then the next 45 seconds on the other side, but then the total time of the posture training will increase. If you do not want to increase your workout time beyond 10 minutes, then divide one minute by 20-30 seconds on each side.
https://youtu.be/w_5VVI8esPU
Legs
During sedentary work, all leg muscles suffer - from the buttocks and back of the thigh, on which we sit, to the feet, depending on how we position them. It is more effective to stretch the leg muscles while standing using your own weight, but you can also do this at a table.
- Sit with a straight back, leave one leg on the floor, and extend the other forward. Try to raise it as high as possible, straining the front surface of the thigh. Pull your heel away from you and point your toes toward you, stretching the Achilles tendon. Repeat with the second leg.
- Open your pelvic muscles. Bend one leg at the knee and place its heel on the other thigh, swinging the bent leg. Repeat with the second leg.
- Stretch your hamstrings and glutes. Bend your leg, lift it as high as possible, and clasp it with your arms. Pull your knee towards you. Repeat with the second leg.
Yoga
At 30 years old, not all exercises for stooping are easy. For example, yoga poses require a unique combination of strength and flexibility. If, despite the previously mentioned exercises, you are still wondering “how to correct bad posture at home,” then we have selected several simple but effective yoga poses especially for you.
Cobra pose
Cobra pose not only allows you to open your chest as much as possible, but also works your back muscles. This exercise is great for slouching, helping to straighten your spine and push your shoulders back.
To perform this exercise, lie on your stomach. Tighten your lower back muscles and push away from the floor with your hands.
Focus on pushing your shoulders back as far as possible, tilting your head back slightly. Stay in this pose for 20-30 seconds.
This pose not only opens the chest, but also strengthens the front of the shoulders and lengthens the spine.
Get on your knees, place your hands on the floor so that your palms are directly under your shoulders, and keep your back straight. Gradually straighten your legs while lifting your hips up.
Hold the position for 20-30 seconds.
Upward facing dog
Upward-facing dog pose is similar to cobra pose, except that in this case, the hips are lifted off the ground and the arms are fully extended. This pose helps strengthen the muscles of the chest and abs, as well as the lower back and shoulders.
Lie face down on the floor. Straining your lower back, lift your body off the floor and, leaning on your hands, stretch your head up.
Your hips should lift slightly off the floor.
Stay in this position for 20-30 seconds. This pose can also be combined with upward-facing dog.
The benefits and harms of plow exercise
In this exercise, the emphasis is on the mobility, coordination and flexibility of the performer.
Typically, inversion poses are performed at the end of a yoga class. Thus, a person whose head is below the pelvis receives a wide range of healing energy impulses. Essentially, a person redirects all accumulated energy and clears the channels for newly arrived positive charges.
Having learned the plow exercise, many will be able to move to a higher level of self-development and knowledge. Physical benefits will also come after performing the exercise several times.
In this position, maximum extension of the spine occurs. Early defects in posture will improve, flexibility and mobility of the spine will develop.
The exercise also activates all functions of the intestines and urinary system. Problems with the internal organs of the small pelvis will disappear, and fat deposits in the abdomen and waist will also disappear. With systematic approaches, the exercise relieves nervous fatigue and increases mental activity.
Harm from the plow exercise can also easily occur if you do it carelessly or without the help of a professional. It is possible that performing this exercise will lead to severe injuries to the intervertebral discs, that is, they can provoke a rupture of the disc and develop a herniation in the lumbar spine. And the hernia is often removed surgically.
This exercise is contraindicated:
- people with high blood pressure and cardiovascular diseases;
- with diseases of bronchial asthma;
- with consequences of traumatic brain injuries;
- people suffering from epilepsy;
- with eye diseases (glaucoma, retinal rupture);
If you have doubts about whether you are performing the exercise correctly, it is better to do it under the supervision of a trainer.
Brain workout
Our productivity is affected not only by physical activity, but also by mental stress. When overworked, fatigue inevitably sets in, which weakens brain functions. We begin to make careless mistakes, forget some details, and cannot immediately grasp the essence of the task. To increase your productivity, combine body training with brain training.
Vikium brain simulators are designed in a simple game form, and one workout takes only 10 minutes. The program itself will create a development program for you and will even remind you that it’s time to cheer up. Train for free for a quick boost, or get full access for the ultimate boost. Be productive every day!