Benefits and disadvantages of exercise
Pull-ups on a low bar are an exercise that has been part of the basic elements of school physical education since the times of the USSR. This technique was often called “female”, since it is a simplified version of the classic pull-ups. However, the technique of the Australian version has several variations and is used not only as a simplification, but as a separate exercise.
Benefits of Australian pull-ups:
- Suitable for athletes with a low level of physical fitness.
- One of the best and safest movements for training the back muscles.
- Significant development of the rear deltas and improved posture.
- No compression load on the vertebrae.
- Minimum load on the shoulder joints.
- Versatility - you can do Australian pull-ups at home, on the sports field, gym or any other place.
The disadvantages of hanging pull-ups while lying down are conditional. They are associated with technical errors and the inability to concentrate the load on the right muscles. The only disadvantage worth considering is the strain on the upper back and neck.
Because of this, horizontal pull-ups on a low bar should be used more carefully by people who have problems with the cervical area of the spine.
GTO standards for hanging pull-ups on a high bar (number of times)
| — bronze badge | - silver badge | - gold badge |
| Stage (age) | Boys | Men | ||||
| 1st stage (6-8 years) | 2 | 3 | 4 | |||
| Level 2 (9-10 years) | 2 | 3 | 5 | |||
| Level 3 (11-12 years old) | 3 | 4 | 7 | |||
| Level 4 (13-15 years old) | 4 | 6 | 10 | |||
| Level 5 (16-17 years old) | 8 | 10 | 13 | |||
| Level 6 (18-24 years old) | 9 | 10 | 13 | |||
| Level 6 (25-29 years old) | 9 | 10 | 12 | |||
| 7th stage (30-34 years old) | 4 | 6 | 9 | |||
| 7th stage (35-39 years old) | 4 | 5 | 8 | |||
| 8th stage (40-44 years old) | 5 | |||||
| 8th stage (45-49 years old) | 4 | |||||
| 9th stage (50-54 years old) | 3 | |||||
| 9th stage (55-59 years old) | 2 | |||||
Pull-ups from hanging on a high bar are performed from an IP: hanging with an overhand grip, hands shoulder-width apart, arms, torso and legs straightened, legs not touching the floor, feet together.
The participant pulls himself up so that his chin rises above the bar of the bar, then lowers himself into a hanging position and, having fixed the IP for 0.5 s, continues to perform the test. The number of correctly completed attempts is counted.
Errors (the attempt is not counted):
- pulling up with jerks or swings of the legs (torso);
- the chin did not rise above the bar;
- lack of fixation at 0.5 s PI;
- alternate bending of arms.
What muscles work
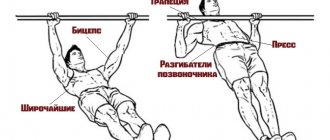
Grip position affects which muscles are used during the movement. The standard technique uses:
- Latissimus muscles.
- Biceps.
- Trapezius muscles.
Also in constant tension are the core muscles, which are activated to maintain the position of the body.
Alternating the grip or changing the apparatus (for example, if you do a movement on the rings) allows you to vary the load:
- Reverse grip (palms facing you) – switches the load to the lats and biceps. It is considered the simplest option, since these muscles are the most developed for beginners.
- A straight grip (palms facing away from you) is the best option, in which the load is evenly distributed on the back, trapezius, biceps and rear deltoids.
- Wide grip - partially reduces the load on the biceps, more includes the lats, diamonds and triceps.
- Narrow grip - switching the load on the biceps and forearms. It is also worth considering that this position of the hands will require a certain flexibility in the hands.
General recommendations
Try to exercise at least three times a week. But at the same time, you must remember that if you are feeling unwell or you slept less than 5 hours before training, then it is better to either limit the load by doing a light workout, or cancel the workout altogether and train after a good rest. In the next article I will tell you how to structure your training to prepare for cross-country. To avoid missing this article, subscribe to site updates.
Share on social media networks
Tweet
Smith machine technique
Smith Australian-style pull-ups can be done in any gym. Moreover, with this type of execution it is very easy to track progress and gradually lower the level of the crossbar.
Technique:
- Lower the bar to the required height and grab it with your hands. Press into your heels so that your body forms a straight line.
- Begin to bring your body towards the bar, performing the movement only using your arms and shoulders (the body does not change position).
- Pause for 1-2 seconds, then slowly return to the starting position.
When working in the Smith machine, you can choose any type of grip, so vary it depending on which muscles you need to load.
Variations
- Pull-ups with a narrow reverse grip. This movement involves more of the biceps and forearms due to its biomechanical nature. The exercise allows you to strengthen your arms and forearms in equal measure with your back, but does not contribute to long-term progress in the development of back muscles;
- Pull-ups with a narrow straight grip. They engage the serratus muscles and force the shoulders to work, but at the same time they work better on the latissimus;
- Australian wide grip pull-up. The most common option, which is used only for developing the lats. This option can be performed with either a forward or reverse grip, and involves the back most actively. Working out the back muscles will be even more active with a reverse grip, since the athlete’s elbows will automatically be pulled towards the waist;
- Pull-ups in training loops. This option is convenient because those who wish can include the rear bundles of deltoid muscles, as well as the latissimus dorsi muscles, in the work. Pull-ups in loops are well suited for those who are just starting to exercise, because you can stand close enough to the place where the projectile is attached and reduce the load so that it is optimal for a beginner. It is enough to perform the movement, pressing your forearms to the body, and you will achieve maximum activation of the latissimus dorsi muscles.
Australian pull-ups: simple version
Due to the fact that the bar on the parallel bars is high, this is the easiest option. Ideal for beginners to strengthen their muscles and master more difficult versions.
Technique:
- Grab the bar and walk your legs forward, resting on your heels. Hang by your arms so that your body forms a straight line.
- Bring your chest as close to the bar as possible.
- Squeeze your shoulder blades together and pause briefly at the peak point, then slowly return to the starting position.
Horizontal pull-ups on parallel bars: difficult version
The difficult option requires some physical preparation, since due to the position of the body, the maximum load falls on the muscles of the back and arms.
Technique:
- Grab the bars close to the edge of the bars.
- Jump forward so as to fix your feet on the bars (the most convenient option is to move your toes to the side in the instep area, fixing the position using the outer side of the foot).
- Begin to pull your body towards the bar, bending your arms at the elbow and shoulder joints.
- Do the exercise at a moderate or fast pace, without pausing at the top.
It is important to feel your back muscles and try to pull with your lats rather than your arms (the biceps are needed to bring your body closer to the bar at the top of the movement). This technique perfectly works not only the back (with emphasis on the upper part), but also the rear deltoids, core muscles and biceps.
Preparing for the exercise
Unlike the classic hang, which is inaccessible if you have limited mobility in the shoulder joint, this version of the exercise is accessible to everyone. Before starting your workout, you need to warm up, do a general cardio warm-up, a joint warm-up, and 1-2 sets of pull-ups using a lightweight technique.
For this, beginners can use an almost vertical stance on the ground and a high support, continuing the usual technique, but without a pause at the top.
The exercise can be included not only as the first back movement, but also at the end of the workout, in which case it can be performed after the other movements have been done. Then joint warm-up is not necessary.
For beginners, it makes sense to do 1-2 sets of push-ups at the beginning of parallel grip pull-up training. The idea is that the inclusion of antagonist muscles contributes to better functioning of the back muscles.
- It is important to keep your spine and legs straight. The knees do not need to be “pushed” forward, they should remain in a neutral position so that the ligaments do not experience discomfort;
- The height of the bar cannot be the same for all people. The average starting position is at waist level, and most people should perform the movement from there. But for beginners, higher bars are also suitable, and for intermediates and those who are trying to correct their posture, pull-ups literally from a lying position on the floor;
- The one who performs it technically correctly is the one who feels the contraction of the shoulder blades to the spine, and consciously brings them together, and does not simply bring the body with the biceps to the bar;
- The starting point of the exercise is characterized by emphasis on the heels, but if the athlete’s hamstrings experience discomfort, standing on the foot with pointed toes, or using various types of supports is allowed;
- Exhale while pulling up, inhale while slowly lowering the body down;
- You need to strive to ensure that both halves of your back work equally, with your forearms parallel to each other. This will promote equal muscle involvement and help you move actively.
Errors
- Work in terms of amplitude, lack of involvement of the back muscles in the work due to pushing with the legs;
- Bend your knees and push your pelvis towards the bar;
- Uneven movement, that is, pulling with one arm and half of the back;
- Retracted shoulder blades at the moment of peak contraction;
- Lack of rigid fixation of the feet, “riding with feet”;
- Holding your breath during exercise;
- Haste and careless pace
- Use a knurled grip and chalk if allowed in the gym. This will help avoid slipping while moving;
- The narrower your feet are, the more you have to involve the latissimus muscles in the work, and the harder you have to pull yourself up;
- Experienced athletes should aim for a parallel hang on the bar, and therefore keep their feet at a decent height
- Adjusting the load is quite simple. The closer the spine is to the plane of the floor, the more effective the work of the latissimus dorsi muscles. Therefore, in the gym, the pull-up bar or bar should be set as low as possible;
- In the gym, you can use not only footrests, but also straps to increase the range of motion by relieving the load on your forearms and palms. It makes sense to put on straps when the grip weakens
Option on rings
Australian ring pull-ups are considered the most difficult version, since in addition to pulling up the body, it is necessary to maintain coordination. This maximally loads the stabilizer muscles and core.
Technique:
- Grab the rings and step back so that the lines are extended. Gradually step forward and lower your body to the desired position.
- Bring your chest as close to the rings as possible.
- Take a short break and return to the starting position.
What to do at home
In the gym, the movement is usually done on a Smith machine. On the sports ground, the exercise is performed on a low horizontal bar while lying down. However, the exercise can be easily adapted to indoor or outdoor conditions. For this we use:
- Any horizontal bar or crossbar (including any stable projection).
- Gymnastic rings.
- TRX loops.
- Rubber bands (but only with a high degree of tension).
Recommendations for implementation in training for girls
Lying down pull-ups are an exercise that is best performed separately from the main program. This will allow you to work the muscles as much as possible and speed up progression. However, if you replace regular pull-ups with it, then it is optimal to insert it on back training days (in the first half of the session).
Try to avoid high-repetition sets. They are good for increasing strength endurance, but will not provide rapid progression. It is much more effective to work in the mode of 10-15 repetitions in 4-5 sets. Performing the last 2 sets to failure will further increase the overall benefit of the workout.
