What muscles are used by Australian pull-ups?
The largest muscle group that Australian pull-ups are aimed at developing is the back.
Namely:
- Latissimus muscles. This is a large muscle responsible for the width of the back. In sports slang they are called “Wings”. The development of this muscle will give the back a reverse V shape. Depending on the grip we use, we can work different areas of the lats. Namely, the area closer to the spine and further from it. This is discussed in more detail later in the article. This muscle is responsible for bringing the arms to the body.
- Rhomboid major and minor muscles. This is a small muscle mass responsible for the movement of the shoulder blades. And since we definitely need to bring them together at the extreme point of the exercise. This means that these muscles will be involved.
- Trapezoid. Acts as an assistant for the rhomboid muscles. That is, it helps them bring their shoulder blades together.
- Teres major and minor muscles. These muscles are located on the shoulder blade. And together with the broadest, they are responsible for the movement of the shoulder.
You can learn more about the back muscles from the article “ANATOMY OF THE BACK MUSCLES“
Also, in addition to the main ones, there are smaller muscle groups that also receive load. This:
- Posterior bundle of deltoid muscles. Works well when moving the arm back. Especially when the bar is grabbed with a wide grip. Also acts as a shoulder stabilizer.
- Biceps. It works in the final phase, when we bend the arm at the elbow joint. With the correct technique, it plays a secondary role.
Australian pull-ups
And of course, this exercise is not complete without the help of the stabilizer muscles. Such as:
- Abdominal muscles . The spine is stabilized from the front. And prevent it from twisting.
- Spinal extensors together with the gluteal muscles. The spine is stabilized from behind.
- Leg muscles. Quadriceps, hamstrings and calves. Legs are stabilized.
As you can see, the exercise is rightfully called basic. Since several joints are involved. Shoulder and elbows.
USEFUL TIPS
1) For very beginners, bending the legs at the knees is allowed, then it is necessary only on straight legs.
2) Pull up as conveniently as possible - with a wide, narrow or medium grip, as well as the opposite one, do not focus on any one of them, each grip has its own effect on the back muscles, forcing different parts of it to be involved in the work. The standard grip is when the forearms are parallel to each other at the top.
3) At the top point, the torso should touch the lower part of the chest to the barbell, or rather at the level of the nipples. If you see it performed at the level of the neck or head, this is not correct, as the back is not fully involved in the work.
4) The lower the crossbar is, the more difficult it is to pull up; the higher it is, the easier the exercise will be. The ideal option would be to perform pull-ups when the torso is parallel to the floor; to do this, place a gymnastic bench or other support under your feet.
5) When you pull yourself up, push your chest forward, arching your back in the lower back, make sure that your shoulders go back and your shoulder blades come together; when you lower, let your back muscles stretch, you can hunch your back for better stretching - all this will allow you to quickly reach the peak of contraction and muscle failure.
6) Throughout the entire exercise, the body should be stretched like a string, do not lower your pelvis, keep your abdominal muscles tense.
7) You can also use weights by attaching it to a belt; the number of repetitions per approach for men is 8-12, for women 8-10.
Squeeze the bar
Benefit: The correct grip will allow you to get the proper contraction of the muscles in your upper back and shoulders. This will make you stronger and allow you to easily lift your weight to the bar.
How to do it: Stand on a box or bench so that your arms reach the bar. Grab it lightly, with your hands slightly wider than your shoulders. Squeeze your hands three times. The third time, imagine that you are trying to squeeze the bar in your hands. Hold yourself like this while doing pull-ups.
Reverse Shrug
Benefit: Takes some of the work off the trapezius muscles. Shifts the load to the latissimus dorsi and teres major muscles.
How to do it: Hang from the bar with an overhand grip. Move your shoulder blades down and back. You will feel your lats tighten in your armpits and your shoulders move away from your ears. If you're not ready to hang from a bar yet, start by doing a reverse shrug on a pull-up machine.
Prepare to strike
Benefit: Most men perform pull-ups with an arched back. However, this undermines your efforts and risks back injury. Tighten your stomach as if you were about to be hit in the solar plexus to keep your back straight and firm.
How to do it: Hang from a bar and imagine that you are pulling your belly button towards your ribs. Maintain this tension throughout the exercise.
Squeeze your buttocks
Benefit: By squeezing your glutes and squeezing your hips, you'll increase stability in your lower body so your legs don't flop around, taking power away from your upper body.
How to do it: Squeeze your buttocks as hard as you can. The pelvis should move up a little, and the back should curve down a little.
Bend your body
Benefit: This position will force your lats to work together with your abs. This will increase your stability, allowing you to focus on lifting your body towards the bar.
How to do it: Tighten your abs, squeeze your hips together, and point your legs slightly forward so your body forms a wide “C.” Maintain this position throughout the entire exercise.
Benefit: A stiff body from crown to toe not only recruits more muscles, including the glutes, hamstrings, and core, but also increases pulling power in the lats and arms.
How to do it: Tighten all your muscles, from your fingers to your toes. Don’t relax your body at all, keep the tension from hang to hang.
Benefit: Reaching the bar with your upper chest and shoulders, rather than just your chin, helps maintain proper shoulder position.
How to do it: Look straight ahead and arch your torso slightly back so that your chin passes the bar. If you can, try to touch the bar with your collarbone.
Hang below
Benefit: Fully straightening your arms after each pull-up ensures that you don't use momentum to do rep after rep. This is more difficult, but will give greater muscle mass gains in the long term.
How to do it: Straighten your elbows fully between reps.
Benefit: Exhaling on the way up increases core tension, making it easier to move as a unit.
How to do it: Do not exhale all the air at once. Instead, use your abs to forcefully squeeze the air out of your lungs throughout the entire lift. On the descent, inhale as you straighten your arms.
Read more: Is interrupted coitus good or bad The whole truth
Do not fall
Benefit: Going down can help you gain strength even more than going up. This means you can’t let your body just fall down. Keep your descent under control.
Benefits of this exercise
The advantages of this type of pull-ups include the following:
- Performing horizontal pull-ups is much easier than classic pull-ups. Therefore, they are suitable for both beginners and professionals. And most importantly, girls can do them. This will allow them to strengthen their back muscles.
- This exercise will help increase the number of repetitions in PULL-UPS.
- They can be performed in any environment. At home, on the street or in the gym. The main thing is to find a low horizontal bar or rings. At home, use a low table that can support your weight. In the gym, a Smith machine or squat frame is suitable for these purposes.
- Suitable for people with back injuries. Since there is no load on the spine. Sometimes Australian pull-ups are recommended for athletes to do during the rehabilitation period after injuries.
- Wide variety of grips and techniques. They will help to load the muscles from various angles. Making your training more interesting and intense.
- Doing pull-ups on a low bar makes it easier to feel the work of your back muscles. Therefore, this exercise will help to establish your neuromuscular connection with the area being worked.
As you can see, Australian pull-ups have an impressive number of benefits. And they can benefit not only beginners, but also professional athletes. Although now the gym industry is increasingly moving away from the usual methods of training with free weights. Replacing everything with newfangled exercise machines. Of course, there is nothing wrong with this, but you still shouldn’t forget about pull-ups. After all, it was they who gave expressive form to many famous athletes.
Benefits and contraindications
Considering the versatility of Australian pull-ups, it is easy to see their benefits for the human body. It is expressed in:
- good development of the posterior dorsal muscles and anterior pectoral muscles;
- tightening the muscles of the upper and middle parts of the body, which contributes to effective preparation for more serious sports loads (for example, the classic hang on the bar);
- alternate loads on different muscle groups (in a set of exercises), which allows individual muscles to rest in turn, making the workout even more effective;
- simplicity of execution (allows even beginner athletes to use the exercise), without serious sports training.
Regularly performing Australian pull-ups will not only help keep the body in good shape, but will also contribute to the greater effectiveness of other exercises, of course, if a person has no direct contraindications to performing them. Harm from horizontal pull-ups is possible only if the following problems exist:
- injuries to the shoulder and elbow joints;
- history of lumbar injuries (for minor injuries, Australian pull-ups should only be performed in a linear position);
- diseases of internal organs, with pronounced pain syndrome.
Important! Even if the pain present is not associated with joints or muscles, you should not overload your body, because even light pull-ups or push-ups can worsen the general condition
Important! Even if the pain present is not related to joints or muscles, you should not overload your body, because even light pull-ups or push-ups can worsen your general condition.
Grip width
There are several options for gripping the horizontal bar. These are: wide, medium and narrow. Depending on what grip we choose, the amplitude of movement will change. That is, to shorten or increase. And also the area of influence on the lats.
- Wide. With this grip, the range of movement will be short. And doing pull-ups will become much harder. Therefore, it is better for beginners to save it for later. When the arms are positioned wide, the outer part of the latissimus muscles will receive more load, and the rear deltoids will also be more stressed.
- Average. This is an intermediate grip. Which equally loads the inside and outside of the lats. Therefore, doing pull-ups with this arm position is much easier. But do not forget that with a medium grip, the biceps are more involved in the work. Since the arms will bend more than with a wide one. And of course, the amplitude of movement will increase. This means we can stretch our lats more at the bottom.
- Narrow. This one is enough and allows you to work out the inner part of the lats. That is, the area is closer to the spine. The movement itself will take place in maximum amplitude. But now the biceps will begin to assist quite strongly when lifting the body up. Keep this point in mind when performing pull-ups; narrow is enough.
Find the one where you feel the maximum work of your back muscles. And make it the main one in this exercise. But you shouldn’t stop at just one thing. For beginners, you can progress by changing your hand position. Starting with a medium grip, then narrow and wide. More professional athletes prefer to alternate all 3 in one workout.
Benefits of Exercise
What muscles work when performing such simple pull-ups? When performing Australian pull-ups, the following are used:
- deltoid muscles;
- press;
- pectoral muscles;
- biceps;
- infraspinatus and
That is, with the help of Australian ones you can quickly pump up the front and rear muscles of the body. Taking into account the alternate change of muscles in a set of exercises, unused muscles take turns resting when performing various workouts. It is thanks to this approach that the effectiveness of training remains at a high level.
Type of grip
We can modify pull-ups by more than just grip width. The load will also change depending on how we grab the crossbar from above, below or in parallel.
- Grabs from above (pronated) . That is, we grab the bar as in any classic pull-up from above by the bar. The palms are facing in the direction of the legs. This grip option puts less stress on the biceps, since it is more difficult for us to bend the arm at the elbow. Therefore, the back will be more involved. But despite turning off the biceps with this grip, it is more difficult to move the elbows back. Especially if you use a wide hand position. Therefore, we will not be able to maximally squeeze the latissimus muscles.
- Underhand grip (supinated). On the contrary, it will involve the biceps more strongly. Therefore, it will be easier to perform pull-ups with this grip. But at the same time, we will be able to move our elbows back further, due to which we will achieve maximum contraction of the lats.
- Neutral grip . Of course, we won’t be able to grab the crossbar like that. Therefore, a neutral grip is mainly used when working with rings or TRX loops. This does not greatly affect the efficiency. But it is worth considering that this grip is anatomically more convenient for us. And we can bring our elbows just as far together as with an underhand grip.
I also advise beginners to start with a lighter option, this is enough from below. And then, as you practice, change the position of your hands until you find a more comfortable position for yourself. You should focus on the sensations in the target muscles. Where you feel it most strongly, that grip will be most effective for you.
How to do
To achieve the most effective results from your workout, it is important to correctly perform all the exercises provided by the program. In the case of Australian pull-ups, much in this matter depends on the specific design and arrangement of the crossbar itself, so we suggest you look into this issue more carefully.
Grip options and bar height
Australian pull-ups can be performed in a variety of styles, focusing on different muscle areas, and the most popular variations are generally considered to be:
Important!
In most cases, it is better to avoid sharp turns of the body, which will ensure the “purity” of the pull-ups.
Execution technique
The classic execution of Australian pull-ups requires the athlete to perform several sequential actions:
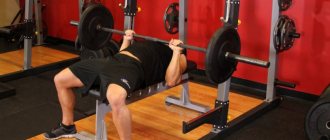
- Having chosen a crossbar with a height of no more than 90 cm, we install it on the supports so that it is no higher and no lower than the belt line.
- Having sat under it a little, we grab the bar, while spreading our arms a little wider than the shoulder line, bring our legs forward and rest against the floor (the crossbar is approximately at the level of the middle of the chest) - this is the starting position.
- We fully align our arms so that the body position becomes as linear as possible.
- As you inhale, pull your torso towards the bar, simultaneously lowering your elbows and bringing your chest to the bar (shoulder blades are brought together).
- We linger in this position for a few seconds.
- As you exhale, we gradually return to the starting position and repeat the exercise again.
Video: Australian pull-ups: technique
Once you have mastered the basic version of the execution, you can move on to more complex techniques of Australian pull-ups, changing the fulcrum, body position and height of the bar, each time adjusting the angle of your body to them (if possible, it is worth achieving work with almost 100% of your own body weight ).
Important!
All movements should be smooth and performed at the same pace, without jerking.
Leg position
Oddly enough, legs also play an important role in Australian pull-ups. And their position can both simplify the exercise and make it more difficult.
- First level. Legs bent at the knee joint 90°. And they stand on the floor. Thanks to this positioning, part of the weight will be taken by the legs, thereby making it easier for us to complete the given number of pull-ups.
- Average level. The legs are fully straightened and the heels rest on the floor. You will immediately notice how the exercise becomes more difficult.
- Advanced level. The legs are completely straight and lie on a hill. Thanks to this setting, we will take an even more horizontal position. And following the logic of the previous paragraph about body position. We can conclude that the legs will not only not take the weight on themselves, but on the contrary, they themselves will act as an additional burden.
As you can see, Australian pull-ups can be adjusted to suit almost any person. Regardless of gender and level of training.
Equipment for training at home
To conduct Australian-type training, you will need a horizontal bar that is approximately one and a half meters high. To perform Australian pull-ups at home, a spacer bar in the doorway, which can be positioned at the required height, is ideal. You can use one of the bars from a special set as a crossbar.
In addition, a fairly long belt thrown over a ceiling or wall horizontal bar would be a good option. Of course, this is not the same as doing pull-ups on a bar, but it’s also suitable as an additional exercise. By the way, this exercise is even more difficult in practice than a regular pull-up.
Execution technique
To begin, take your starting position. To do this we need to find a low horizontal bar. If we work out in the gym and use the Smith machine.
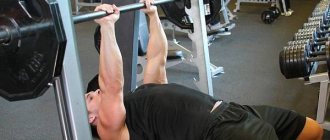
Initial position:
- Set the barbell to the desired height. In the classic version, this is approximately at hip level. The main thing is that while extending our arms, we do not touch the floor with our backs. The same goes for the pull-up option.
- We grab the bar (horizontal bar, loops, rings) with the selected grip. Straighten your arms completely. We have to hang on to them.
- Next, choose a comfortable position for your legs. And we straighten up completely. So that from the heels to the very head our body is stretched like a string. Tighten your pelvis so that it does not sag down.
Performance:
- As you exhale, we begin to pull the chest toward the bar. The movement should occur by bringing the shoulder blades together, and not by bending the arm at the elbow joint.
- At the top point, take a short break. And as you inhale, we begin to lower ourselves down under control.
Watch your movements. When lifted, the horizontal bar should touch the lower part of the pectoral muscles. When lowering down, do not round your back.
Australian pull-ups[edit | edit code]
Stand under the bar, which is at waist level, with your legs extended forward and your body straight from head to toe. Grasp the bar tightly and tense your entire body, pulling your chest toward the bar. Controlling the movement, lower yourself to the bottom phase of the exercise. As with push-ups, try not to bend your hips or squeeze your shoulders. Press your heels into the floor to avoid slipping.
To make Australian pull-ups more accessible to beginners, use a bar that is at chest level rather than waist level - this will give you more leverage.
Recommendations for implementation
- Your movement should take place in three stages. 1) Pull your shoulders back. 2) We begin to bring the shoulder blades together. 3) Bend your arms at the elbow joint. By doing this exercise, you can feel the work of the latissimus muscles.
- Work at the maximum available amplitude.
- As you do the last two reps, pause at the top for as long as you can. Then start slowly going down. This technique will allow your muscles to work statically. Making them stronger and stronger.
- Constantly use different grips and techniques for constant progression.
- Once you can do 12-15 reps in 4 sets, you can move on to regular pull-ups. If you like this exercise, then you can add weight by placing a weight plate on your chest. Or use a special vest with weighting.
- If you want to work your biceps with this exercise. Then use a reverse grip. And pull not to your chest, but to your forehead.
- Keep your back straight throughout the entire exercise.
- Control your movements, avoiding swaying and lifting due to inertia.
Remember, only the right technique can give you the result you want. Moreover, in the shortest possible time period. Don’t rush to move from one option to another if you feel you’re not ready yet. But you shouldn’t stay in one place. Still, load progression is the basis for muscle growth.
Who are the exercises for?
The horizontal pull-up technique is quite easy, which is why it will be an excellent opportunity for people who are just starting to exercise. This option is perfect for girls who find it difficult to pull themselves upright.
Read more: Anatomy of the leg muscles, subtleties and secrets of muscular thighs
If a man wants to visually enlarge his back, then this option will be ideal, since the biceps will also work, which is important
Horizontal pull-ups affect the following parts of the body:
- superficial muscle of the shoulder;
- muscles of the trapezius type;
- press;
- muscle-tendon septum between the thoracic and abdominal regions;
- broad muscles of the posterior surface of the body;
- biceps;
- infraspinatus muscle and diamond-shaped muscle.
If you need to tone up the front and back muscles of your torso, then this is the best option for you. Since the muscles do not work all at once, but at the same time in a set of exercises, they get enough time to rest
The approach under consideration will help bring you high results, which is very important both at the initial stage and in the future.
Execution technique
Grab the bar in a way that makes you feel comfortable
Make sure your arms are completely straight and your body is at a right angle to the floor. The heels should touch the floor. Please note: the correct frequency of the “inhale-exhale” technique must be observed. It is necessary to exhale when lifting the body
The chest should touch the bar at this moment. Watch your shoulder blades: they should be contracted throughout the entire procedure as you work your body, so that all the necessary muscles receive a load. After you exhale, you need to return to the position you had at the very beginning. Attention!
Having familiarized yourself with the basic requirements, you need to begin to act according to the next stage - perform exercises for 5 counts. If you want to increase the load, then change the height of the crossbar. Try to also watch the inclination of the body, since at the initial stage it will not be horizontal, which will help train with everyone.
Australian pull-ups will help you feel masculine and strong because it will work your lats and trapezius muscles, but this is only possible if you don't skip workouts and do it every day.
Those who are just starting to practice should do 6 sets of 12 repetitions with different grips. Athletes who have been involved in this field for a long time are advised to do this exercise after general training.
What are the positive characteristics of Australian pull-ups:
- You can practice at home if you have several chairs nearby that are equal in height and a crossbar that can be placed on their backs.
- This type of training helps prepare the body for the next option - moving on to more serious and difficult exercises.
- The technique is quite simple and does not require much effort.
- You do not need to find someone to back you up, since the exercises are quite simple and do not pose any particular danger.
Inclusion in the training program
Australian pull-ups can be safely done at the beginning of training and done 3-5 sets for the maximum number of times. A change in grip is also welcome. To target all areas of the back.
They are also used to learn how to perform classic pull-ups. Or increase the number of repetitions in them. For this purpose, light training is used. That is, we do three approaches without rest, first with a medium grip, then with a wide grip and finally with a narrow grip. Basically, do each approach to failure. In total, perform 3-4 such circles.
As you can see, the Australian pull-up, although little known, is extremely effective. Any athlete can use them. Therefore, at the initial stage, I would recommend that you use them in your training. And when you reach a professional level. Then decide for yourself whether to leave them or it’s time to move to a new level.
Good luck to everyone in your training!
Basic mistakes
Not everyone does horizontal pull-ups correctly, so we decided to look at some mistakes made by beginner athletes:
- deflection of the body and additional stress on the back: the body and legs should be at right angles, only in this way will you achieve success;
- technique with jerks: you should try to do all actions slowly and smoothly;
- shoulder blade extension: if you want to transform your latissimus muscles for the better, then watch your shoulder blades and keep them in the same position;
- touching the bar in the neck or abdomen: your back will increase in size if you reach the bar with your chest.
Horizontal pull-ups are quite simple to perform. If you perform hanging pull-ups lying on a low bar, your health will begin to improve, over time you will feel a surge of energy, you will feel that your back has become stronger and stiffer.
We recommend that you also read the article on the topic - how to do pull-ups on a horizontal bar. There you will learn what grips exist to pump up your arms, back, as well as chest and shoulders. Follow our recommendations and exercises and become healthier.
“Australian” pull-ups are done on a bar, which should be located at waist level. This exercise is the best option for those who are not yet able to master the classic version of pull-ups, and especially for girls at the initial stage of their training aimed at improving the body. Many people are wondering how many “Australian” pull-ups will be required to prepare for regular pull-ups? Once you can do several sets of 10 repetitions, you can safely move on to a new stage in the training program - regular pull-ups.
However, even when you switch to the classic version, the “Australian” can be left in the program as an exercise for working the rear delts and muscles of the middle back.
“Australian” pull-ups can be combined with push-ups in supersets, given that each exercise is designed to work opposite muscles. While some muscles are recovering, others will be stressed. As an option, you can also consider combining “Australian” pull-ups with classic ones in cases where you plan to work on increasing the number of pull-ups in one approach.
Training options
Ways to perform Australian pull-ups:
Beginner athletes are best suited for exercises performed with a forward and reverse grip. First of all, this applies to those who, with the help of Australian training, want to learn how to do pull-ups in the classical way. In such a situation, performing several approaches 10 times will ensure the development of basic skills in exercises on the bar. A little later, the bar can be lowered a little to begin learning more complex variations of hanging. After all, even experienced athletes often use Australian pull-ups, albeit on a low bar, for additional muscle pumping at the end of the workout.