Street workout combines easy and complex exercises, the variety of which makes training interesting and useful. There are also specific elements characteristic only of this sport. For workout masters, the terms “flag”, “prince’s exit”, “horizon” take on a special meaning, so let’s try to understand the basic elements of street sports.
Description
This exercise is borrowed from artistic gymnastics. Now it is actively used in the direction of street fitness workout.
The "horizon", or "planche" as it is often called, is an exercise in which the body is held horizontally with straight arms in a position parallel to the floor. The hands should be at the same level as the belt.
Many people wonder how to learn the “horizon” exercise on their own. This requires physical training and patience. A beginner should not try to perform the element right away; unprepared muscles and ligaments can be injured.
To learn, you need to acquire knowledge about the exercise and prepare physically. We'll talk about this below.
What muscles are involved?
To perform this element on the horizontal bar, it is necessary to purposefully develop certain muscle groups for the “horizon” exercise, which are involved in the execution process.
First of all this:
- pectoral muscles;
- triceps;
- anterior deltoids;
- spine extenders;
- abdominal muscles;
- round muscles of the back;
- muscles - body stabilizers;
- gluteal muscles.
In addition, good balance and coordination are required to hold the plank.
Lose Weight with the 30-Day Fat Burning Plank Challenge
The proposed 30-day fat-burning plank program will speed up your weight loss process tenfold, taking just a couple of minutes a day.
If you are just at the very beginning of your weight loss journey and have already heard about the plank, congratulations - you are more knowledgeable than I was when I was a beginner!
As I said before, until I started my journey into the world of sports a couple of years ago, I was not familiar with training and different exercises.
I first encountered planks while doing my first Beachbody exercise routine, P90X. I quickly realized how many muscle groups the plank uses.
The planks are extremely varied. All the variety of variations of planks will help beginners strengthen their muscles, and the most trained athletes will receive an adequate load.
Using this 30-day fat-burning plank program, you can train your core muscles, including the back muscles that are most important for our 40-year-old bodies.
In women over 40, core muscles often weaken over time. This can be seen from the saggy, flabby belly.
The back is often injured when doing housework if the core muscles are not trained.
This is where the 30-Day Fat Burning Plank Challenge comes into play. The only exercise that takes just a couple of minutes a day will improve the condition of your core muscles, reduce the risk of injury, speed up your metabolism and lose excess fat.
Benefits, harms, contraindications
Like any other sports element, the horizontal exercise on the horizontal bar has its advantages and disadvantages.
As positive points it is worth noting:
- additional shoulder relief;
- increase in deltas and triceps;
- strengthening the abs and torso;
- Thanks to the powerful static load, visceral fat is actively burned.
The only disadvantages include insufficient physical training, due to which you can get injured while performing the exercise.
Contraindications to performing the element are:
- joint injuries of the hands (shoulder, wrist or elbow);
- dislocations;
- weak fingers;
- spinal hernia or injury;
- protrusion.
Preparatory exercises
Teaching the “horizon” element includes a number of preparatory exercises, each of which requires step-by-step development. Before performing static exercises, it is recommended to start with strength exercises that prepare the muscles. It is also important to prepare your shoulders to support your body weight with your muscles rather than your joints.
Below are several exercises that are performed in sequence as a preparatory workout:
- Exercises with a barbell or dumbbells. The sports equipment is taken with palms down and slowly raised with outstretched arms in front of you, the exercise is repeated several times. It is good to perform statics with a barbell or dumbbells; for this, the apparatus is raised to shoulder level and held on outstretched arms for as long as possible.
- Push ups. This exercise helps develop the muscles of the back and shoulders. During the execution of the element, it is necessary to move the body forward. If you cannot achieve this position the first time, you can gradually tilt your torso forward during each workout.
- Push-ups on hands with feet against the wall. During the exercise, the body weight is transferred to the arms, while the legs should not rest against the wall, but only slide along it. The readiness of the shoulder muscles for the “horizon” is determined when a person can perform three sets of 20 push-ups.
- Float. During the exercise, the emphasis is on the triceps. Take a position with emphasis on the palms and feet; at the initial stage, bending the arms is allowed. Resting your knees on your elbows, lift your bent legs off the floor, lifting your lower back. It is necessary to maintain balance for at least a few seconds, gradually increasing the interval.
- Exercise “closed horizon” (with legs lifted). You can include such a load in training only after the elements described above have been consolidated. Place your hands on the floor, legs straight, body straight. The weight is transferred to the arms, the legs are lifted off the floor and the body is kept suspended for as long as possible. When it becomes easy for an athlete to perform such a plank, he can make it more difficult by pressing his knees to his chest.
For newbies
Beginners begin to master street workout with simple elements. A large number of complex turns, push-ups, pull-ups and even squats out of habit will lead to falls, unpleasant sensations, and disappointment.
It is not necessary to perform the first elements on sites with a large selection of equipment. Bars, a horizontal bar, benches without backs and stairs are quite suitable.
Warm-up is required
Before you start doing the main exercises, you need to warm up. The purpose of warming up is to reduce the risk of injury, prevent muscle damage, warm them up, increase blood circulation, adapt to physical activity, and get ready for exercise.
Warm-up includes:
- Rotations of the arms, neck, torso, bending, turning, stretching of arms.
- Running or jumping in place.
- Faster rotations, twists and tilts.
Basic elements
Many programs have been developed for beginners. One of the most effective is a set of exercises for 4 days. It includes only the basic elements. On the first day they do:
- Wide grip push-ups;
- Shoulder-width pull-ups;
- Raising legs from a hanging position;
- Incline dips.
These are all basic elements; they are modified in the following days. In the second workout, pull-ups are performed with a wide grip, and push-ups are performed straight on the uneven bars. The third one uses a narrow grip for pull-ups. In the fourth, they do push-ups from the floor in the usual way, and straight on the uneven bars.
5 day program
The five-day program is designed to train five days a week. It may include various exercises, but its meaning is quite accurately reflected in the technique of performing pull-ups on a bar.
- On the first day, do five sets of regular pull-ups. The number of lifts depends only on the athlete’s capabilities. They are performed at a fairly fast pace.
- During the second workout, perform the “pyramid” exercise - each approach will be marked by an increase in the number of pull-ups. In the first run they do one thing, in the second – two, and so on until the maximum is reached. Rest between sets is 10 seconds. After the last one, they make another approach with the greatest load.
- On the third day, so-called training sets are performed. The number of approaches is 9, the rest between them is no more than one minute. The number of exercises in one session depends on the strength and endurance of the athlete. Each complex includes pull-ups with a narrow, regular and wide grip.
- On the fourth day, a maximum load training set is performed with an unlimited number of approaches. Do the exercises until you get tired.
- In the last workout of the week, the most difficult exercises of the first four days are repeated.
A set of simple exercises
Workout training starts with simple exercises. One of the basic elements for beginners is the pull-up. It involves the muscles of the arms, back, shoulder girdle, neck, chest and abs. They usually pull themselves up with their hands shoulder-width apart. Narrow- and wide-grip pull-ups are also popular.
The second element is push-ups. The usual push-ups from the floor and parallel bars are interspersed with more complex exercises with clapping, resting on the ball. When performing an element on the uneven bars, the muscles of the arms and chest are used, while the load on the abs and back is reduced.
The exercise for lifting legs from a hanging position is used by beginners from the first training. Performing body lifts on the crossbar or parallel bars begins with hanging upside down. Do squats anywhere on the site. Already at the initial stage of training, strength elements are performed with insignificant additional weight.
Warm-up
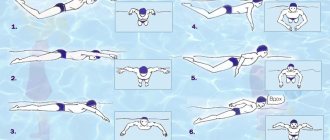
An approximate warm-up before performing the “horizon” exercise is as follows:
- Rotational movements knead the joints of the hands. Start the exercise with a small amplitude, gradually increasing it. One set of 10 rotations.
- Tilt the head left and right, back and forth 10 times.
- Tilt the body left and right 10 times. Circular movements of the body clockwise and counterclockwise 10 times.
- Bend down 10-20 times.
- Bend down and jump up 10-20 times.
- Boxing 30 times at the first stage, gradually increasing to 50 times.
- Delta stretching. With your left hand, take the right shoulder and press it towards the sternum, then repeat the exercise with the other shoulder.
- Pull-ups on a wall bars or horizontal bar 5-10 times.
- Push-ups on the floor from 5 to 20 times, 3 sets.
- Push-ups with legs against the wall from 5 to 20 times, 3 sets.
- Lifting dumbbells on straight arms from 10 to 30 times in 3 sets.
- Plank on straight arms 30-60 sec.
- Side plank 30-60 sec.
- Hitch.
Strategy one
Stage 1.
We put our hands at the waist and do push-ups in this way - and this is the first exercise that will bring you one step closer to the desired element. I bet that if you tried to do push-ups like this from scratch, you wouldn't succeed. Yes, this exercise is difficult to perform, but do not despair - everything is achievable, the main thing in sports is patience and perseverance!
The exercise is aimed at developing the triceps, shoulder girdle and back muscles.
How to do push-ups with your hands at your waist
- Take a lying position. The body forms a straight line from neck to toes.
- Place your hands as close to your waist as possible. You can place your palms parallel to your body or spread them apart - this does not play a special role, but the load on the wrists changes. If your hands are not flexible enough, then it is better to spread your fingers to the sides.
- Make sure you breathe correctly! The body rises - exhale, the body falls - inhale.
- You may not be able to do push-ups with your hands at waist level right now, but that's okay. With each workout, try to place your hands closer to your pelvis.
To learn how to do push-ups without legs, repeat step 1 until you can easily do 20 push-ups with your hands at your waist.
Stage 2
The next task is horizontal push-ups against a wall or other support. This exercise is closer to planche push-ups, but differs from them in that here the legs rest against the wall rather than being held in the air.
How to do push-ups from a wall
- Take a lying position. At the same time, keep your body straight, do not bend.
- Place your hands at waist level. Place your feet on the wall (you will need to slide your feet along the wall, wear socks).
- Raise and lower your body on your arms without using your legs. They are just support. In this exercise they have to slide on the wall just to keep the body balanced.
- You should be comfortable doing 20 (preferably more) reps before you begin learning unsupported horizontal push-ups.
Stage 3
Let's complicate the task. Now you need to take emphasis on the horizon with your legs apart (they should be in weightlessness, without support). Try doing push-ups while remaining in this position.
If you performed the first two stages efficiently and conscientiously, then you should be able to do push-ups 5-10 times without any problems.
Stage 4
Finally, let's get to the most important part - push-ups without legs with legs together. In fact, we performed them in the third stage, but this is still a summary exercise, since push-ups with legs apart are still an order of magnitude easier
- Take a lying position.
- Place your hands at your waist.
- Bring your legs together.
- Do horizontal push-ups from the floor.
For advanced: perform all exercises with fists and fingers.
Technique for performing on the horizontal bar
It is important to perform the “horizon” exercise correctly (the photo of which is presented below). To do this, the following sequence of actions is followed:
- The bar is grasped so that the elbows are turned towards the stomach. The grip can be either upper or lower, the main thing is that it is comfortable to hold.
- The arms are spread shoulder-width apart and pulled above the bar, while the body weight is transferred to the arms.
- The legs are raised to a horizontal position, while the torso is moved forward. Hips and shoulders should be at the same level, toes pointed. The entire body should form a straight horizontal line, without sagging of the body or legs.
- Ideally, the “horizon” is performed with the legs closed, but it is allowed to separate them in the first stages. The wider your legs are, the easier it is to maintain balance.
- The static position is held for as long as possible, then they again take a vertical position and jump off the horizontal bar.
Common mistakes
Beginners and people trying to learn how to do the horizontal exercise on their own often make mistakes that interfere with their training.
The most common of them:
- Flexion of the elbow joints during the execution of the element.
- Supporting the body with elbows, shoulders, joints.
- Arching of the back, most often the lower back.
- Lifting of the lower legs.
- Raising the buttock above the level of the body.
It is worth paying close attention to the listed errors and preventing or correcting them. The “horizontal” exercise is not only physically, but also a technically complex element, therefore, when mastering it, the body tries to lighten its load by shifting the center of gravity or providing additional support. To perform it correctly, you need to learn how to control your body, as a result, endurance increases significantly and muscle mass increases.
What does the “climbing” exercise do?
The “climber steps” exercise loads different muscle groups, so it can be considered not only effective, but also truly universal. If you follow the technique, training not only strengthens your abs, but also engages other muscles and helps keep them toned. The exercise allows you to:
- strengthen the deep muscles of the trunk, which provide stabilization of the spine;
- tighten your abs, legs and arms;
- maintain spinal health;
- get good posture;
- increase the elasticity of ligaments;
- compact bone tissue;
- intensively burn calories for weight loss;
- form a sculpted, beautiful press.
The benefit of the “climber” exercise also lies in the fact that with its help you can increase the vitality and endurance of the body, necessary for strong physical exertion.