Along with sports and fitness, a variety of additional accessories are included. Some of them actually allow you to train more effectively.
For example, weights for arms and legs. But the design of these devices is so simple that you can easily make them yourself. At the same time, you will save a lot of money, since in specialized stores the cost of these goods can be unreasonably high. Playing sports should not require constant financial influences. Therefore, we bring to your attention several ways to make weights with your own hands.
DIY hand weights: second method (easy)
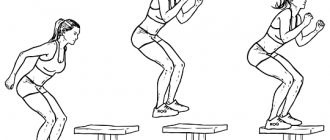
We can't always fit training into our schedule. These simple homemade weights for your arms and/or legs will allow you to exercise at home and forget about gyms and additional spending. You can use them while doing squats, lunges, and arm swings, or wear them while cooking in the kitchen or drying your hair! While you move, weights work on your figure. The benefits of sports weights are invaluable.
This option, unlike the first one, has only 4 steps , and you don’t need to be a jack of all trades.
You will need:
- A pair of long socks;
- Dry rice;
- Plastic bags.
Instructions:
- Step 1: Place equal amounts of dry rice into two bags.
- Step 2: Place one rolled and sealed rice bag in a sock.
- Step 3: Trim the ends of both socks to use as a tie.
- Step 4: Place the finished wrist weights on your wrists and get moving!
Something about weight
Most often, the mass of these devices ranges from five hundred grams to five kilograms and increases gradually as the muscles strengthen. Arm weights 5 kg are suitable only for trained people who have sufficient physical fitness.
As for the options presented by the belt, their weight can reach fifteen kilograms, since the load will be distributed more evenly and over a larger muscle group.
It is important in this case not to overdo it, since the wrong weight can lead to injury. If you decide to make your own hand weights, be careful in this regard.
How to make leg weights with your own hands?
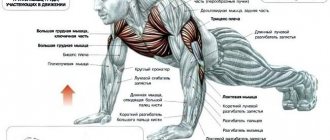
Ankle weights burn fat and help build leg muscles . How? They add resistance during exercise. While you'll benefit from aerobic exercise (which is known to increase your heart rate and burn calories), the extra weight can also increase your risk of injury. For best results, use weights for strength training. These include exercises that target specific leg muscles, such as squats, lunges, swings, and leg raises.
How to properly use leg weights?
Additional weight should be applied to the area just above the ankle joint to provide resistance as the legs move. The purpose of these weights is to increase the tone of the gluteal, quadriceps and calf muscles. The added resistance results in increased muscle mass over time.
Be careful! If you place weights incorrectly, you can suffer sprains, sprains and minor injuries, which most often occur while running or walking.
Let's figure out how to make ankle weights.
How to make reusable leg weights with your own hands at home
You will need old long socks and some beans, beans or peas.
- Step 1: Weigh 450g to 680g of beans using a kitchen scale. This amount best matches your sock size. Keep the beans in a bowl. Weigh a second pile, equal to the previous one.
- Step 2: Tie a knot one quarter away from the top of the sock. Add beans. Tie a second knot. It should be placed at the same distance below as the first one. The beans should be located in the center of the sock.
- Step 3: Tie the sock in place around your ankle or thigh. You can also attach it using special Velcro, thereby providing additional fixation.
How to make your own disposable leg weights
- Step 1: Fill two sealed plastic bags with sand. Weigh them on a kitchen scale and add or remove excess sand as needed to achieve the desired weight.
- Step 2: Place the bag on your ankle and tape it to your leg with a bandage. This will secure the weight in place. Make sure the sandbag is held firmly, but be careful not to wrap it too tightly as this can cause numbness in your feet.
- Step 3: Secure the ends of the bandage so that they do not interfere during training.
DIY weights will turn your workouts into a real test of strength, especially if you do exercises like raises and raises. Start with light weights and move slowly throughout your workout. Also, be careful if you have knee, hip, or ankle problems.
Useful information: how to replace dumbbells at home?
Do not use such weights when walking as they are likely to cause injury. Why buy equipment in stores or online for £20 or more when you already know how to make your own leg and arm weights at home? We hope this material will help you with this.
Pros and cons of training with weights
It must be remembered that using weights to build muscle is a bad method.
The positive aspects of weights are as follows:
- They help you shed extra pounds faster because they increase your overall exercise, which leads to burning more calories and reducing body fat.
- Increases endurance and improves tone.
- Promotes muscle definition, strengthens the shape of the legs, buttocks and the muscular frame of the back.
- Improves blood circulation and heart function.
- Increases the technicality of exercises.
There are no disadvantages to weighting materials. The main thing is to use them without violating safety precautions and without neglecting the rules for their use.
The use of weights by children under 14 years of age is strictly prohibited.
A few more tips
In order to make use even more comfortable and the resulting device to last much longer, it is recommended to place the weighting agent filler (especially if it has a crumbly form) in special small bags, thus the fabric will not come into contact with the filler, which means it will wear out much less .
Another rather important point is the quality of the aggravating element itself. In principle, you can use anything instead, but some options will be much better than others. In particular, you should not choose materials for such purposes that can injure the skin. Such fillers include all kinds of sea stones and other non-crumbly materials. If you decide to use salt, it is better to give preference to the “Extra” option, which has a softer texture. In this case, the use of bags is mandatory, since the filler material will not only fall out without it, but will also begin to irritate the skin, which, of course, cannot be called a pleasant sensation.
As for the weight, make sure that it is the same on both limbs - this will help avoid muscle strain, injury and subsequent discomfort. It is better to start training with minimal weight, gradually increasing the load. Only a gradual approach can lead to truly outstanding results.
Homemade weight vest
Making a weighted vest with your own hands is more difficult, but it is possible. For this purpose, you can use any ready-made durable vest and sew pockets for filling inside. It can be in the form of fabric bags with shot, bearings, nuts, or the same sand or metal plates.
If you want to make the entire vest yourself, you need sewing skills and the ability to make a pattern.
Pattern drawing
How to make a weighted vest yourself is shown in detail in the video. You will need to make a pattern using the following measurements:
- Neck circumference – OS.
- Chest circumference OG.
- Vest length – D.
Initially, the pattern is made from paper or cheap fabric.
You need to grab it with threads and try it on. It is important that the vest sits tightly on the torso and does not dangle. After the pattern is refined, it is transferred to the fabric. A vest is sewn from the cut out parts. All seams must be made closed, double (seam stitch). First of all, fasteners are sewn onto the finished vest. The most effective type is made from Velcro tape with buckles - this way the vest can be adjusted depending on the underwear.
The final stage is sewing on pockets for weights. Depending on its type (cylinders, plates, bags with filling), the shape of the pockets and valves for them is cut out (so that the weights do not fall out during sudden movements and tilts).
Pockets must be calculated taking into account the volume of the weight (a third is added to their width), plus 1.5 cm on all sides for the seams.
The pockets are sewn on the front side using a double seam.
The flap is equipped with Velcro or a button for secure fastening. A homemade weight vest is no worse than a branded one, but almost 10 times cheaper.
Manufacturing process
Hand weights, the reviews of which are extremely positive, are made in much the same way as everyone else. In addition, the finished product in this case will be quite universal, and therefore suitable for use on the lower extremities if necessary.
To make a weighting agent you will need two rectangular pieces of fabric. In terms of height, ten to twelve cm will be enough, and the length will depend on the girth of the hand (or ankle). However, you should take into account the fact that when filled, the fabric will shrink and there will be much less free space. In this regard, 5 to 7 centimeters should be left in reserve.
The resulting halves should be turned inside out and fastened together using a sewing machine or a very strong continuous hand seam. This will become the basis of the future weighting material - the space where the selected filler will be placed.
For convenience, the resulting “pocket” should be stitched across several times - the filler will thus not be a monolithic block and will become more comfortable to use.
A zipper is sewn to the top of the resulting pocket, which will fix the fillers in the required position, preventing them from falling out.
A nylon tape is sewn in the middle of the resulting bag, with the help of which it will be fixed on the leg or arm; a ring is sewn to one end of the tape - the remaining edge will be threaded into it.
If you chose Velcro or lacing as fastening, these elements are attached directly to the ends of the weighting material.
The material from which the accessory is made should be soft and comfortable to use. This is especially important if the hand weights are for children.
Criterias of choice
So, we figured out why weighting agents are needed - it’s time to choose a suitable weighting agent:
- Wearing comfort. No matter what, this indicator should be the most important. Indeed, unlike dumbbells, weights are worn for a much longer period of time - and any rubbing or improper balancing can lead to discomfort, and in rare cases even to dislocations.
- Weight of the weight. It should be chosen depending on your purpose and period of wearing. It is better to purchase several sets, for everyday wear, for cardio and for strength training.
- Target. Not only the weight of the weighting agent, but also the type of structure depends on this. For CrossFit, soft cuff weights filled with sand are best suited.
- Filler. Lead, sand and metal. Lead is rare, and metal is quite uncomfortable to wear, as it limits the range of movement. The best solution would be to purchase a sand weighting agent.
Filler
The second thing you need to decide on is the filler option. For these purposes, sand and salt are most often used, since these are the materials that can be called the most accessible and suitable.
If hand weights are adjustable, they may use metal plates or a special design that allows for subsequent changes in weight. In this case, you will also need a very ordinary zipper so that filler can be added to the structure.