Benefits of DIY
An inversion table is a device that is used for therapeutic and preventive purposes in cases of dysfunction of the musculoskeletal system. Using such a device, you can perform simple exercises for the spine, ensuring the straightening of the vertebrae, the flow of blood and lymphatic fluid to hard-to-reach places. Regular exercise on the simulator can improve your overall health and lead to the following positive effects:
- improve posture;
- strengthen the ligamentous apparatus;
- prevent the development of hernias, protrusions, infectious, inflammatory diseases of the spine;
- improve blood circulation and lymphatic drainage.
A noticeable disadvantage of an inversion table is its cost. For this reason, more and more often people who suffer from pain in the back and cannot afford an expensive exercise machine or massage are trying to make a wellness device with their own hands. Even taking into account the cost of the necessary materials, a self-made product is several times cheaper. If all drawings are followed and quality materials are used, you can obtain a safe device for treatment.
Improves posture
Strengthen the ligamentous apparatus
Prevents spinal diseases
Improves blood circulation and lymphatic drainage
Savings when making your own
New revolution. Anti-gravity yoga for the face
Articles
Oleg Burnaev
04/22/2015Aelita Akhmedova Hollywood actresses are abandoning facial plastic surgery in favor of a unique method of training the facial muscles in an inverted position. Elina Ivanova, yoga therapist and Critical Alignment Yoga instructor at Yoga Class, spoke with THR about the new trend and exercises that will help you defeat the force of gravity.
Following advanced Hollywood, anti-gravity yoga has been practiced by Moscow yoginis for several years now. These hammock exercises, designed to combat gravity and back pain, were among the first to be tried by Gwyneth Paltrow , Mariah Carey and Britney Spears .
But another direction in AntiGravity, yoga for the face, for a long time remained available only to residents of the “Dream Factory”. Meanwhile, followers of the technique claim that training the facial muscles has significant advantages compared to massage, cosmetology and plastic surgery. Among them is Victoria Beckham . She became interested in exercise while living in Los Angeles. Jennifer Aniston is another opponent of injections, and also relies on working out her facial muscles every day.
Therefore, when we saw a class on anti-gravity yoga for the face on the schedule of the Yoga Class studio, we could not pass it up. It turns out that they study here according to a unique author’s course developed by Elina Ivanova .
“This technique was born from several at once: the best practices of the Dutch method of Hert Van Leeuwen Critical Alignment Yoga and Therapy, the Swiss philosophy of activating the deep muscles of the face of Benita Cantieni and Hollywood facial gymnastics were taken,” Elina says about her course.
In the gym, in addition to the usual mat, clients are given a bar (it is placed along the spine when performing exercises while lying down), as well as special equipment for correctly performing inverted poses. The lesson consists of working out important parts of the spine - cervical, thoracic, lumbar.
Elina explained that incorrect body position not only has a bad effect on our posture and pinches internal organs, but also has a bad effect on the facial muscles. When we slouch, our back tightens and our facial muscles are pulled down: it is impossible to have a beautiful face with poor posture. Therefore, it is important to combine exercises for the body and face. The result of this work is toned facial muscles, beautiful skin color, and wrinkles are smoothed out.
The last exercise is to do an inverted stand upside down after applying the cream to your face and neck. It requires a certain amount of courage.
This trick increases blood circulation and oxygen supply to the facial muscles, and this inevitably leads to skin rejuvenation.
“It’s really very effective,” Elina encourages. — The cream is absorbed 20-30 times better than in the normal body position. Beginners stand for three minutes, and advanced yogis can stand for more than half an hour.”
I could hardly stand it for more than three minutes, but after the stand I felt all the muscles in my face and it became easier to hold my back. It’s too early to look in the mirror, but the instructor promises that if you don’t miss classes, the results will not keep you waiting.
https://youtu.be/HxalnB_0zoM
Follow THR on Telegram
Themes:
- Life style
- Article
In what cases and for what diseases is it used?
An inversion trainer for the spine can be used for many pathologies, but it is important to remember that with arthrosis, as well as ankylosing spondylitis, use can become dangerous due to stiffness of movement.
The simulator can be usefully used both for treatment and for preventive purposes for the following pathologies:
- Poor posture.
- Scoliosis 1 or 2 degrees.
- Spasm of muscle fibers.
- To prevent varicose veins and blood stagnation in the pelvic area.
- Impaired blood flow and lymph movement.
- For relaxation amid stress.
- To strengthen muscles and ligaments.
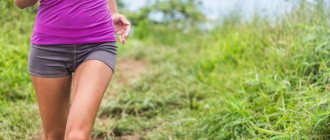
After a working day, an inversion board for the spine will help relieve excess fatigue.
Efficiency of decompression
In most cases, a microsurgical operation, the price of which ranges from 60 thousand to 200 thousand rubles, allows one to achieve significant relief of the patient’s condition. The chances of a full recovery, provided it is carried out in a timely manner, are quite high. The main part of the manipulations (70%-80%) is performed at the lumbar levels, since the lumbar area is characterized as the most loaded and mobile part of the ridge, easily vulnerable to degeneration and injury. The second most common area for decompression is the neck.
Approximately 95% of patients initially admitted to the hospital with cervical and lumbar nerve entrapment are discharged after decompression with noticeable functional improvements. Many of them note a noticeable reduction in pain and muscle weakness of the limbs already in the first hours, day or two after the operation. In approximately 3%, symptoms remain unchanged, and in 1%-2%, the condition worsens.
The stated efficiency percentages here take into account the entire range of possible pathologies that are generally subject to decompression microsurgery. Therefore, prognostic data may differ depending on the specific diagnosis, initial neurological status, individual characteristics of the body, method and category of complexity of the intervention.
Materials and tools
Factory-made metal structures are designed for people weighing over 200 kg. The stationary table weighs more than 50 kg and is used in hospitals, beauty salons, and health centers. For personal use, it is recommended to choose a plastic product that is easy to fold and carry. If you make the simulator yourself, wooden boards or chipboard will do.
Advantages and disadvantages of materials used to make an inversion table:
- metal - the product made from it is durable, but heavy, the material requires special skills in work;
- wood is environmentally friendly, durable, this table has good technical characteristics. Minus – requires additional processing;
- Chipboard or laminated chipboard are materials of medium strength, have a large palette of colors, reasonable prices, are light and easy to work with. Disadvantage - low-quality options can emit harmful substances;
- MDF is an option that is suitable for creating models for use at home by people with low weight. The disadvantage of the material is the price. Although it costs less than wood, it is much more expensive than chipboard, for example.
In factory models and homemade devices, materials are often combined. The legs of the simulator and its frame are made of steel pipes, the table top is made of wooden or chipboard boards. For the convenience of training on the simulator, a small soft cushion is made at the head, the back is trimmed with textiles or leatherette.
Metal
Tree
Preparation of materials and fitting them to the drawings is done using a grinder, grinder, or jigsaw. You can also contact a furniture manufacturing company. There the customer will receive ready-made bars and boards, which just need to be correctly connected and securely fastened.
To make a high-quality inversion table, you should prepare the following materials:
- wooden beam (20 x 40 mm), metal and steel tube 8 mm in diameter;
- bolts, nuts, screws, washers;
- braided cord, wide cargo belt (from 50 mm);
- abrasive wheel.
To work with a wooden table, you need the following power tools: jigsaw, drill, screwdriver. A hammer, a grinder, a wrench, and a knife will also come in handy. To paint and process wooden boards, you need to take brushes. In addition, you need a wide piece of fabric or leatherette.
Where is it sold and how much does it cost?
A simulator for stretching the spine upside down is not a panacea for any pathology. It helps treat diseases, but does not eliminate their root cause, so it should only be used in combination with other methods of therapy.
Regular exercises give the following effect:
- Relieving muscle spasms.
- Increased blood flow to brain cells.
- Strengthening the ligamentous apparatus.
- Increased intervertebral space.
- Reducing pressure on nerves.
- Improved blood circulation.
- Developing flexibility and improving posture.
- Elimination of edema.
- Acceleration of metabolic reactions in the body.
- Strengthening the immune system.
- Weight adjustment.
The exercise machine is perfect for preventing varicose veins on the legs.
Budget models are available for sale that are designed only for spinal traction. Their cost ranges from 8-9 thousand. Expensive models costing about 30 thousand are characterized by maximum strength, can withstand maximum load and are designed for performing many exercises.
Drawing and dimensions
Unfortunately, the price of such simulators, despite their simplicity, turns out to be quite high. For example, in Moscow the cost ranges from seven to ten thousand. However, many craftsmen say that there is nothing difficult in producing such a board. Indeed, a little dexterity, the ability to handle tools, as well as the necessary materials - and the trick is in the bag, a useful healing prophylactic is ready.
- Pine timber (150x50) for the base of the simulator with cabinet chipboard (16 mm) attached to it. The length is, according to our drawing, 2 meters 40 centimeters.
- For the carriage there is the same beam (length 27 centimeters). It is advisable to choose durable types of wood.
- Two meters of mounting rail (2x40).
- Three meters of metal chain, 4 mm thick.
- The lower base (length 0.6 meters) is easiest to saw off from the blank for the handle of a shovel or hoe.
- The carriage crossbars are made from the same cuttings (length 0.55 meters)
- Screws with a diameter of 5 millimeters for securing slats and beams.
- Nuts and washers, 8 mm in diameter.
- Screws with washers, diameter 6 millimeters (length 10 centimeters).
- Bolt Ø 8, L 70.
- Dowels and hooks for the wall.
- Carbine.
- Nails of different sizes.
- An electric drill, preferably with a screwdriver.
- A set of cutter attachments for drilling large holes.
- Wood saw and metal hacksaw.
- Screwdriver Set.
- Hammer.
Manufacturing method
To prevent your board from slipping, we have come up with a simple and effective life hack. To do this, a piece of rubber is cut to size, for example, from an old camera, and then fixed to the lower edge of the simulator.
- In order to secure the board from below, drill a large hole into which the base will be recessed. Coordinate all dimensions with the presented drawing.
- On the other side, a hole is drilled at an angle. It must be end-to-end and is intended for the securing chain.
- Make holes in the base for the bolt heads so that they do not damage the floor surface during exercise.
- Two more holes are drilled at the base of the carriage, which will be used for fastening.
- It is better to cut the ends of the carriage (200×320) from a durable board. It should easily support the weight of the person who will exercise on the machine.
- Make holes at the ends for the crossbars (handles).
To make working out on such equipment not only useful, but also enjoyable, its base must be covered with thick fabric. The easiest way to secure it is with a stapler. Experienced people advise using an old overcoat or something similar for this.
Assembly
First, the carriages are assembled. To do this, you need to glue the ends to the base and connect them through a through hole in the base. Be sure to tighten the connecting nuts thoroughly to prevent the structure from becoming loose with regular use. The top crossbar can simply be nailed to the ends. The bottom one just needs to be inserted - it will be adjustable and there is nothing to secure it to.
- Thread the chain through the hole in the beam.
- Secure the beam itself with chipboard screws.
- The lower base is attached to the screws.
- On the back side it wouldn’t hurt to screw some slats on which you can adjust the carriage.
Lastly, you need to drive dowels onto the wall or ceiling to which the chain will be attached. By rearranging the carabiner along the links of the chain, you can easily change the inclination of the board. Pay attention to the drawing of the assembled Evminov board, how it will look when attached to the wall.
However, there are people who do not want to suffer for a long time, but just get up and study. They take an ordinary board, attach a crossbar to it, and then simply lean it against the wall. This simplified version also has a right to life. However, keep in mind that the stability of such a simulator leaves much to be desired, so you can easily fall off it, causing yourself further injuries.
If you purchase a factory table, it has height adjustment, which allows more than just one family member to study. You need to select a size 10 cm larger than the tallest person. When creating your own simulator, you should also add 5-10 cm to the parameters of the table top and support legs.
In the standard scheme for making an inversion table made of wood, the height is 2 m, the angle between the supporting legs is 40 °, the width is about 1.5 m. For the tabletop, it is recommended to take 4 wooden slats 3 cm thick or glue two sheets of chipboard (1, 6 cm). When changing the dimensions of the product, you should adhere to the angle between the supporting legs.
Gymnastics for sore knees
“When I was 37-38 years old, I became interested in running,” says Viktor Vladimirovich. — Every morning, four to five times a week, I ran about six kilometers, then in the summer I swam in the Moscow River, and at other times I took a contrast shower. The mood and performance were excellent. But the time came when pain in the knee joints appeared. I no longer wanted to quit running, but the pain did not allow me to continue doing it.
Official medicine was powerless. Of course, procedures, various ointments, etc. made my lot easier, but nothing more. I even went for a consultation to the Pyatigorsk Research Institute of Balneology, which specialized in the treatment of musculoskeletal joints. The professor, doctor of sciences, after studying the medical history and talking with me, concluded that I have arthrosis of the knee joints and I should limit my movements in the future and forget about running altogether. I couldn't agree more.
When I once again underwent a course of treatment, the nurse, seeing my ordeals, advised me to contact a physical therapy methodologist. Galina Grigorievna, I will remember and thank her until the end of my days, suggested a gymnastics complex for the knee joints. At the same time, she demanded that three conditions be met:
1. Gymnastics must be done lying down so that the weight does not put pressure on the knees.
2. Do each exercise on a count; you need to start with the smallest numbers.
3. You will have to do the complex for the rest of your life, and forget about running.
I had no choice. After 10-15 days of training, the pain in the knees began to recede, swelling decreased. I clung to gymnastics like a drowning man clutching a straw. And I have been doing this complex for more than 30 years. I added something to it taking into account age and for the prevention of other diseases. My knees are fine so far. I believed in the power of exercise.
Set of exercises:
Stretch your feet and knees
— legs lie straight, bend and straighten toes (49 times);
- turn the feet to the right in a circle, then to the left in a circle;
- pull the feet (fingers) towards the shin;
- raise the left leg, bend it at the knee and pull it to the chest, take it back to its original position, the same with the right leg;
- raise the left leg to the level of the bent right leg at the knee, and rotate the foot to the right, the same with the left;
— raise the right leg to the level of the bent left leg at the knee and rotate the foot of the right leg to the left, then rotate the foot of the right leg to the right;
- raise the left leg up and lower it down, bending at the knee, energetically, the same with the right;
- the left leg is straight, we bend the right leg at the knee and place the right side of the foot of the right leg on the knee of the left leg, while using the knee of the right leg we try to reach the horizontal plane. To strengthen this exercise, you can slightly raise the knee of the left straight leg. Repeat with left leg;
— legs straight, shoulder-width apart, bend the right leg at the knee joint and place the knee to the left leg, at the same time turn the head and pull to the right (10 - 15 times). We bend the left leg at the knee joint, and place the knee towards the right leg, at the same time we turn our head and pull it to the left;
— lift your legs straight up and spin the bike, first toward you, then away from you, to strengthen this exercise, you can move your legs away from you longer;
— lift your legs straight up and behind your head, strengthen your abdominal muscles;
- legs straight, relax - slightly shaking at the knees;
- turn the whole body onto the right side - the left arm is extended straight along the body, slightly raise it and make movements from the foot to the head and in the opposite direction;
— also lying on the right side, we raise our left leg and arm and make energetic counter movements;
- raise your head up and down;
— turn the whole body onto the left side, repeat the exercises for the right side.
After charging is completed, water procedures:
-contrast shower, ending with cool or cold water;
-go to bed under the blanket for 3-4 minutes to warm up;
- Let's wish ourselves a successful working day.
EXPERT'S COMMENT
Don't confuse arthrosis with arthritis
— In his book “Knees Hurt. What to do?" “I paid a lot of attention to the diagnosis of joint pain, and tried to draw the readers’ attention to the difference in knee pain with arthritis and arthrosis,” comments Sergei Bubnovsky, MD, kinesiotherapist. — Based on the author’s letter, it is clear that a certain professor, Doctor of Science, after studying the “case histories” and a conversation (?!) announced that V.V. Antonenko arthrosis of the knee joints. I am sure that this was a medical error, which, oddly enough, played a positive role.
The fact is that the author was jogging, and running, as you know, involves hundreds of compression effects on the articular surfaces, primarily the knee joints. The musculo-ligamentous apparatus of the knee joints is designed to prevent these “impacts”. Daily or regular similar loads, and even compression loads, of course, tired this ligamentous apparatus, which has lost its elasticity. In such cases, the ligaments and muscles become rigid, i.e. rigid, creating pain in the places of their attachment. In this regard, microcirculation deteriorates, i.e. nutrition of the joints, inflammation occurs in the soft tissues of the joint (muscles, ligaments, tendons). Externally, the joint is intact, but walking is very difficult.
In such cases, it is recommended to do special gymnastics for the muscular-ligamentous apparatus (preferably on decompression machines, which help relieve inflammation, swelling, pain and restore nutrition to the joint). The author went intuitively, turning to another specialist, in this case, to a physical therapy methodologist, who showed him a set of exercises for the knee joints, thanks to which he was able to restore normal blood circulation in the knee joints. I carefully studied these exercises, and I can quite categorically for the second time My answer is to say that the professor really made a mistake in diagnosing him with arthrosis.
Let me explain, arthrosis is a deformation of the articular surfaces, as doctors say, “a violation of congruence.” Those. a situation of irreversible destruction of joints, which ultimately leads to endoprosthetics - the replacement of a “living” joint with an implant. The exercises described by V.V. Antonenko, in the presence of atrosis of the knee joints, are in principle impossible to perform, except perhaps exercises for the foot.
But the presence of arthritis of both knee joints, i.e. I can’t deny inflammation of the muscular-ligamentous system, especially since the author is fond of running. Arthritis allows you to do all these exercises, which relieve inflammation and pain. Of course, from my point of view, for better joint restoration, I would recommend exercises on machines, especially for the muscles and ligaments of the back of the leg. But that's another question.
As a doctor, I am against running, especially running on asphalt and in bad shoes. And one more thing: now in medicine, when making diagnoses, there is pressure from overdiagnosis, which artificially aggravates the disease and forces the patient to use expensive medications, procedures, or even undergo joint replacement. Be careful if you have received a diagnosis of “arthrosis of the knee joint” - try to get advice from doctors who study not only X-rays, but also the physiology of the joint, i.e. muscles, ligaments, tendons, which, unfortunately for sick people, are not paid attention to by arthrologists and neurologists.
Contraindications
Exercising on a table is a gentle training option, but one cannot discount the presence of contraindications, and their list is extensive and includes the following conditions and diseases:
- Ear diseases.
- Large body weight.
- Presence of abdominal hernia.
- The period of bearing a baby.
- Glaucoma.
- Retinal pathologies.
- Presence of neoplasms.
- High blood pressure levels.
- Injuries of the musculoskeletal system.
- Osteoporosis.
- Installed implants in joints.
- Age-related dementia.
- Fear of being upside down will not allow you to effectively practice on an inversion board.
Before starting training, you should definitely visit a doctor and discuss such exercises with him.
Microsurgical spinal decompression: what is it?
Microsurgical decompression of the spine is a surgical intervention aimed at eliminating factors that compress the neurovascular structures of the spinal canal. It involves the use of optical intraoperative devices and minor trauma to soft tissues, which significantly reduces blood loss during surgery, facilitates and speeds up rehabilitation, and also allows one to achieve a good cosmetic effect.
Modern decompressive microsurgical operations are performed through incisions measuring 1–4 cm, and optical equipment provides a high degree of visualization of the surgical field. Therefore, they are among the least traumatic surgical interventions and at the same time allow for the effective release of compressed spinal roots and blood vessels.
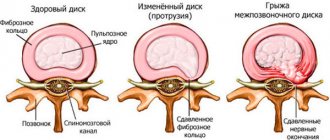
The essence of the operation is the surgical removal of pathological defects that provoke compression of the spinal canal, nerve roots and vascular formations. These roles are often played by:
- intervertebral hernia;
- vertebral osteophytes;
- hypertrophied ligaments;
- adhesions formed after previous operations;
- hematomas;
- benign and malignant formations.
Their removal allows the release of compressed nerves and blood vessels, which creates the preconditions for their rapid recovery.
The operation can be performed in two ways: using microsurgical instruments under the control of a microscope or using endoscopic equipment. Both decompression surgery techniques are effective, but differ in the degree of tissue trauma. Each of them has its own indications and limitations. Therefore, the choice of spinal decompression tactics remains with the neurosurgeon.
Endoscopic decompression surgery
This type of surgery has long been widely used around the world and is recognized as the most gentle way to remove pathologically altered tissue. It involves making incisions whose dimensions do not exceed 1–1.5 cm.
Through them, a telescopic probe and an endoscopic tube are inserted into the patient’s body, which is a conductor for all the necessary surgical instruments, through which the altered tissue is resected to the required extent. Modern equipment makes it possible to achieve the highest level of magnification of the surgical field with high-definition images transmitted from a video camera inserted into the body to the monitor in real time.
Spinal decompression using the endoscopic method is recognized as the most gentle for healthy soft tissues. Therefore it allows:
- reduce blood loss;
- facilitate and also speed up the body’s recovery process;
- minimize intra- and postoperative risks.
The endoscopic surgery takes about 45 minutes and can be performed under local anesthesia. But with a high level of patient anxiety and a number of other cases, general endotracheal anesthesia is used.
Spinal decompression using the endoscopic method can be performed using three approaches:
- TESSYS (transforaminal) - a lateral posterior approach is used through the so-called Cambin triangle, with the patient lying on his side or stomach. It is suitable for the removal of various herniated discs and in a number of other situations, including Cauda syndrome.
- CESSYS (anterolateral) – used to eliminate pathologies of the cervical spine and involves creating access to the spine through the anterolateral surface of the neck.
- iLESSYS (dorsal) – used to remove pathological formations in the lumbar spine and implies access to it through the anterolateral surface of the abdomen.
The essence of the operation is as follows:
- The skin is treated with an antiseptic solution, and an incision is made in the projection of the vertebra that provokes the development of neurological symptoms.
- Through an incision, an expander is inserted into a safe area of the spinal space under the control of an image intensifier. The working sleeve is immersed along it, through which the endoscope tube is passed. Its diameter is 6–8 mm. An LED and a camera are connected, which immediately begins broadcasting the image to the monitor.
- Under multiple magnification with the help of special instruments inserted into the surgical field through an endoscope tube and replaced during the operation, the neurosurgeon performs resection of pathologically altered tissues. It consistently eliminates the formation that caused the development of vertebral compression syndrome. Thus, special nippers are used to resect bone osteophytes, and a microprobe is used to remove a herniated intervertebral disc.
- The removed fragments are removed from the body through a special compartment of the endoscopic system, and the resulting cavity is thoroughly washed with saline solution.
- The equipment is removed and stitches are placed on the postoperative wound.
But endoscopy may not be performed in all cases of vertebral compression syndrome. Due to technical limitations, it is not able to solve the problem:
- severe lateral and circular stenosis of the spinal canal;
- bilateral caudogenic lameness;
- medial hernias;
- severe paresis;
- paravertebral tumors.
Decompression surgery using a microscope
If it is impossible to perform endoscopic surgery or it is necessary to perform a number of complex manipulations, surgery with a microscope is used to decompress the spine. It is recognized as the most productive tactic of decompression surgery and can be used for a huge number of different diagnoses.
Modern microscopes provide a magnification of the surgical field up to 40 times, which 100% covers the surgeon’s visualization needs and allows each action to be performed with the highest precision in all parts of the spine.
This type of surgical intervention has all the advantages of classical open operations, but is significantly less traumatic, which makes it possible to classify operations with a microscope as minimally invasive.
The surgeon performs all actions through an incision of about 3–4 cm. Surgery is performed only under general anesthesia and requires from 1 to 3 hours. Its essence can be described as follows:
- The skin is treated with an antiseptic solution, and an incision is made in the projection of the stenotic lesion with convenient access. It is chosen so as to provide maximum protection from damage to the structure of the musculoskeletal system.
- Monitoring his every movement, the neurosurgeon takes the nerve away from the protruding part of the vertebra to a safe place and begins to remove fragments of modified joints, ligaments, vertebrae, intervertebral discs, etc.
- If necessary, a stabilizing metal structure is installed.
- The postoperative wound is washed, disinfected and sutured.
After surgery with a microscope, you can get up and move independently on the same day or the next. The patient will have to stay in the hospital for at least 4 days. If there are no complications, he is discharged home and sent to undergo a rehabilitation course.
How to make it yourself
First, you need to prepare all the materials yourself based on the measurements in the selected drawing. It is necessary to saw the slats and polish them with a grinder with an abrasive wheel of P 220 grit. The boards should not cling to clothing or damage the skin during exercise. Finally, coat them with furniture varnish and let them dry thoroughly.
- In places where structural elements are connected, make holes for metal tubes. Next, fasten the boards together.
- Insert bolts and washers into the tubes based on the existing diagram. Using nuts, secure the hinge joints of the legs, levers, and support elements to these places.
- To enhance the safety of using the simulator, secure the cross bars with screws.
- Attach restrictive polymer cords to the legs with screws, the location of which can be seen in the diagram. To prevent them from unraveling during use, secure the ends with a drill.
- Attach straps at the bottom of the tabletop that will hold your feet while doing the exercises. To enhance safety, protection will also be required in the chest area.
Finally, attach rubber to the ends of the table legs to prevent it from sliding. After assembling and checking the strength of the product, coat the homemade exercise machine with paint of your favorite color. In areas of damage you will need to use plaster.
More detailed instructions for making an inversion table with your own hands can be found in specialized forums. People willingly share their experiences, telling how easy it is to build a health structure, how much material is needed, and what the approximate cost is. Using ready-made tips, even a beginner can cope with such a task.
Prepare all materials
Insert bolts and washers into the tubes
Attach restrictive polymer cords to the legs
Attach straps to the bottom of the tabletop
Glue rubber to the ends of the table legs and cover with paint
How to choose an inversion table
Buying a simulator of this type requires a serious and competent approach. First, decide between the mechanical and electrical options. The first has an affordable price, the second is more convenient and functional. In addition, the mechanical version is perfect for use at home. Make sure the frame is strong and reliable. Please take into account other recommendations:
- Design. At home, folding exercise machines are more practical, but non-folding ones are often more stable.
- Weight. With increasing weight, the structure becomes more reliable, but less mobile. Look for a middle ground.
- Number of position adjustments. The more there are, the more detailed you will be able to approach your classes and vary the appropriate load.
- Don't forget to pay attention to the height adjustment so that the chosen machine suits you and the rest of your family who are interested in inversion classes.
In order for a reversible table for the spine to bring benefit and not harm, it is necessary to take a responsible approach to its choice. When purchasing, you need to pay attention to the following points:
- Model weight. Lightness allows you to quickly and conveniently transport the table. But this design becomes not so stable.
- Quality of material. The table must be inspected, all wear parts must be made of durable metal, the handles are made of non-slip material, and the plastic back must have holes for ventilation.
- Table category. It can be stationary or portable. The first option is more reliable and stable, it will last longer, but there is no way to transport it after installation.
- Table management. It can be mechanical or electronic. The first option is cheaper in cost, and the electronic mechanism is more convenient to use.
- Possibility of regulation. When purchasing, it is important to pay attention to the possibility of adjustment to a person’s height.
- Pay attention to the number of adjustable positions. With a large number of them, it is possible to diversify your workouts and regulate the load.
- Availability of clamps. They must be reliable. You need to pay attention to their width; narrow ones can dig into the skin and cause discomfort and pain during exercise.
- Before choosing, you need to carefully study customer reviews about manufacturers and models.
If you decide to purchase such a simulator, then you need to get acquainted with the features of the models existing on the market.
Which gravity boots to choose
Gravity boots are potentially dangerous sports equipment to use, so their choice must be approached with full responsibility.
It is important that they are made of high-quality materials, and all seams must be securely stitched. You should also pay attention to metal fasteners and hooks; they should be made of hard metal that is resistant to stress, because it is these fasteners and hooks that will support the weight of your body.
Before purchasing, be sure to try on gravity boots and make sure that while they fit tightly, they do not put pressure or chafe on your feet.
Top manufacturers
JUNIOR
- Country of origin: Russia.
- Maximum permissible load: 90 kilograms.
- Material: genuine leather.
- Height: 20 centimeters.
- Girth diameter: from 18 to 33 centimeters.
- Cost: 2200 rubles.
PLAIN COMFORT
- Country of origin: Russia.
- Maximum permissible load: 120 kilograms.
- Leather material.
- Height: 20 centimeters.
- Girth diameter: from 23 to 33 centimeters.
- Cost: 2500 rubles.
NewAge Comfort
- Country of origin: Russia.
- Maximum permissible load: 120 kilograms.
- Leather material.
- Height: 23 centimeters.
- Girth diameter: from 20 to 36 centimeters.
- Cost: 3650 rubles.
Inversion table models
Many manufacturers produce such tables, but they all have their own distinctive characteristics. The most popular models are:
- DFC table. Has the following characteristics:
- Folds up.
- It is possible to adjust for height.
- You can select the inversion mode.
- Convenient latches.
- Compact sizes.
- Z-UP. A variety of designs are available with the ability to change the inclination of the board. It is controlled by an electric drive and allows you to exercise with a weight of up to 120 kg. Perfect for practicing at home.
- Body Sculpture. The table allows you to smoothly move from one position to another. The characteristics are:
- Withstands up to 135 kg.
- Suitable for heights from 147 cm to 198 cm.
- Folds up.
- Multifunctional.
- You can make turns of 20, 40 and 60 degrees.
- Body Solid inversion table model. Design with a seat belt that guarantees reliability and allows you to rotate. The back of the table is made of breathable synthetic material, which guarantees comfort during classes. The table folds easily and can be adjusted to suit heights from 140 cm to 2 meters.
- HouseFit. The simulator is lightweight and portable and does not take up much space. A foam cushion is provided. Withstands a maximum load of 135 kg.
- Ortifit brand inversion table. Folds and can support up to 136 kg, adjusts to heights from 155 to 200 centimeters. Among the disadvantages, buyers note the weight and the inability to use for people with short stature.
- Oxygen. The simulator is equipped with additional functions and has a contoured relief, which increases safety during training. It is possible to adjust the angle from 5 to 90 degrees. There is a massager and back warming function. Controlled by remote control. Can occupy 25 positions.
If it is difficult to navigate the variety of simulators, then it is better to consult a specialist.
When you decide to buy an inversion table, familiarize yourself with the situation on the modern market. Manufacturers of commercial and sports equipment offer customers both stationary models and folding structures. There are exercise machines, the back of which is transformed into a chair at the beginning of the lesson. Functional tables for inversion therapy can be mechanical or equipped with an electric drive. Many exercise machines of this type are equipped with soft bolsters and a backrest for convenience.
This table is a great way to maintain a healthy back and spine. You can purchase a suitable model in an online fitness store with delivery by mail in Moscow, St. Petersburg or any other city in the country. The DFC SJ6200 inversion therapy table is adjustable to suit the user’s height, has an adjustable ankle support and selects the inversion mode, which is done using a special rod. There are only three modes: easy, medium, professional - up to 55 degrees. More details about the characteristics of the table:
- Model name: DFC SJ6200;
- price: 9490 rub.;
- characteristics: folding, for user weight up to 113 kg, dimensions in working condition - 144x72x133 cm, folded - 91x72x172 cm, weight - 19 kg;
- pros: relatively compact, lightweight, cheap;
- cons: none.
There are various designs of tables for inversion classes on sale; for example, there are models equipped with a motor for fixing the ankles. In any case, such a simulator can be perfect for training, because... There is no need to hang completely upside down on it, because... the user can gradually change the angle of inclination according to their capabilities.
- Model name: Z-UP 3;
- price: 99990 rub.;
- characteristics: for users with a height of up to 188 cm, weight – up to 120 kg, motor – DC 24V, power parameters – AC 220V 75W, rotation speed – 0.9 rpm, size in working position – 88x190x201 cm, assembled – 88x64x181 cm, weight – 40 kg;
- pros: durable, reliable, has an electric drive;
- cons: expensive.
Body Sculpture
Despite the fact that inversion tables are not that cheap, many large retail outlets offer customers good discounts as part of ongoing promotions and sales. An excellent way to keep your back in perfect condition is the Body Sculpture BI-2100E table. Exercises on it relax the back muscles, strengthen blood vessels, relieve pain, etc.
- model name: Body Sculpture BI-2100E;
- price: 12090 rub.;
- characteristics: maximum user weight - 135 kg, adjustable for height - 147-198 cm, design - folding, working dimensions - 115x70x158 cm, folded - 70x40x190 cm, weight - 27 kg, adjustment options - full rotation, at an angle of 20° , 40°, 60°
- pros: functionality, reasonable cost;
- cons: none.
Body Solid
When deciding to choose an inversion therapy table that is perfect for home use, take a closer look at the Body Solid line. The BI-168 model has a spring seat belt that controls the stability of the system and helps you roll over confidently and quickly. The nylon back has a breathable surface, which improves user comfort.
- model name: Body Solid BI-168;
- price: 14600 rub.;
- characteristics: maximum user weight – 136 kg, adjustable for height – 140-203 cm, design – folding, back – nylon;
- pros: comfortable, high quality;
- cons: costs more than analogues.
HouseFit
A good choice would be to purchase an inversion training table from the HouseFit brand. Alternatively, you may be satisfied with the product simulator 049202-1. Lightweight and durable design folds quickly and easily, taking up minimal space:
- model name: HouseFit 049202-1;
- price: 9030 rub.;
- characteristics: maximum load - up to 130 kg, for height - 147-198 cm, polyurethane foam pillow, dimensions in working condition - 130x64x146 s, weight - 22.5 kg;
- pros: inexpensive, convenient;
- Cons: a little heavy.
Optifit
Inversion training simulators from the Optifit brand have gained considerable popularity and distribution. One of the popular modifications is NQ-3400, the use of which can help combat back pain. This occurs due to stretching of the intervertebral discs, removing the load from the back. Product parameters:
- model name: Optifit Rio NQ-3400;
- price: RUB 11,890;
- characteristics: folding design, maximum load - 136 kg, dimensions - 157x67.5x116 cm, height - from 155 to 201 cm, weight - 25.5 kg;
- pros: cost, comfort, convenience;
- cons: weight, length suitable for people over 155 cm tall.
Take a closer look at another simulator from Optifit. This table will cost a little more, but it is suitable for most people who want to do inversion training, because... the lower height threshold is only 125 cm:
- model name: Optifit Vista NQ-3900;
- price: RUB 14,390;
- characteristics: folding, maximum load - up to 136 kg, for height - 125-201 cm, dimensions - 116x67.5x161 cm, weight - 27 kg, number of positions - 3;
- pros: functional, comfortable;
- cons: costs more than analogues.
Oxygen
The Oxygen Healthy Spine Deluxe exercise machine can be an excellent assistant for regular exercise and training. This premium desk comes with a number of additional and unique features. A comfortable support with a contoured relief is just what you need to perform exercises as safely and effectively as possible.
- model name: Oxygen Healthy Spine Deluxe;
- price: 23890 rub.;
- characteristics: design - folding, folded size - 71x83x203 cm, working size - 193x83x177 cm, weight - 31 kg, load - up to 150 kg, user height - 147-198 cm;
- pros: convenient, comfortable, there is a remote control;
- cons: cost, weight.
To maintain a healthy back and spine, take a look at Oxygen. The folding design has 25 positions in increments of 2:
- Model name: Oxygen Healthy Spine;
- price: 14290 rub.;
- characteristics: dimensions - 120x60x140 cm, weight - 22.5 kg, maximum user weight - up to 150 kg, design - foldable;
- pros: good functionality;
- cons: none.
Decompression and stabilization surgery
There is often a need to combine decompression surgery with the installation of a vertebral stabilizing system. This is a reliable guarantee of eliminating the risk of developing or existing vertebral instability.
Stabilizing operations are performed in the second stage after removing pressure on the neurovascular formations. They consist in connecting vertebrae prone to displacement with special structures of rigid or dynamic fixation, which is impossible endoscopically. Therefore, if there is a need to install a stabilizing system, spinal decompression is performed through operations with a microscope.
Rigid stabilizing systems
Rigid fixation systems involve the installation of a bone graft (usually taken from the patient’s ilium) or a special artificial cage into the intervertebral space, followed by installation of a metal structure on two or more adjacent vertebrae. As a result, they become immobilized and eventually fuse together, i.e., spinal fusion occurs.
The method allows you to completely eliminate segmental instability of the spine, but if it is necessary to simultaneously fix a large number of vertebrae, it provokes a decrease in the possible range of movements.
Rigid stabilization involves the use of transpedicular fixation or transcutaneous stabilization techniques. They are very similar to each other and are equally effective, but the latter has a better cosmetic effect, since all manipulations are carried out through pinpoint punctures of soft tissue.
The essence of the method is the use of special titanium screws and plates. The screws are screwed into the point of intersection of the transverse processes of the vertebra with the articular ones on both sides of the vertebra. Thus, at least 2 vertebrae are fixed, although in some situations stabilization of a significantly larger number of spinal motion segments is required. A titanium plate is passed through the screw heads, providing rigidity to the structure and distributing the load on it.
Dynamic stabilization
Dynamic stabilization consists of implanting structures that not only reliably fix the vertebrae in an anatomically correct position, but also do not interfere with their mobility within natural limits. This allows you to preserve the full biomechanics of the spine, but it also costs much more.
The method involves the use of special endoprostheses of intervertebral discs, which are installed between the spinous processes of the vertebrae. Modern endoprostheses are made from biologically inert materials and are completely safe for the body. They can be made of titanium, polyamide, thermoplastic polymers, etc., and the combination of different materials makes it possible to achieve the closest possible approximation to normal spinal mobility.
How to do it yourself?
If you decide to save money and know how to use carpentry tools, then you can make a simulator with your own hands. The step-by-step instructions are as follows:
- Cut the prepared board in accordance with the dimensions of the future simulator.
- Sand the slats.
- Apply varnish to the surface.
- Drill holes at the joints of the parts.
- Insert pieces of metal pipe.
- Connect the slats together using bolts and nuts.
- Install and secure the cross bars.
- Restrictive cords are attached to the legs of the exercise machine with screws.
- In the lower part and in the area of the hip joints, fasten loops from the belt for fixation.
- Straps are attached to hold the chest.
- Attach pieces of rubber to the end of the table legs to prevent slipping.
The homemade exercise machine is not designed for heavy weight, so it is better not to use it for training people weighing more than 80 kg.
How to use an inversion table?
It’s not difficult to purchase a trainer, the main thing is to learn how to use it. The recommendations are as follows:
- Adjust the height to suit your height.
- For the first workout, set the minimum inclination angle.
- For beginners, the minimum rotation speed is suitable; it can be gradually increased.
- Adjust the foot platform so that they fit as securely as possible.
- Spinal traction should be done at a slow pace and carefully.
After adjustments, you can start training:
- Lean your back against the board, fix your legs and stand on the platform.
- Raise your arms and lower them to your chest. The table will rise slightly if everything is set up correctly.
- When moving your hands, the body changes its position and turns head down.
- By moving your hands, the body returns back.