Turkish get-up with kettlebell
The Turkish Get Up exercise cannot be called very popular.
I see two reasons. On the one hand, no one popularizes it here (in the West, numerous crossfitters and weightlifters do this). On the other hand, it is quite complex, which scares off the general public. Today I’ll try to “overcome” these 2 reasons and maybe today someone will include it in their training. So let's start with motivation. Why do you need a Turkish lift?
Firstly, this is an exercise for almost all the muscles of the body with a special emphasis on the core muscles. Secondly, work on the stability of the shoulder joint and work on the ability to hold weight on an outstretched arm (this is important for presses and snatches). Thirdly, the development of coordination, balance and the ability of the body to work as one. Fourthly, this is a very energy-consuming exercise, which is important when losing weight. . Now let's move on to the "complexity" point.
Is this really such a difficult exercise that you can't do it? And only the most experienced, the most experienced, can take risks? The answer is no. If you, of course, are a complete beginner who hasn’t really touched weights and barbells yet, then, of course, wait and accumulate a little experience. And if the basic things have been more or less mastered and you can call yourself, perhaps not an experienced athlete, but not quite a “green” amateur, then you can try it. You can try with both a kettlebell and a dumbbell. The key to success is gradual mastery of the exercise.
Now let’s move on to the “complexity” point. Is this really such a difficult exercise that you can't do it? And only the most experienced, the most experienced, can take risks? The answer is no. If you, of course, are a complete beginner who hasn’t really touched weights and barbells yet, then, of course, wait and accumulate a little experience. And if the basic things have been more or less mastered and you can call yourself, perhaps not an experienced athlete, but not quite a “green” amateur, then you can try it. You can try with both a kettlebell and a dumbbell. The key to success is gradual mastery of the exercise.
Take your time and break the lifting process into parts: first only to a sitting position, then to a standing position (without going down) and then proceed to the full lifting and lowering to the starting position. Plus - light weights to begin with and even, perhaps, just repeating the Turkish get-up several dozen times (not in one, but in several workouts) without weight.
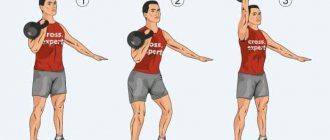
- Take a position lying on your back. The weight sits on the floor next to your shoulder. Turn onto your left side and grab the kettlebell with both hands (top and bottom of the arm), and roll back onto your back.
- Press the weight up with your left hand. At this time, the right hand lies on the floor at an angle of 45 degrees.
- Bend your left knee. The gaze is fixed on the weight. Push up onto your elbow (without taking your eyes off the weight), then straighten your arm completely.
- Lift your hips off the floor (right leg extended forward at this time). Then bend your right leg underneath you (and you're still looking at the kettlebell).
- Lift your right hand off the floor and straighten your body. You will get a lunge position with support on the knee of your right leg. (You don't have to look at the weight anymore. The man in the picture above is looking - you can do it either way).
- Holding the kettlebell at arm's length (arm close to your head, not out to the side), stand straight.
- But this is not the end. Now perform all the movements in reverse order. Then repeat on the other side. Some useful tips:
- Place Turkish get-ups at the beginning of your workout. Doing them when you are tired is not a good idea.
- Don't chase too many reps.
- Add working weights gradually and start with small ones.
- Take a video of yourself. If there is no coach nearby, this is control of technique available to everyone “from the outside.”
Source:
Kettlebell bench press (“Turkish press”)
- Muscle group: Shoulders
- Additional muscles: Abs, calves, hamstrings, quadriceps, triceps
- Type: Power
- Biomechanics: Basic
- Force Vector: Pushing
- Equipment: Kettlebells
- Level: Intermediate
Kettlebell bench press (“Turkish press”) - exercise technique:
- Lie on your back on the floor and press the kettlebell into a vertical position. Bend your opposite leg at the knee.
- Keeping the kettlebell in a constant position, turn your body in the opposite direction and lean on the elbow of your free hand.
- Straightening your free arm, sit up and then rise to your feet. Stand up slowly, looking at the weight. Return to the starting position by repeating the steps in reverse order and perform the next repetition.
Source: https://www.bodyfitness.ru
Seven common mistakes and how to fix them
| Mistake #1: Gripping the kettlebell incorrectly |
| Unlike dumbbells or barbells, the grip of the kettlebell should be “excessive” - so that a slight bend in the wrist is felt. This is necessary due to the shift in the center of gravity of the weight. It hangs below the wrist and on the back of the forearm, meaning it pulls your wrist into hyperextension, increasing the likelihood of injury and loss of balance. With an over-grip, the center of gravity moves closer to the bones of the arm, resulting in a stronger and safer position. Imagine that you are clenching your fist as if you are about to punch a heavy bag. The grip should be strong, but not excessive. |
| Mistake #2: Bend your elbow |
| One of the most potentially dangerous mistakes is to bend your elbow while lifting the kettlebell. If you bend your elbow even the slightest bit, you will be holding the kettlebell with muscle strength alone, without using your entire body for support. When performing Turkish squats correctly, the weight is always supported by passive structures, i.e. skeleton. Flexing the elbow destabilizes the shoulder and increases the risk of injury. A bent arm also puts excessive stress on the triceps, which can cause the muscles to fatigue and the weight to fall off; By the way, this can happen without warning. If this happens, do not try to interfere - let it fall, just lean to the side. If you have difficulty keeping your arm straight, your biceps may become overextended and a strain may occur. If you can't do a Turkish squat with a straight arm, perform only those parts of the squat that allow you to keep your arm straight. Even partial, Turkish squats are great exercises. |
| Mistake #3: Starting the exercise with the bottom arm in the wrong position |
| At the beginning of the movement, the free hand (which does not have a weight) should be at an angle of 45 degrees to the body. |
| Mistake #4: Standing up passively |
| Some people mistakenly roll into the starting position of Turkish squats, instead of tensing up and actively moving to the first position. |
| Mistake #5: Rocking rather than spinning |
| Instead of rotating joints, some people tend to rock their body, going from three to two points of support (or from two to three on the way back). Try to rotate your hip joint to transfer your weight completely to your back knee - this will make it easier for you to rise or lower your arm back to the floor |
| Mistake #7: Not Enough Space |
| If the body is aligned correctly, there will be some space between the torso, limbs and head. If this is lost, then you begin to rely only on passive methods of stability, as opposed to creating tension and actively maintaining body positions. |
| Mistake #6: Relaxation of the shoulder and other joints |
| Shoulders should be “tight,” meaning the head of each humerus should be positioned deep in the socket to allow you to control your movements and protect your joints and muscles. Imagine that you are pulling your shoulder blades back. This position engages the latissimus dorsi, creating a “shelf” that helps support the kettlebell overhead and your weight on the floor. If this position doesn't help, you may need to address tight muscles, especially the muscles around the shoulder girdle—the pecs, lats, triceps, and biceps. This also applies to other joints. The shoulders are connected to the hips—each shoulder to the opposite hip—by a series of fasciae. If you shrug one or both shoulders, the loss of tension will cause you to tighten your hips, which in turn will affect your ability to engage your abdominal muscles in a roll and reduce your ability to stand up powerfully into a lunge. Collectively, these errors place undue stress on vulnerable parts of the body such as the knees and lumbar spine. Make sure that the joints are slightly stretched and not bent. But be careful not to hyperextend your elbows or knees. |
| Mistake #7: The front part of the body is not engaged |
| Try to keep your ribs pointing down, tightly gripping your body, throughout the exercise. |
published econet.ru
Author: Dr. Joseph Mercola
Benefits of Turkish Squats
Turkish squats are not one movement, but several interconnected ones, including all three planes of movement. Keeping the weight overhead throughout the exercise is quite taxing on the core, and you must keep your torso upright as you bend, twist, and lunge.
In addition to building strength, Turkish squats increase overall body stability, body awareness, balance and coordination. Very few exercises can boast so many benefits. The list of effects is truly impressive!
| Improves upper body stability | Improves lower body stability | Promotes cross-lateralization (where the right hemisphere of the brain works with the left side of the body) |
| Links the right hand to the left leg and the left hand to the right leg | Improves coordinated functioning of the upper and lower extremities | Promotes automatic stability of the trunk and limbs |
| Stimulates the vestibular system, promoting the development of balance | Stimulates the visual apparatus, promoting the development of balance | Stimulates the proprioceptor system to promote balance |
| Develops front/back weight shift | Builds strength in the upper body, core and hips | Promotes orientation in space |
| Shoulder stability in closed and open chain | Promotes chest expansion and rotation | Improves mobility and active flexibility of the legs and hips |
| Improves rotational and forward stability | Stability in two different leg positions – lunge and squat positions | Stability of the hip of one leg during the initial roll to the press and when performing a bridge |
Turkish rise. This is a brutal exercise with a guaranteed deal.
Turkish rise. This brutal exercise is guaranteed to make you the king of strength + pump up your core and deltoids!
The history of bodybuilding contains many exercises that have been undeservedly forgotten. One of them is the “Turkish rise”. At one time, it was recognized as potentially dangerous for ordinary amateurs and therefore excluded from the arsenal of fitness clubs.
Meanwhile, the Turkish get-up was one of the fundamental exercises at the beginning of the last century, when Sandow and Hackenschmidt began an era of amazing strength records that have not been broken to this day. The Turkish get-up, just like the deadlift and squats, develops strength throughout the entire body. At the same time, all stabilizer muscles, as well as the inner muscle layer responsible for balance, increase strength. Along the way, muscle coordination increases, which is the main condition for phenomenal strength.
Note
Despite its multifunctional nature, the Turkish get-up puts the most stress on the shoulder girdle, or more precisely, the deltoid muscles. Among the strongmen of the past, the Turkish get-up was especially valued because it helped increase strength in bench presses.
These days, you should use the Turkish get-up on delt training days. The movement not only increases their strength, but also strengthens the shoulder stabilizer muscles. All this is guaranteed to help you lift working weights in traditional exercises.
Source:
Description of the exercise
The Turkish get-up is an excellent functional exercise that develops the muscles of the entire body, trains coordination and balance. It will be difficult for beginners to immediately cope with this exercise 100%. You should start doing it gradually, first try doing the Turkish get-up without weights.
The exercise can be performed with a kettlebell, dumbbells or any object suitable for you.
Why is the rise Turkish?
History says that 200 years ago this exercise was used by Turkish wrestlers. They tested their strength with this test: they had to take a 50 kg weight, lie on the floor with it, and then stand up, holding it at arm's length. Of course, no one says that you need to take so much weight right away, but gradual development will help you achieve any results.
Benefits of Exercise
The Turkish get-up is a whole sequence of movements that must be performed in order to get up from a lying position with a kettlebell in an outstretched hand, and then return to it. Even doing this without weight is not the easiest task. In different phases of the exercise, the muscles of the core, shoulders, legs, and arms are involved in the work. In other words, the main advantage of lifting is that it loads the entire musculature, forcing different muscle groups to work harmoniously and coordinatedly.
In addition, including exercise in the training program will allow you to:
- Make tendons more elastic and joints more mobile. Strengthening the shoulder joints and arm muscles, in particular. And this significantly helps when performing other strength exercises, such as the military press (this is an overhead press while standing or sitting), arm raises, etc.
- Learn to maintain balance and perform movements in a coordinated manner.
- Burn a large amount of energy, which is important when losing weight.
It is also worth noting that if you have injuries to the shoulder joint, it is better to abstain from Turkish raises. Either do them without weights or use a kettlebell or dumbbell of minimal weight.
Turkish Get Up is the perfect kettlebell exercise
Another “old school” exercise that deserves special attention. And that's why. Turkish get-ups are a versatile exercise that develops strength. Not arm or leg strength. Breasts or butts. And the strength of the body in general. Turkish get-ups are for strength what burpees are for overall conditioning. If you are really pressed for time, then do these two exercises. And you will have sporting happiness. And a strong, strong, healthy body.
Turkish climbs are about 200 years old. Turkish wrestlers used them to hone their fighting skills. The task was simple: you had to lie down next to a 50-kilogram weight, lift it and take a standing position, fixing the weight above your head.
Sounds kind of simple. Take a weight or dumbbell. And he stood up with her. Right? Yes... But it's not entirely easy.
This is one of the most impressive exercises. Because it simultaneously trains and strengthens:
- Shoulders and shoulder blades.
- Thoracic spine.
- Main and lumbar spine.
- Hip department.
- Every other element of human anatomy you can think of!
In reality, when you do Turkish get-ups, you are working the entire body in the style of real athletes. All muscles from the neck to the ankles are involved in this process. You will strengthen your entire body as long as lifting is on your training schedule.
How to do Turkish get-ups
Although the exercise description is quite simple (stand with a dumbbell or kettlebell overhead), Turkish get-ups still have their technical intricacies. And certain phases. It's just safer and more efficient to do them this way. In this video, the girl performs them with perfect technique:
This is about technology. Look carefully several times before doing it. And fix every intermediate position. Start, of course, with light weights.
When asked how many lifts to do at one time, there are a couple of popular approaches. The first was proposed by Steve Maxwell and actively promoted by Pavel Tsatsouline (it’s just that they are both preachers of kettlebell fitness in the West):
1) Perform lifts, alternately changing hands with a kettlebell (dumbbell), for 5 minutes. There is nothing magical about 5 minutes. That's just how long a round lasts in Brazilian Jiu-Jitsu. And Maxwell did it
The important thing is that there is no point in counting how many times you do it. Because in reality your body is under tension all this time
So there’s no point in twitching in this case.
The second approach to performing Turkish get-ups is proposed by biomechanical specialist Mike Roberts. He also received the RKC (Russian Kettlebell Challenge) certificate at one time, where he fell in love with Turkish climbs. But he suggests doing them like this:
2) 3 reps per side for as many sets as you can perform with good technique. How to determine when a technique has become bad? When in one of the phases of the exercise you begin to lose control: your hand trembles, you cannot take a stable position. If you are a complete beginner, then just start with one approach and gradually (from workout to workout) increase their number.
In general, if you carefully think through the progression of lifting (for example, increase the time in the first case or the number of approaches in the second), then the exercise will turn into a training program! Only I would add more at the beginning and at the end of the workout. Maybe in the future I will write out such a program for 2 exercises in detail.
Source:
Exercise technique
The technique of Turkish lifts is quite complex, let’s look at it step by step using the example of classic equipment - a kettlebell.
With a weight
Before you start working on the exercise, do a joint warm-up, and also select a light weight kettlebell to begin with in order to first thoroughly work out the technique of Turkish get-ups.
- Starting position: lying on your back, the weight is in a straightened arm, at 90 degrees to the body, the non-working arm is pressed to the body, legs together. In the first phase of the movement, the non-working arm is abducted from the body at 45 degrees, the leg opposite the working arm is bent at the knee joint, placed on the heel - an important point, the distance between the heel and the buttock must be maintained! There is no need to bend your knee more than 45 degrees; this can very easily injure the joint.
- By holding the weighted arm above you, we create support for the non-working arm. With a continuous movement, we push off the floor with our supporting hand, simultaneously contracting the abdominal muscles. We do this while exhaling, while the abdominal muscles contract as much as possible, which, firstly, facilitates movement, and secondly, creates powerful support for the spinal column, in particular for the lumbar vertebrae. Thirdly, you need to take the blow while exhaling - if you are learning this exercise with an “applied” purpose, this is not unimportant.
- At this stage, the starting position is as follows: sitting, one leg bent at the knee, the other straightened, lying on the floor. The opposite hand with the bent leg rests on the floor, taking on part of the body weight. The second arm is straightened at the elbow, raised above the head with a weight. We raise the pelvis, we find ourselves on three points of support: the foot, the heel of the leg that has been straightened, the palm of the supporting hand. With this palm we push off the floor, create a powerful impulse, transfer the center of gravity to the pelvis, while simultaneously bending the previously straightened leg.
- We find ourselves in a position on bent legs, the arm with the weight is fixed above the head. We powerfully straighten the knees and hip joints, while looking upward in such a way that the extensor spine is activated along its entire length, which is very important from the point of view of injury safety of movement.
- Bend your knees, move your pelvis back a little, continuing to hold the weight above your head.
- We move our non-working hand away from the body, gently transfer part of the body weight to it; it is better to touch the floor first with your fingers, then with your palm.
- Straighten the knee of the same arm, rest on the heel, foot, palm.
- We lower the pelvis to the floor under control, straighten the leg at the knee joint, and at the same time lie down on the floor under control, keeping the abs and neck muscles in static tension; there is no need to fall uncontrollably to the floor. There is no need to press your supporting hand against your body; you can immediately move on to the next repetition.
You need to breathe constantly during the exercise: at each of the listed stages you need to do one breathing cycle - inhale-exhale, and as you exhale you need to move on to the next phase of the movement; while inhaling, you can “take a break.” It is not advisable to hold your breath here, as this will only make you tired faster.
The Turkish get-up exercise with a kettlebell is difficult to coordinate, and therefore traumatic - before doing it “at speed”, master it step by step, first without weight, then with light weight. The optimal working weight would be a kettlebell of 16-24 kilograms. Having mastered the kettlebells of this weight with ideal technique, you can move on to performing Turkish get-ups with greater speed and time.
Other types of exercise
The Turkish get-up can be performed with a kettlebell, barbell or dumbbells. If the option with dumbbells is the easiest option possible, then the most difficult option is lifting from the floor with a barbell held at arm's length, since here the muscles of the forearm and hand are most involved. Holding the barbell in an outstretched hand so that neither end of the bar is “skewed” is not a trivial task.
To master this version of Turkish get-ups, it would be optimal to first master traditional Turkish get-ups, and with a working weight. The next step will be to perform Turkish get-ups with a bodybar - this will train the hand muscles to keep a non-standard apparatus in balance. When you can confidently perform the Turkish get-up with a bodybar, move on to the 10-kilogram bar; once you have mastered the movement with it, move on to the Olympic bar. The advantage in this version is that having mastered the entire complex from the bodybar to the Olympic bar, you will become the owner of a truly steel grip.
What muscles work?
In dynamic mode, when performing Turkish lifts, the leg muscles work, especially the large load falls on the quadriceps and calf muscles. The abdominal muscles also work, and both the rectus abdominis and oblique muscles are used equally. The serratus muscles on the side of the working arm are also well involved.
In static conditions, the triceps brachii muscle, pectoralis major and minor muscles work. The deltoid muscle works in a dynamic mode - especially the anterior and middle fascicles, the posterior deltoid stabilizes the shoulder, along with the “rotator cuff” - the supraspinatus, infraspinatus, subscapularis, teres major muscles, the joint acquires greater resistance to traumatic influences. Direct involvement of the back muscles is minimal and limited to the function of stabilizing the spine and pelvis.
Execution technique
Initial position:
- Place the projectile on the floor next to the intended workplace.
- Take the starting position lying on your back near the weight so that it is located approximately in line with your chest. Let's take the right side as the “working” side.
Movement:
- Turn your whole body towards the projectile and grab it with both hands, bent at the elbow joints. In this case, the working (closest to the projectile) hand should be at the bottom of the handle, the auxiliary hand should be at the top.
- Roll back onto your back, pulling the weight with you. Transfer the weight of the projectile to your bent right arm.
- Take your free left hand away from your body and place your palm on the floor. Pressing your shoulder blades and lower back against the support, press the weight vertically upward onto your straight arm.
- Bend your right leg with the same name as your working arm at the knee joint, so that the entire surface of the foot is on the floor.
- Fix your gaze on the weight, controlling it. Keeping your core engaged, lift your non-working shoulder off the floor and shift your weight to the forearm of your free hand. The next step is to fully straighten your left arm at the elbow joint.
- Raise your pelvis above the floor, distributing your body weight on three support points: your palm, your “working” foot, and the heel of your straightened leg. From this position, move into a lunge, bringing your left leg back and placing it on your knee. When the position is stable enough, push off the floor with your supporting hand.
- Shifting your body weight to the foot of your front foot, powerfully rise from the lunge to your full height.
- Perform the movement in reverse order, lowering yourself to the starting position lying on the floor.
- Perform the prescribed number of repetitions for one arm, then change your working arm.
Attention!
- Keep your eyes on the apparatus throughout the exercise. This way you are much less likely to lose control and get injured.
- Avoid bending your arm with weight at the elbow joint. Involuntary bending will lead to loss of balance due to a shift in the center of gravity. In addition, this will put the shoulder joint in an unstable position and can provoke a “local” injury.
- Do not bend the wrist of your working hand to the “outside” side. This leads to a shift in the center of gravity of the projectile and creates a traumatic load on the wrist joint.
- Do not use gymnastics mats or mats. At the time of performing a difficult-to-coordinate movement, they prevent you from taking the most stable position.
- Do not “fall” to the floor while returning to the starting position. Strict technique must be strictly observed in the second phase of the exercise with constant tension in the working muscles.
Recommendations!
- Make sure that the weight at all stages of the movement maintains a position perpendicular to the floor and does not “go” to the side. This will help you concentrate on maintaining the correct movement technique and prevent loss of the projectile.
- Please note that there should be a gap between the heel of the working leg bent at the knee and the buttock, which will allow maintaining the natural trajectory of movement for the joint.
Execution options!
- Turkish climb "without a bridge" . In this version of the exercise, when moving into a lunge, the moment of placing the body in the plank “lowers”. Leaning on his free hand, the athlete immediately takes a stand on one knee. This version of the movement is considered simpler in terms of coordination.
- Turkish get up with dumbbells or barbell . You can replace the projectile with any other one. There will be little change in terms of load, but with a barbell it is much more difficult to perform this exercise, since you need to monitor the balance of the bar.
Turkish get up technique
Upward movement.
- Lie on the floor, first taking the weight in your right hand. Lying on your back, lift the weight with your arm straight at the elbow to a vertical position, do not twist your hand, the weight touches your forearm.
- Bend your right leg at the knee, resting your foot on the floor. The second hand is placed on the floor to assist in lifting.
- Using your abdominal and chest muscles, lift your right shoulder up, keeping your arm straight and vertical. Continue pushing with your left hand and lifting your body until you lift your buttocks off the floor, transferring the load to your right foot (in this position, your knee has reached a right angle).
- Using your left arm and right foot, move your left leg from a straight position back under your pelvis, as if you were performing a backward lunge.
- Do not change the position of your hand with the weight, keep it straight. Straighten your body by lifting your left hand from the floor. Push off with your feet, placing all the weight on your legs. Rise up from your lunge, stepping your left foot toward your right. Fully straighten up at the top, keeping the kettlebell arm in line with your torso.
The reverse movement is performed in reverse order.
- Also return to the starting position - step back with your left foot, as in a lunge.
- Gently lower your left palm to the floor, tilting your body to the left, but without losing the straight position of your right hand.
- Using your left hand and right foot, bring your left leg forward and straighten both legs.
- Contracting your abdominal muscles, slowly lay your back on the floor without lowering your right hand with the weight to the floor. Perform the movement on the same side several times.
After approaching the right side, safely change your grip to your left hand, doing this in a standing or sitting position.
Recommendations
Here are some useful tips to help make your workouts as effective as possible:
- To put maximum emphasis on your shoulders, the Turkish get-up can be combined with exercises such as dumbbell overhead presses (military presses), lateral raises, standing raises, and bent-over raises.
- Place lifts at the beginning of your workout while your muscles are not yet fatigued by other activity.
- Do not bend the hand in which you are holding the weight.
- Practice the technique with a minimum weight projectile and only then increase the weight.
When performed regularly, lifting or, as it is sometimes called, Turkish press, will allow you to pump up the muscles of the whole body and develop good coordination.
More articles on topics: Dumbbells
Effective exercises:
- Learning to snatch a kettlebell - technique, breathing and other subtleties
- Kettlebell swings - training strength and endurance
- Snatch and jerk of a barbell - exercises for weightlifters
Trainer's tip: During training, concentrate on your own sensations. Don't be distracted by extraneous thoughts
This way you will not only take care of your figure, but also get rid of stress.
leave a comment
Other types of exercise
The Turkish get-up can be performed not only with a kettlebell. You can make your task easier by choosing dumbbells, or, conversely, complicate it by choosing a barbell. The Turkish get-up uses the muscles of the forearm and hand to the greatest extent. Here you need to not only hold the barbell in your outstretched hand, but also make sure that none of the ends of the bar are warped.
The Turkish get-up can be performed not only with a kettlebell. You can make your task easier by choosing dumbbells, or, conversely, complicate it by choosing a barbell. The Turkish get-up uses the muscles of the forearm and hand to the greatest extent. Here you need to not only hold the barbell in your outstretched hand, but also make sure that none of the ends of the bar are warped.
How to Get the Most Out of Squats
Turkish squats are very intense and involve a lot of moving parts of the body, so start with light weights (or no weights at all) until you master the movements. Try using a shoe instead of a kettlebell first, just to understand the correct body mechanics.
As Amy Rushlow says, “Don’t be surprised if you look like a drunk the first time.” Beginners should start with a kettlebell weighing 5-7 kg, at best. Nine kilograms is an intermediate stage for this exercise, and 11-14 kg is already for experienced ones. If you immediately grab the strongman weights, you risk injury.
Between each position, pause and catch your breath, mentally checking your form and trying to monitor the strength of your joints and core muscles. If you can't complete a full rep correctly, it's best to stop rather than persist and risk injury.
Remember that the benefits of this exercise come from the quality of the movement, not the amount of weight. 12-15 reps are great. On the other hand, you can perform 1-3 repetitions on each side as a warm-up. Remind yourself not to rush - each repetition should take 45 to 60 seconds.
Kettlebell exercises. Turkish rise
The kettlebell Turkish get-up is a great functional exercise. When performing it, all the muscles of the body are involved, which must perform the work harmoniously and consistently. You can compare this exercise with. Anyone who is more or less seriously involved in bodybuilding knows that deadlifts can really increase strength in all exercises.
The same is with the Turkish get-up - the exercise is difficult and not the most pleasant to perform, but if you want to increase the strength and power of the whole body, it is simply necessary to include it in your training.
Another undoubted advantage of this exercise is that it helps develop joint mobility. Performing a Turkish get-up with a kettlebell will help you improve your joint health, correct posture problems, and give you the cardio you need for a healthy heart.
I want to make one more important point. Kettlebell exercises such as the Turkish get-up develop functional strength and use all the muscles in our body.
This means that by doing the exercise you will eventually get rid of weak parts of the body. I think you have often met bodybuilders who have broad shoulders, large biceps and thin legs.
So, when doing exercises with a kettlebell, you will never have such problems, because exercises with a kettlebell require coordinated work of the whole body.
Execution technique
1. Starting position - lying on your back.
2. Gently take the kettlebell in your right hand and extend it up in front of you.
3. Bend your right leg and lean on it. Roll slightly onto your left thigh, place your left hand on the floor and extend your arm further up.
4. Using your right leg and left arm, carefully lift yourself off the floor. The left leg is straightened. The kettlebell is also held overhead in the straightened right arm.
5. Bend your left leg under you and kneel. The result is the following position - the left knee rests on the floor, the right foot rests on the floor, the weight in the right hand is extended above the head.
6. Inhale and straighten up.
7. The exercise is not finished yet. Perform all movements in reverse order to return to the starting position.
Adviсe:
1. While performing the exercise, do not take your eyes off the weight.
2. If you lose your balance or feel like you can’t hold the weight, don’t fight it—throw it to the floor. A dent in the floor is better than a broken arm.
3. Do not bend your hands.
4. First perform the exercise several times without a weight to get used to it.
5. Perform 5 times on each side. This exercise can be performed as a separate complex during a specific workout. For example, do 3 sets of 10 minutes. For 10 minutes, perform the exercise with a kettlebell 5 times on each side. I promise it will be fun!
6. If possible, do the exercise barefoot. Schwarzenneger could not exercise barefoot - some types of shoes (especially running sneakers) interfere with maintaining stability and balance.
In the video below, Steve Cotter does an excellent job of showing and explaining the Turkish Get Up exercise with a kettlebell.
Source:
Benefits and contraindications of exercise
The main benefit of the Turkish get-up with a kettlebell is that it loads the entire musculature, forcing all muscle groups to work in a coordinated and harmonious manner. And this is no coincidence: the Turkish rise involves a whole chain of successive movements. You need to get up from a lying position, stretch your arm upward with a load and return to the starting position. Even without weight, such a task is not feasible for everyone. In addition, the Turkish get-up exercise:
- Develops coordination of movements, allowing you to quickly rise from a lying position.
- Not only does it work all the core muscles, but it also does it dynamically.
- Helps to quickly lose weight: due to the work of all muscles, the energy consumption of the element increases.
- Makes tendons more elastic and joints more mobile.
- Strengthens shoulder joints and arm muscles.
The Turkish get-up is a versatile training tool for developing stabilizer muscles, the ability to control an external object in space, overall body coordination and functional strength. This exercise is widely used in martial arts, cross-training and functional training. When performing it, all the muscles of the body are involved, which must perform the work harmoniously and consistently.
The classic version involves the use of weights, but the arsenal of weights can only be limited by the imagination of the trainee. If you don’t have a weight, you can use a dumbbell, and in order to better work out the stabilizers, use options for working with a barbell. But for this you first need to practice.