Execution technique
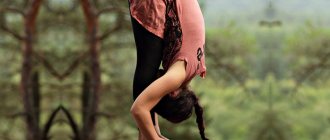
- You should start with the “Child” pose: sit on your heels, lean forward, slowly pull your chest towards your legs, press your forehead to the mat. Straighten your arms along your body, turn your palms up without touching your feet. Exhaling, lower your body closer to the floor surface.
- Relax in the resulting position, then slowly raise your head, placing your hands on your knee joints.
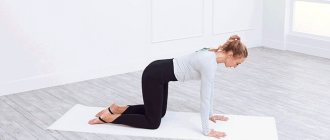
- Place your elbow joints and forearms on the mat in front of your knees, clasp your elbows with your palms. This way, the hands will be in the correct position before performing the Dolphin asana.
- Leave your elbows in place, but remove your palms from them, extend your forearms in front of you, and clasp your fingers together in a “lock.” The arms form a “triangle” for support.
- The elbow joints and feet still remain on the floor, and the hips need to be raised to the highest position, forming an inverted “V” shape with the body. Monitor the distribution of weight: it should be on the elbow joints. Straighten your knees, raise your head to the maximum possible position.
- Gradually move your torso forward, moving your chin towards your hands (it should go forward, beyond the “lock”), head up. Then slowly move your body in the opposite direction, as far away from your clasped hands as possible. Repeat the transitions back and forth as much as possible.
- Sit on your knees, bend forward, press your hips to your heels. Separate your hands and extend your arms along your body. Relax in Child's pose.
Attention! If you have shoulder joint disorders, you should consult your trainer before performing the asana.
https://youtu.be/v5sWkv1CgCM
Twisted Side Angle Pose
What Muscles Will Be Burned: Quads, Hamstrings, Glutes, and Upper Back.
This exercise consists of several steps:
- Stand straight with your feet together.
- Inhale, bend your knees, lower your hips and raise your arms above your head.
- As you exhale, bend your elbows and lower your right elbow to your left knee. Place your palms together and push your elbow from below your hip to lift and rotate your chest upward. Pull your right hip back slightly so that your knees are parallel to each other.
- Stay in this position for 30 seconds, take five breaths. Exhale and return to the starting position. Repeat the same on the other side.
Benefit
This pose has a beneficial effect on the body:
- opens the chest area;
- normalizes digestive functions;
- has a calming effect on the nervous system;
- strengthens the muscles of the upper and lower extremities;
- softens the effects of menopause;
- prevents the occurrence of osteoporosis.
Reference! The Dolphin asana is recommended for those who are not yet ready to perform inverted poses. The exercise helps strengthen the back muscles and abs, prepares the spine for more complex asanas.
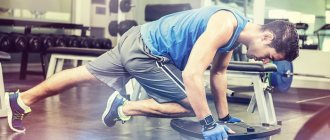
Dolphin plank pose
This pose from our yoga routine for weight loss at home is aimed at training the deltoids, pectoral muscles, abdominal muscles, lower back and quadriceps.
- Take a horizontal position on the floor, arms and legs straight.
- Lower yourself onto your forearms. Don't arch your back. Arms from shoulder to elbow are perpendicular to the floor.
- Hold this pose for five breaths and return to the starting position.
Contraindications
You should not move to this pose if you experience:
Yoga for beginners from scratch We recommend! Free classes for those taking their first steps in yoga. Short original sequences that will allow you to smoothly and effectively begin practice without violence against yourself, but with an accurate aim at the most problematic area for most residents of big cities. Read more.
- high blood pressure;
- eye diseases (glaucoma, retinal disorders);
- arm or shoulder injuries.
If you find an error, please select a piece of text and press Ctrl+Enter.
Goddess pose
This asana will work your quadriceps, hamstrings and glutes.
- Take a wide step to the side, with your feet turned out.
- Bend your knees and squat so that your buttocks are parallel to the ground.
- Raise your arms up, bending your elbows at an angle of 90 degrees, with your palms facing away from you.
- Hold this pose for five deep breaths.
Boat pose
The boat pose works the muscles of the back, lower back, hips and buttocks.
- Sit on the floor, bend your knees near your chest. Keep your balance.
- Straighten your legs as much as possible without rounding your spine. Keep your arms straight in front of you.
- The main thing is not to slouch. Hold this position for five breaths.
See also: Yoga for the back
Adviсe
While arm strength is important to help lift you up, your hips are lifted and held up by your abdominal muscles.
Preliminary practice in poses such as Plank (Kumbhakasana), Plank-Dolphin (Makara Adho Mukha Svanasana), Boat (Paripurna Navasana) is excellent preparation for balancing the arms, for example, in a pose such as Eight Arcs Pose.
Flexibility is also needed here! Opening the legs and hips with preparatory poses such as Pigeon Pose (Eka Pada Rajakapotasana), Contented Child Pose (Ananda Balasana). Also, “Intense Stretch Pose (Uttanasana)”, “Staff (Chaturanga Dandasana)”, “Butterfly Pose (Baddha Konasana)” and “Intense Lateral Stretch (Utthita Parshvakonasana)” are a great way to achieve success.
Keeping your gaze focused on one fixed point (either on the ground directly in front of you or on your feet) can help with stability and mental focus.
Why you should try acroyoga
Acroyoga is more than just spectacular tricks and functional exercise for the body. “This is a practice aimed at interaction, unlike ordinary yoga, which, as a rule, involves only internal work,” says Natalia Doynikova , acroyoga teacher at the Botanika studio. “The practice of trust and mutual understanding between partners.”
However, acroyoga classes strengthen not only relationships, but also the muscular frame. “Acroyoga helps develop strength, flexibility, and balance. And in a playful way. You don’t think about how many approaches you’ve done, how many seconds you hold the pose, you’re just doing a fun and exciting activity, and in the end, over time, you’ll notice that the muscles of the arms, legs, core and back (namely, they work the most in acroyoga) have come to tone,” explains Natalia Doynikova.
Anyone can try acroyoga; no special skills or experience of regular yoga are required. “Asanas are built through balance,” says Vsevolod Pakhomov , acroyoga teacher at the Botanika studio and partner of Natalia Doynikova. - The weight and load falls on the bones (and not on the muscles), and they are known to be very strong. So even if a person doesn’t have a lot of strength or stretch, they can handle it all with the right technique.”
You should refuse classes in case of serious injuries, pregnancy, postoperative period, hernia and protrusion of intervertebral discs.
Full cicada
This yoga pose works great on your back muscles, deltoids and buttocks.
- Start in a horizontal position, lie on the floor.
- Extend your arms in front of you, shoulder-width apart.
- Inhale while simultaneously lifting your legs, head and upper body from the floor.
- Breathe and try to relax your shoulders and buttocks.
- Stay in this pose for five breaths and then lower yourself to the mat.
Sage Pose
The following yoga asana for weight loss is suitable even for beginners and will allow you to pump up your triceps and oblique abdominal muscles.
- Start in a horizontal position with your hands and feet on the floor.
- Bring both your feet together so your big toes are touching. Place your right hand on your left.
- Lean on your left heel, raise your right arm up. Stay in this pose for five deep breaths, trying to maintain balance.
Intense sunrise
This pose works the triceps, rhomboids (between the shoulder blades), and hamstrings.
- Sit up straight with your legs extended in front of you, toes touching the floor. Place your palms behind your hips.
- As you inhale, push your hips up without lifting your arms and legs off the floor. Raise your hips as high as possible, slowly lower your head back.
- Stay in this position for five breaths, then lower your hips to the floor.
Chakrasana – wheel pose
The wheel pose will help work the back muscles, trapezius, rear deltoid (back of the shoulder) muscles, and stretch the front part of the body.
- Lie on your back, bend your knees and place your feet on the floor as close to your buttocks as possible.
- Bend your elbows and place your palms on the floor parallel to your shoulders.
- Inhale, lift your shoulders and hips off the ground, and hold the wheel pose for five deep breaths.
An 8-minute yoga routine in pictures will help you easily lose weight at home. You just have to be patient and practice regularly. Then the result will not take long to arrive. You will be slim, beautiful, healthy and energetic. Good luck!
Benefits and effects of backbend asanas
Backbend asanas are poses that are performed with extension of the spine. The deflections are varied; they can be performed either lying on the stomach or lying on the back, as well as standing, sitting and on all fours. See photo 1: virabhadrasana 1, bhujangasana, setubandhasana, marjariasana.
Back bends appeared at about the same time as slopes, namely in the 15th-17th centuries. All these poses were performed while lying on the stomach. Dhanurasana was described first, then it was joined by bhujangasana, makarasana and salabhasana (photo 2).
Healing and mystical effects were attributed to deflections, as well as to tilts:
The digestive fire in the body will constantly increase, all diseases will be eliminated and the snake-like goddess [Kundalini] will awaken through the exercise of Bhujangasana. (2.43)1
The most obvious effect of backbends is to increase the mobility of the spine. This is especially true for the lumbar region (the thoracic region is less mobile due to anatomical features, and the neck must be protected from bending backwards).
In addition, backbends also stretch the rectus abdominis and iliopsoas muscles, helping to eliminate tightness in these areas, which are quite common.
Power bends (such as salabhasana) strengthen the deep back muscles, help eliminate back pain and improve posture when slouching.
Gentle backbends, performed against the backdrop of spinal traction, can significantly improve the situation with herniated intervertebral discs, reducing their size and smoothing out symptoms.
They also stretch the chest muscles and rib cage, deepening breathing and improving lung function.
No less important are the effects these poses have on the internal organs. In bending asanas, the intestines are stretched, which has a beneficial effect on peristalsis. The kidneys and adrenal glands are stimulated by squeezing the muscles in this area, increasing blood flow and improving innervation, which improves diuresis and hormonal function of the adrenal glands, which is especially beneficial during menopause, as well as depletion of their function. The pressure increases throughout the abdominal cavity, therefore the blood supply to the internal organs and the outflow of venous blood improves.
Backbends also stimulate the sympathetic part of the autonomic nervous system, i.e. have tonic properties. Together with relaxation poses, they balance the autonomic nervous system during dystonia.
The main danger of bending back is injuries to the cervical and lumbar spine. Recently, one student returned to me after a long break and told me that while dancing, she unsuccessfully performed a “bridge,” which led to a compression fracture of the spine! Fortunately, there were no serious consequences.
Less serious injuries are more common: spasms and pain in the back muscles, pinched nerves.
Especially dangerous in this sense are deep (extreme) deflections and deflections from a standing position (ushtrasana, hasta uttanasana, etc., see photo 3), because in them, in addition to deflection, the spine also experiences a compression load due to gravity. Asanas lying and standing on all fours are safer in this regard, so it is better to start mastering them with them.
From a safety point of view, it is important not to push the deflection to the maximum, limiting it to approximately 70% of the amplitude available to you. You should not throw your head back, because... The neck is even more fragile and mobile than the lower back, and injuries occur more often. The neck should continue the natural line of the spine, and not “break” back.
Deep bends should be performed after preliminary stretching of the spine. This relieves compression from the intervertebral discs and reduces the risk of overloading the lower back.
Also, in deep deflections and standing deflections, it is important to slightly twist the pelvis forward and strain the buttocks, this protects the lumbar spine from bending.
In case of hernias or protrusions in the neck or lower back, scoliosis, osteoporosis, as well as during pregnancy, you should be especially careful when practicing bending asanas, limiting yourself to soft, non-limiting options, observing safety precautions and avoiding pain in the lower back and neck.
After performing deep backbends, it is necessary to perform a soft compensating bend to avoid overloading the lower back. Most often, this compensation is balasana (photo 4).
Backbend asanas can be strength-oriented (for example, shalabhasana) or stretching-oriented (for example, bhujangasana).
In power deflections, as a rule, the amplitude is small, but the muscles of the back and buttocks actively work. If the muscles are weak, you should start mastering with simple power bends (ardha shalabhasana, ekapada shalabhasana, see photo 5).
These poses must be performed slowly, lifting the body vertebra by vertebra to engage the deep back muscles.
It is also important to bring the shoulder blades together and pull the shoulder joints down, which will allow you to engage the interscapular and trapezius muscles - in most people they are weakened, which leads to stooping, as well as overload and spasms of the neck muscles.
Backbends aimed at stretching require less muscular work, but are performed with deep amplitude. If your spine is not very flexible, start with shallow bends - for example, ardha bhujangasana (photo 6), gradually moving to deeper and more complex ones.
In these asanas, it is important to avoid extreme positions and lower back pain. Move your shoulder joints back and down, freeing your neck. Don't throw your head back. Try to ensure that the entire spine from the tailbone to the back of the head is one smooth line, without “kinks” in the neck and lower back. Twist your pelvis forward and tighten your buttocks, especially in standing backbends and deep lying backbends, this protects your lower back.
See, for example, Bhujangasan's video:
_____
1 Gheranda Samhita. Per. A. Rigin