The most unexpected and impressive element of scary Halloween decor is the realistic illusion of a ghost, where a black and white figure (or one head) suddenly appears nearby or flies right in front of you. By the way, the technique described here is used in the haunted house at Disney Land! And it's actually very easy to reproduce on your own. The illusion can be placed in a shop window or behind an office glass partition to scare people passing by, or you can decorate your home or holiday party with such a creepy creature.
Creating the illusion of a ghost as a detail of the Halloween interior of an apartment or house
1. First, you need to take a video of a scary head or solid figure. In our case it will be the head, but variations are removed by analogy. Stand in front of a background curtained with black fabric, wrap your body in a shapeless black fabric like a cloak so that only your head is visible from this cocoon. Place the flashlight under your head and slightly in front and turn it on, pointing straight up at your face. Turn off the lights in the room (no light should leak from the street either) and start recording on the video camera. Big dark shadows created by a bright flashlight will make your face look absolutely devilish. During recording, do not forget to move your head from side to side, back and forth, and use facial expressions so that your ghost in the recording is as alive as possible.
2. The illusion works great in doorways - it's a great way to scare people moving from room to room. Place a table in the opening, place a laptop or TV monitor on it - as far as possible and to the left of the opening, i.e. so that the screen is directed to the right. A great option is to place the screen on double stacks of books so that the ghost image is noticeably higher than the tabletop.
3. The key to the success of this illusion is reflection from a clean, flat surface. And this is where plexiglass (plexiglass) comes into the picture. Insert a piece of plexiglass into a small picture frame - this will make the glass much easier to handle later. A large sheet of plexiglass will cost you 3000-5000 rubles. Place the glass at a 45 degree angle to your laptop or TV. Secure the glass in this position with heavy books or bricks (on both sides) so that it does not fall, even if someone accidentally pushes the table or touches the plexiglass itself. Turn on the previously recorded video and you will see an image of a ghost appear in the glass. Experiment with the position of the components and the distance between the glass and the image source so that the ghost “hangs” in the glass exactly where it is needed.
4. Cover your books and laptop keyboard (or use a tablet) with a thick black cloth to prevent those being scared from discovering your trick.
5. Decorate the doorway with even more black fabric to hide the corners of the glass frame and the very existence of the laptop or TV screen. The fabric above the door can be secured with decorative buttons, pinning the latter on top to the wooden door frame.
6. Turn on the video and a ghost will appear between the folds of the fabric. Play with the lighting of the room: if the room is dark, your guests will only see your head. But when there is light in the room, this surprise can actually become even more ominous, as the head will appear to be flying around the room.
The illusion of a ghost in front of an office glass or in a shop window
1. The concept is the same, but the location of the screen in relation to the plexiglass is different. Place the monitor on its back, i.e. with the screen facing the ceiling. Again, place the screen on a stack of books or a box to raise the image higher.
2. Place the table behind the laptop/monitor. Make sure the table is not blocking the ceiling-facing screen.
3. Place the Plexiglass above the screen: rest the upper part against the window or glass, and place the lower part on the edge of the table, securing it with several bricks so that the glass does not slip. The plexiglass should again be at an angle of approximately 45 degrees relative to the screen, but first check the result outside the display window. Then experiment with the height of the laptop and the angle of the plexiglass to achieve the desired ghost position.
4. Hang the black fabric on the window, but do not cover the screen and the reflective surface of the plexiglass. Cover the books/drawer, keyboard and desk with a cloth, turn off the lights in the room or close the display case tightly to prevent light from entering from the store. Be aware that the plexiglass may begin to reflect what is outside in front of the window. To reduce this effect, try turning off all unnecessary light sources outside and inside.
Happy Halloween!
Variation on a theme - face in the mirror
1. We shoot a video in exactly the same way as described above, only this time we wrap the entire head and neck in black, leaving only the face visible. We record the video on a disc, insert the disc into the tape recorder and set it to play cyclically.
3. Connect the screen to the player, hang the mirror with the TV on the wall. Optimally - in the same place where the TV used to hang, then everything will definitely stay in place. We hide the tape recorder nearby.
4. Take a fabric that is the length from floor to ceiling and the width of the entire wall and, having cut out a circle in a strategic place, hang it at a distance from the wall so that the fabric covers the TV and wires, leaving only the mirror frame visible.
All you have to do is turn on the disc and invite guests. This idea looks most creepy in a dimly lit corridor, where ordinary mirrors are lined up in a row.
Open the photo in Photoshop, open the layers panel, right-click on the background layer (for now this is the only layer in the panel), in the context menu that appears, click on the item “Convert to Smart Object” (Convert to Smart Object), more about converting layers Smart Objects is covered.
The image itself will not change, but now a small icon has appeared in the lower right corner of the layer thumbnail, notifying us that this layer is now a smart object:
Step 2: Apply the Motion Blur filter
To create the halo effect, we'll use several Photoshop filters, starting with the Motion Blur filter. Open Filter -> Blur -> Motion Blur (Filter -> Blur -> Motion Blur) In the filter dialog box, set the angle to 0°, and increase the “Distance” parameter by dragging the slider to the right, the more you move the slider to the right, the more the larger the blur parameter will be, the final value will depend on the size of your image. My image is quite large, so I'll set the value to 500 pixels:
The effect of this filter should now look something like this:
If we look in the Layers panel, we can see that the Background layer, converted to a Smart Object, has had the Motion Blur filter added as a Smart Filter.
If you feel like you made the blur too strong, or, conversely, not enough, just double-click the filter name to reopen its dialog box and adjust the parameters:
Step 3: Selecting a Smart Filter Mask
Click on the Smart Filter mask thumbnail in the Layers palette to select it, after which a white frame will appear around the mask thumbnail, letting us know that the mask is selected:
Step 4: Take the Brush Tool
We'll use a mask to bring back some of the original, non-blurred areas of the image. Select the Brush Tool from the toolbar.
Step 5: Set the Brush Color to Black
In order to return non-blurred image fragments, we will need to paint on the mask with a black brush; for this we need to set the main color of the color palette to black. When the mask was activated, the main color of the palette became white, the background color became black, we need to do the opposite, to do this we just need to press the X key on the keyboard, after which the colors will swap places.
The base color should now be black:
Step 6: Lower the Brush Opacity to 25%
With the brush selected, in the options bar at the top of the program window, reduce the Opacity value to 25%. This will allow us to reveal the original image gradually, with each stroke, making the revealing process easier to fine-tune the blur in a specific area (rather than the all-or-nothing effect we'll get from brush strokes at 100% opacity):
Step 7: Selecting Brush Diameter and Hardness
Right-click anywhere on the image to open the Brush Set dialog box. I'll select the top left brush by clicking on its icon. This gives us a brush with a Hardness of 0%, or in other words, the softest edges possible. The diameter depends on the size of the photo. Press Enter to close the dialog:
Step 8: Painting Certain Areas of the Photo
We have our brush set up, let's start painting the areas where the original should be, i.e. zero blur, in the portrait these are the person’s eyes, nose and mouth. Each time you drag your brush over an area, more and more of the original image is revealed.
Attention! Don't forget to release the left mouse button between strokes!
You can adjust the brush size directly from the keyboard by pressing the square bracket keys (]
to increase the diameter and
[
to decrease). If you accidentally painted over an unwanted area, press the letter X on your keyboard to swap the foreground and background colors and drag your brush over that area. Then press X again to set the Foreground color to black.
Here I painted over the center of the girl's face to clear up the motion blur from her eyes, nose and mouth, and I also brushed along part of her hair:
If we now look at the mask thumbnail in the Layers palette, we can see where we painted with black. The remaining area (filled with white) is where the blur effect remained in full force:
Step 9: Convert the current smart object with filters into a new smart object
So, we have applied the Motion Blur filter, now we need to add another filter. But this second filter must be applied to the entire image, and not just to certain areas of the picture, as the Motion Blur filter currently does. This creates a potential problem because... there is only one mask for smart filters for one smart object for all filters, and we have already used it to cancel the effect of the filter in some areas of the picture, and it turns out that we need a separate mask for the new filter.
The way out of this situation is simple. We need to nest the existing smart object with filters applied to it into a new smart object.
To do this, right-click on the layer and click on the corresponding line of the context menu, as the first time, as a result we will get a new Smart Object:
Step 10: Applying the Diffuse Glow Filter
Let's apply a second filter, Diffuse Glow, which will add a glow effect to the image.
Before you select a filter, press the letter D on your keyboard to quickly reset the colors in the color palette so that the background color becomes white.
Now go to Filter -> Filter Gallery. This opens a large Photoshop filter gallery window Gallery dialog box with an image preview on the left, filters and their categories in the middle column, and options and options for the selected filter on the right. Click on the "Distort" line in the middle column, which will open it, and click on the thumbnail for "Diffuse Glow":
This filter has three settings. The first is Graininess, I will set the value to 6, but the value of this value depends on the size of the image. The second parameter is the degree of glow (Glow Amount), it controls the intensity of the glow. I'll set the value to 10. And the last parameter - Original (Clear Amount) behaves like the opposite of the "degree of glow", I'll also set it to 10:
Click OK when you're done to accept the changes and close the gallery. Here's what my image looks like after applying the diffuse glow:
Now in the Layers panel we will see the Diffuse Glow filter applied as a smart filter to the smart object. In addition, we have a new mask for this filter, it is completely white. and we won’t do anything with her, because... we want to apply the filter to the entire image:
If you want to go back and change any of the settings for the Diffuse Glow filter, simply double-click on the Filter Gallery line in the Layers panel, which will open the filter dialog box.
I want to reduce the opacity of the glow effect. To do this, click on the icon located on the right side of the “Filter Gallery”:
A dialog box will open where I will reduce the opacity to 90%:
Step 11: Adding a Hue/Saturation Adjustment Layer
Now you should give the portrait a color that matches the image of the ghost. We will do this by adding a Hue/Saturation adjustment layer. Click on this layer's icon (first icon on the left, middle row) in the Adjustments panel:
Photoshop adds a new adjustment layer directly above the Smart Object in the Layers panel:
Controls and options for the adjustment layer open in the Properties panel. First, check the “Rendering” option, this will allow us to shade the entire image with one color. The tinting itself is done by dragging the Hue slider left or right to select the tinting color. I think a greenish-blue color would be great for a mystical effect, so I set the value to around 180:
This is what my image looks like now:
Step 12: Change the Layer Blending Mode and Lower the Opacity
And finally, change the blending mode of the Hue/Saturation adjustment layer from Normal to Color. The change may be small, but with this blend mode the adjustment layer will only affect the colors of the image, without affecting the brightness values.
Directly opposite the blending modes option is the opacity adjustment. The default value is 100%, and lowering it will bring out some of the original colors in the image. In my case, I'll lower the opacity value to 60%:
At this point the work is completed, the ghost photo effect is ready!
Useful tips
Despite the fact that this holiday is not official in Russia and the CIS countries, people still like to celebrate it, because it is not only unusual, but also quite colorful and original.
Many people throw parties on Halloween. They can take place both in clubs, cafes and restaurants, and at home.
To decorate your room beautifully and prepare original Halloween crafts, we provide several interesting ideas, many of which you will definitely like.
DIY Halloween: Little Ghosts
You will need:
Styrofoam balls (found at an office supply store)
White cloth or gauze
Black pins
Thick thread.
1. Wrap each foam ball in fabric and tie a thick thread at the neck to secure the fabric.
2. Insert black pins to become eyes.
3. To hang the ghost, you can make a small loop of thread on the top of the head.
DIY Halloween Crafts: Spider Garland
You will need:
Thin brushes
Strong thread
Needle and thread or tape.
1. Prepare 4 pipe cleaners, gather them into a bunch and bend them in half.
2. Grasp the top of the head where the pipe cleaners fold, bend it slightly and twist the pipe cleaners to form the body of the spider.
3. Start straightening the spider's legs.
4. Using a thread and a needle or tape, attach the spider to the thread.
5. Make a few more spiders to create a larger garland.
Take the starting position - stand on one leg. Grasp the support with your hand on the same side. The support can be a special handle or the frame of the simulator. Secure your other leg in the cuff of the machine. The leg should be moved to the side. Place the hand on this side on your belt.
- Take a breath. Bring your leg. Try to move your leg as far as possible.
- Exhale.
Standing leg adduction - execution.
This exercise is an isolating exercise for the hip adductors. It is not recommended to perform this exercise with heavy weights to avoid knee injuries.
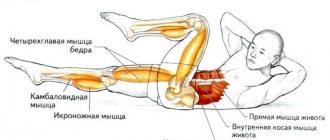
The adductor muscles of the thigh are located on its inner surface. These muscles have significantly less volume than the quadriceps. And functionally, these muscles receive less stress in everyday life. And you can only boast of well-developed hip adductor muscles in a swimsuit. For these reasons, this exercise has not gained much popularity among male athletes. This exercise is present in the training programs of professional athletes who strive to develop their legs harmoniously and “tighten up” lagging parts. And the standing leg raise is especially popular among the female half of gym goers. If for men training the upper body is a priority, then for women the opposite is true. I think no one will argue that a female figure with toned legs looks much more attractive than a female figure with developed biceps.
The standing leg adduction is an isolated exercise that targets the inner thigh. It does not require much energy and is performed mainly at the end of a leg workout. In order for the exercise to bring maximum effect, you need to adhere to the following recommendations: 1) Take your leg as far as possible, stretching the muscles. This will increase the amplitude of the exercise. 2) Avoid sudden movements to avoid injuring the muscles. 3) The adductor muscles of the thigh are not accustomed to serious loads in everyday life, so you need to start training with minimal weights, very gradually increasing the load. You will feel the effect even from minimal weights. 4) The working leg should move further than the supporting leg, in front of the supporting leg. The movement resembles scissors. This way you will achieve a good muscle contraction and better work the inner thigh. 5) Do not rotate the pelvis during the exercise; the movement should be carried out exclusively through the adductors of the hips.
There are variations of this exercise that will allow you to work your inner thighs at home . The first option is to perform the exercise with an elastic band. One end of the harness must be secured to a fixed support. This could be a battery riser, the leg of a massive cabinet or bed. Fasten the other end of the tourniquet to your leg. For example, if you are working on your left leg, stand with your left side to a stationary support, lean on it (or the wall) with your left hand, and move your left leg to the right. Adjust the length of the band so that you can do at least 10 repetitions in one set. The second option is not as convenient, but it also allows you to pump up your hip adductor muscles at home. To do this, you need a light weight pancake from a collapsible dumbbell or barbell, weighing 2-3 kg. Place the plate flat on the floor, lean on it with the inside of your foot and the adduction of your hip, move it as far as possible. The next repetition can be done with the other leg. This option is worse, as it limits the amplitude and does not allow the muscles to stretch.
Chapter:
- Leg muscles
Other back exercises:
- Leg press in the simulator
- Squats
- Leg extension in the simulator
- Squats with dumbbells
- Wide stance squats
- Front Squats
- Lying leg curls on a lying machine
- Standing leg curl on a machine
- Seated leg curls on a machine
- Leg adduction while sitting in the exercise machine
- Standing calf raise
- Calf raise while standing on one leg
- Foot press on the machine
- Seated calf extension
- Seated shin extension with a knee on the knees
How to do it: 3-4 sets of 12-20 repetitions.
DIY Halloween decor
For this project, you can use your imagination and use any objects (things, toys) to create an original Halloween corner.
In this case, a witch's locker was created. A large wooden box was used for this, but instead you can use a cardboard box to which you can attach several shelves and decorate with paints (gouache) and/or black duct tape (or duct tape).
As decorations you can add:
Toy skulls
Bats cut from black paper
Artificial web (buy in cans or make your own from threads)
Antique books and unwanted keys
Jars and cones, painted with gouache in the desired colors.
DIY Halloween at home: bloody candles
You will need:
Food parchment (baking paper)
White thick and thin candles
1 red candle
Pins and nails
1. To begin, cover your work surface with parchment paper and remove all stickers (if any) from the candles.
2. Light the red candle and get ready to drip red paraffin onto the thick white candle. You can insert pins and nails into the white candle in advance. Be careful, remember - paraffin is hot.
3. The same can be done with thin candles and then insert them into the candlestick.
Cast of a ghost's hand
“A bath with molten wax. We added cholesterol to it to eliminate tampering... We were afraid to miss the moment when the emerging hand plunged... A slight splash in the twilight - the hand plunged into the melted wax. “It emerged”, covered with wax... Disappeared, leaving behind a “glove” that preserved the forms of living matter that had not yet been studied. This time the thin “wax gloves” were smaller than a normal hand.” Dr. Geley showed these casts and the plaster castings made to sculptors, molders, and pourers. He sent out one hundred and twenty-three photographs. And no one indicated a way to make the same casts obtained during the sessions.
The French doctor Richet, known for his extraordinary mentality, undertook to study this new form of matter; he called it “ectoplasm.” But neither he nor Geley advanced beyond that summary - that this is decentralized energy, a formation capable of taking different forms, changing with effort, and the effort shaping them is “an unknown spiritual force.”
In 1922, they managed (with the medium Klusky) to produce “paraffin gloves” - so narrow at the wrists that only a child’s hand could put them on, and at the same time the results of their experiments were demonstrated in London, the museum on Victoria Street, Abbeyhouse, and also at Holland Park College. The experiments were repeated.
Professor Bottaji: “... Something foggy formed by itself, then a semblance of milky-white steam and - physicality: a palm of natural flesh color appeared! I circled the cane around. Possessing mobility itself, this “materialized substance” came into contact with the ordinary forms of the matter surrounding it, influencing it, it was so dense that casts were obtained, and I, shaking my palm, felt its fingers.”
From the book “Secrets of Nature” by A. Denton: “Materialism implies that thought and spiritual power are derived from matter. But a hypothesis arises whether matter is the result of the work of spiritual force, thought. Of course, with this hypothesis about the disembodiment of the mind, it is as if we are looking at the end of a book that has not yet been read. However, the Russian scientist Mendeleev said that without a hypothesis you cannot even notice a fact.”
Twenty-seven French academicians, who were very skeptical at first, assured after the session that they rejected any falsification: “wax gloves” not only cannot be faked, made in advance, but they could not have been made without the obviousness of the forgery. In addition, if soft clay was laid out on a tray in the corner of the room, then sometimes impressions would appear on it by themselves, and this was no less surprising.
Sir Arthur Conan Doyle agreed that he had exhausted the evidence for those who were skeptical about obtaining a cast of the hand - which he, a faithful servant of Her Majesty Science, shook with surprise. But Faraday even said: “There is nothing more amazing than the truth.”
Tissot's famous engraving “Apparition Medianimique” (“Mediumistic Apparition”) depicts a materialization session. And this is not a hallucination or a disorder of the mind, and the engraving reveals that old truth that beyond all the ideas of our mind there were manifestations of a seemingly intelligent entity that were impossible to explain scientifically, and since then they have not only not been explained, but also not must have realized the full scope of such manifestations.
The human mind is not universal. However, Berdyaev once said: “...The book may not pretend to be scientific, but it claims to be true.”
How to make flying candles for Halloween
How to make a big Halloween ghost with your own hands
You will need:
Transparent trash bags
Transparent wide and thin tape
Mannequin or volunteer
* you can use part of a mannequin (without the head) or something that has the shape of a torso, as well as a ball for the head.
Fishing line (for hanging).
1. Torso
1.1. Place a large clear bag over the mannequin. If you have a volunteer as a mannequin, make holes in the bag for the head and arms and then put it on it.
1.2. Start wrapping thick tape around the bag. Pay special attention to the most intricate parts of the torso. Wrap around your waist, neck and shoulders. Add some tape to connect all the already wrapped parts - a couple of pieces from the neck to the shoulders and a couple from the waist to the neck.
* For more difficult places, you can use thin tape.
In the picture you can see strips of blue tape - this is so that you can better understand what to do next.
1.3. Continue wrapping the tape, varying from horizontal to vertical strips. The main thing is that the entire torso is covered.
1.4. To make the shape stronger, add another layer of tape. You can add a couple more layers if desired, but the more tape, the less transparent the ghost will be.
1.5. Using scissors (preferably with rounded ends), cut the shape from the back from the neck to the waist in a straight line. The dark tape in the picture shows exactly where this needs to be done.
1.6. Carefully remove the form from the mannequin and set it aside.
7. Now
the head .
If you don't have a head model, you can use a regular ball of the appropriate size.
*Under no circumstances use a real person for this.
7.1. Place a transparent bag over the mold.
7.2. Wrap thin tape around the neck to secure the bag at the bottom. And to secure the bag on top, wrap tape around it in the forehead area. If you are using balls, simply place some tape on the bottom and then start wrapping it around the entire ball.
Scary Halloween is coming soon, very soon. Few people celebrate it here. But this holiday is terribly fun! Therefore, another holiday for the kids won’t hurt. Moreover, the most interesting thing in every holiday is the preparation for it. You can spend many unforgettable moments with your children in the process of making funny horror stories. Several ideas have already been described in the article. And now I want to teach you how to make a Halloween ghost from gauze with your own hands.
This is not at all difficult, but such a cast looks very believable.
Shoulder, shoulder girdle and shoulder joint[edit | edit code]
The shoulder girdle consists of the collarbone and scapula. The proximal end of the clavicle forms with the sternum the sternoclavicular joint, the only joint connecting the shoulder girdle with the axial skeleton. This joint is strengthened by the anterior and posterior sternoclavicular, costoclavicular and interclavicular ligaments. The distal end of the clavicle and the acromion form the acromioclavicular joint, which is strengthened by the coracoclavicular and acromioclavicular ligaments.
The glenoid cavity of the scapula and the head of the humerus form the shoulder joint. This is a very mobile and therefore rather fragile spherical joint, reinforced by the articular labrum, articular capsule and articular-brachial ligaments.
Movements of the arm in the shoulder joint (Fig. 5.1) occur under the action of many muscles. Flexion is carried out by the clavicular part of the pectoralis major muscle and the anterior part of the deltoid muscle. Extension occurs due to contraction of the latissimus dorsi muscle, teres major muscle and the sternocostal part of the pectoralis major muscle. Abduction is provided by the deltoid muscle and the rotator cuff muscles (subscapularis, supraspinatus, infraspinatus and teres minor). Adduction occurs due to the contraction of the pectoralis major muscle (sternocostal part), the latissimus dorsi muscle and the teres major muscle. The subscapularis and pectoralis major muscles internally rotate the humerus, while the supraspinatus, infraspinatus and teres minor muscles externally rotate the humerus. Horizontal adduction is accomplished by simultaneous contraction of the coracobrachialis, pectoralis major, and anterior deltoid muscles, and horizontal abduction is accomplished by contraction of the infraspinatus, teres minor, and posterior deltoid muscles.
Figure 5.1.
Range of motion in the shoulder joint.
A.
Flexion and extension.
B.
Abduction and adduction.
B.
Rotation outwards and inwards.
D.
Horizontal abduction and adduction.
Figure 5.1
(end). Range of motion of the scapula.
D.
Raising and lowering.
E.
Outward and inward rotation.
G.
Abduction and adduction.
The rotator cuff is the muscles immediately adjacent to the capsule of the shoulder joint (subscapularis, supraspinatus, infraspinatus and teres minor).
Simultaneously with the movements in the shoulder joint, movements of the scapula occur, namely its abduction, adduction, rotation outward or inward, as well as elevation and descent. Abduction of the scapula is carried out by the pectoralis minor and serratus anterior muscles, adduction by the rhomboid muscles, rotation of the lower angle outward by the serratus anterior and trapezius muscles, rotation of the lower angle inward by the pectoralis minor and rhomboid muscles, elevation by the levator scapulae muscle, and descent by the pectoralis minor muscle. .