Qin-na and Wushu
It is believed that a Qin Na master can control a person's movements, render him helpless, unable to move, and, if necessary, even take his life.
Techniques of painful impact on joints, ligaments and muscles are found in almost every style of Chinese Wushu. After all, in fact, qin-na is one of the four traditional technical actions of hand-to-hand combat, which consists of punches, kicks, throws of the enemy and the actual grips themselves. Therefore, it is not surprising that each school of Wushu has several of its favorite painful techniques to suppress the enemy’s resistance. However, in addition to this, nowadays there is a system in which a large number of Qin Na techniques are combined and structured into one holistic and interconnected series. In Qin-na, the method of painful impact and control over the enemy is elevated to an absolute level and all preparation, all strategy and tactics of using techniques are subordinated to the idea of complete power over the situation in hand-to-hand combat. As a result, the art of painful grips and controls has since a certain time become an independent discipline that can be studied separately from the entire wushu technique.
The Insidious Handshake The handshake technique clearly demonstrates how the “painful and control grip” technique can be unexpectedly used in the most ordinary situation. 1. A normal handshake is the starting position for an effective technique aimed at applying pain to the joints of the fingers. 2. The opponent’s hand is strongly compressed and, with the help of the second hand, is moved to the side - across the body. The purpose of the movement is to bring the attacked part of the fingers (ring and little fingers) to the starting position for painful impact. 3. Painful pressure on the fingers is performed in the direction against their natural bends. The main force of control comes from the bottom up. The attacker's arm straightens, and the enemy is forced to rise on tiptoes in pain.
Choosing furniture and appliances for the kitchen-living room
The furniture in the living room combined with the kitchen can be selected according to the design from the photo. You should adhere to certain rules, then it will not unnecessarily clutter the space, but will exclusively fulfill its functional and decorative purpose.
Along with architectural techniques, you should not neglect the methods of visual division of a single room.
Suitable furniture and its arrangement, if the kitchen and living room are one room.
- Sofa. Upholstered furniture in a shared kitchen and living room will get dirty faster than usual; this should be taken into account and preference should be given to material that can be easily cleaned. It is not recommended to place the following items on the back side of the sofa: household appliances, dining table.
The best option is to put a cabinet or shelving there, which will act as a visual room divider.
- Closet. Open shelves and racks will look more appropriate than a standard cabinet. You can also place decorative vases and figurines in them, as well as kitchen utensils.
- Bar counter. Often the basis for it is a part of a destroyed wall. Using this piece of furniture you can organize a hanging shelf for glasses. This is a multifunctional design that can serve as both a place to receive guests and a work surface.
By connecting the kitchen to the living room, even a typical space is updated into something unusual and luxurious.
- Kitchen set. The option of fronts without handles is easier to combine with the rest of the furniture in the living room and decorative elements. There is modern furniture specially created for the combined kitchen-living room. Its special feature: mounted modules that create the effect of weightlessness. This set is maximally functional and has a special mechanism for opening and closing.
- Dinner table. It can be used as an area divider for cooking and entertaining guests. Successful lighting design of this area will create an additional effect of smooth division of space.
- Kitchen island. Such additional work space is only available if the sq. m. allows.
This is a stylish and comfortable solution for a room with a large area and high ceilings.
Note! All furniture must have a high degree of protection against moisture.
Appliances for the living room and kitchen.
- Hood. A powerful modern hood is a prerequisite for creating a joint area for cooking and a place for receiving guests and relaxing.
- Fridge. Give preference to silent models.
Thanks to the arrangement of furniture, the area of usable kitchen meters also increases.
- Stove and dishwasher. Choose compact models that can be built into kitchen furniture.
- TV. To save space and convenient viewing, it is better to use a bracket and hang the device on the wall.
It is important not to forget about lighting. With its help you can cover insufficiently attractive areas.
Honed over centuries
The origins of Qin-na, according to researchers, go back to ancient times. And despite the fact that the history of the East in general and China in particular is replete with myths and legends that bizarrely mix truth and fiction, it can still be said with confidence that the history of this art goes back at least several centuries.
Adrenalin
UWM League: gladiator battles of the 21st century
Externally, the system of painful and controlling qin-na grips looks very impressive. In response to an attack, the master grabs the attacker by the arm or leg, neck or torso with lightning speed and, acting on vulnerable areas and points of the body, applies pain to the joint, paralyzes the muscles, deprives the enemy of consciousness and most often knocks him to the ground, putting him in a helpless state.
To understand how formidable a weapon the Qin-na system is, it is enough to just list the main sections of its technical arsenal:
- techniques for everting bones;
- muscle separation techniques;
— techniques for blocking veins and breathing;
- techniques for influencing vital points of the body.
Impact on the chin In the “art of painful and control grips” there are not only grips, but also throws. The main goal is to injure the opponent by hitting his head on the floor or ground. Deadly dangerous technology! 1. The essence of this attack in qin-na is the forceful bending of the cervical spine back in order to throw the enemy. To do this, one hand fixes the lower back and presses on it, and the second directly bends the chin back. The main thing is that the pressure force is directed strictly along the spine. 2. As soon as the hands begin to put pressure on the chin and lower back, bending the body forward and downward “connects” to the movement. The attacker bends forward, keeping the pressure firmly on the spine. 3. If the pressure on the spine is not released until the end of the technique, the opponent will definitely “fly” with the back of his head to the surface of the floor or the ground. This is deadly. In the demonstration version of this technique, the pressure on the spine stops approximately half a meter before the fall - the opponent “lands” on his back.
How to salt herring
Salmon herring can be prepared in many different ways, but it acquires special taste and nutritional value after salting at home. There are quite a few recipes, but the most correct one is the one used by Volga fishermen.
Since the carcasses are large, they need to be salted in cut form, since they will be salted whole and unevenly. For this you need:
- pieces of herring (400-500 gr.) (defrosted can also be used),
- coarse salt,
- spoon of sugar,
- black peppercorns,
- bay leaf,
- a set of spices for fish (rosemary, tarragon, thyme, etc.).
The pieces are washed well and placed in a glass or enamel container. Separately, spices, salt, sugar are stirred in boiled water and the fish is poured with this mixture so that it is completely covered. The container is covered without any load and left for 3-4 days (not in the cold).
There is a way to pickle without preparing the brine. It is quite popular because it is not only simple, does not take much time, and the list of components is extremely short. In addition, the taste of salted meat is excellent. The method consists of simply rubbing the crease with a mixture of black pepper, 1.5-2 tablespoons of salt and spoons of sugar. After this, the processed meat is wrapped in several layers of cling film and put in the refrigerator for three days.
Four stages of perfection
The techniques of the four categories listed above are unique stages of improvement in the “art of painful grips and controls.” For example, the technique of “turning bones” is the first step in mastering qin na. This type of technique involves influencing the joints of the human body in order to disrupt their physiological functioning.
“Muscle separation” is a more complex technique. Its essence is to, by acting on different muscles of the enemy, using cunning techniques to bring them into an inoperative state, that is, to paralyze them. At this stage, the Qin Na practitioner is required to have more advanced physical and technical preparation.
The techniques of “blocking veins and breathing” are an even more complex step. The meaning of this technique is clear from its very name: to defeat an enemy, it is necessary to block his access of oxygen to the lungs or stop the flow of blood in the veins and arteries for some time. At this level, lethal techniques are already being studied, and knowledge, skills, and practice to master this level require much more than the previous two.
And finally, the fourth step is “impact on the vital points of the body.” This technique is associated with knowledge of acupuncture and traditional oriental medicine. Her techniques are based on targeted impact on certain areas of the human body. Moreover, according to the teachings of Chinese masters, some types of influence can be performed only at a strictly defined time, directly related to human biorhythms, time of day, etc. This level is the highest level in qin-na, which only a few reach.
Almost all qin na techniques are accompanied by severe pain. Painful holds and controls serve only one purpose - to win hand-to-hand combat in the shortest possible time. And, as a rule, the consequences of such a victory for the enemy are damage to ligaments and joints, loss of consciousness, and in some cases, death. Qin Na techniques are very dangerous, and this cannot be ignored.
Astrakhan herring
Astrakhan herring is a collective image of several types of commercial herring, which were caught throughout the 19-20 centuries. on the Volga River. Most of the fish belonged to the species of belly, blackback, Kessler, Caspian and Volga herring. They differ somewhat in their appearance and size. The belly has delicate olive-colored skin with black spots on the sides. Carcass length – 51 cm, weight – 400 g.
The blackback is more massive, with a thick body up to 60 cm long. The gill covers have fan-shaped grooves. Unlike the paunch, it has noticeable teeth on both jaws and premaxillary bones. It is this type of fish that makes up the bulk of large herring, which is collectively called the herring. When you look at the photo you can see the differences.
Since the mid-19th century, a special industrial recipe and salting technique has been developed, which is fundamentally different from the Dutch method, which is used for sea fish. Preparation was carried out in special rooms called “exits.”
Due to its great popularity, Astrakhan herring was caught in large quantities, especially during spawning, which led to a critical decline in numbers. This is the main reason why fishing restrictions were introduced, as a result of which prices increased and meat became unaffordable for ordinary people.
How to pump up your hands and fingers: exercises to strengthen your wrists – Gym
When it comes to training your arms, pumped up biceps and toned triceps immediately come to mind. Few people care about strengthening and pumping up their wrists and fingers, although this is a necessary and useful task.
The strength of a handshake has always been an indicator of the level of courage, not to mention the importance of pumped up arms for an athlete. Strengthen your hands to have a strong grip and also to prevent sports injuries.
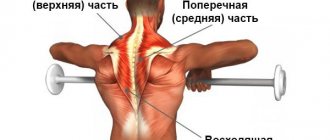
Anatomy of the wrist muscles
The anatomy of the wrist muscles is quite complex and interesting. And the work to strengthen them is very labor-intensive.
In short, our brushes consist of:
- lumbrical muscles;
- palmar and dorsal interosseous muscles;
- muscle groups of the thumb;
- muscle groups of the small finger.
The muscles of the hands are directly connected to the muscles of the forearm, so exercises aimed at strengthening the first muscle group also work well on the second.
How to pump up your wrists at home
We begin exercises designed to strengthen our grip and strengthen our forearms.
Clenching and unclenching the palm
The first exercise is the most famous and simple; no additional sports equipment is needed to perform it. But despite its simplicity, clenching and unclenching the palm is very effective and efficient. It is used both as a warm-up for tired hands and as a rehabilitation exercise after serious injuries and even operations.
- Make a fist using maximum force.
- Keep your fist clenched for 5–10 seconds.
- Unclench it, straightening your fingers as much as possible.
Classic squeezing and unclenching of the hands
Expander
This exercise already requires an auxiliary device, namely an expander. There are many varieties of this sports exercise machine, but right now we are only interested in wrist expanders. They, in turn, are divided into:
- torsion bars
- spring
- U-shaped
The load of these expanders can be adjustable or fixed. There are also rubber and silicone exercise machines, which are better known as “donut” and “egg”.
The technique for performing the exercise itself is very simple:
- Place an expander in your palm.
- We compress and unclench it.
When you can easily perform 50 repetitions of this exercise, move to a higher level - increase the load on the expander.
Exercise for hands with an expander
Push-ups on fingers
Finger push-ups are a great workout, thanks to which you can work not only your hands, but also many other muscles:
- pectoralis major and minor;
- deltoid;
- triceps;
- muscles of the forearms;
- trapezoidal;
- latissimus dorsi muscles.
But do not rush to start the exercise right away if you have never practiced it before. If you distribute your body weight incorrectly, you can seriously damage your limbs. First of all, you need to learn how to stand firmly on your toes.
To begin, get into the starting position for push-ups, but on your knees.
If you feel that your toes can bear the load, then straighten your legs and stand on your toes, first for ten seconds, then twenty, and so on, until you feel that you are ready for the exercise. Now to the exercise itself:
- Taking the starting position as for classic push-ups, but instead of palms, we rely on our fingers.
- We inhale and, bending our elbows, slowly lower ourselves so that our chest touches the floor.
- We return to the top position.
- We perform 10–15 repetitions.
You may not be able to stand on your toes right away, but don’t despair: patience and endurance are the best helpers. It’s not for nothing that this exercise is specialized for martial arts masters who can easily do push-ups on one finger. You can master the same skill if you constantly practice and move forward.
: How to do push-ups on your fingers
Push-ups on the back of your hands
This type of push-up is primarily useful for strengthening the wrists. But if you do not have an urgent need for strong wrists, then you should not perform this exercise, because it is quite traumatic.
- We take the classic push-up position, but with emphasis on the backs of the hands;
- The palms should be facing inward with the fingers facing each other.
- We perform push-ups slowly and without sudden movements.
At first you will feel pain in your hands and wrists, don’t be alarmed, your hands just need to get used to the new type of load.
Barbell wrist curls
This exercise is rightfully considered one of the most effective and useful for both the hands and arms in general, because it affects a large number of muscles, including deep ones. Wrist curls are performed either with an empty bar or with a light weight.
- We sit on the bench.
- We grab the bar with a medium or narrow grip.
- We place it along with our forearms on our knees.
- Inhale and straighten your hands upward.
- Exhale and bend your hands downwards.
Curl curls with a barbell while sitting on a bench
This exercise can be performed by slightly changing the starting position.
- We kneel in front of the bench.
- We take a barbell and place our arms, bent at the elbows 90 degrees, on the bench.
- We perform classic wrist curls.
Performing wrist curls with a barbell resting on a bench
The grip can be used both overhand and reverse.
: Technique for performing wrist curls with a barbell
Dumbbell wrist curls
Dumbbell curls are a variation of the previous barbell exercise. The muscle groups that are worked are the same. But the undeniable advantage of dumbbells is that it is much easier to purchase them and keep them at home than a barbell. Which means. and training with them can be done at home in any free time.
- Take the dumbbell in your hand.
- Place your forearm on your thigh or bench.
- Lower the brush.
- Raise the brush to its original position.
Technique for performing wrist curls with dumbbells
Zottman Curls
Another exercise with dumbbells that works not only the wrists, but also the biceps and triceps.
- We take dumbbells in both hands and stand up straight.
- We press our elbows to the body and turn our palms there. We don't move our shoulders.
- Inhale and as you exhale, lift the dumbbells, turning your arms palms up.
- Having raised the dumbbells to the shoulders, we fix our hands in this position for a couple of seconds.
- Rotate your hands 180 degrees so that your palms face down.
- As you inhale, we begin to lower the dumbbells and again turn our hands so that they are facing the body.
- We lower our hands with dumbbells to the starting position.
Performing Zottman Curls
Use light or medium dumbbells. Raising should be done in about 2 seconds, and lowering in 4. To make Zottman curls most effective for your arms, perform them in combination with other exercises .
: How to perform Zottman curls
Exercises on the horizontal bar
The benefits of a horizontal bar for wrists will not be a revelation to anyone. If you are in good physical shape, but have an insufficiently strong grip, you simply will not be able to do a pull-up on the bar. Therefore, you should not avoid this projectile. An excellent bonus of training on the horizontal bar will be the benefits for the spine and overall posture.
Hanging on the horizontal bar
In order to work the muscles of the hands on the horizontal bar, it is not necessary to do pull-ups. It is enough to perform the following algorithm of actions with high frequency:
- Grab the bar with a medium overhand grip.
- We hang on the horizontal bar for 1-1.5 minutes.
When you begin to easily cope with this workout, then start hanging on your fingertips.
Then master hanging in the upper position :
- We grab the bar with a regular or reverse grip.
- We pull ourselves up and remain in the upper position.
- We try to hold out in this position for as long as possible.
Pull-ups on the horizontal bar
Once you have learned how to hang from the bar and have sufficiently strengthened your wrists, move on directly to the pull-ups themselves.
- Grab the bar with a grip that is comfortable for you.
- Pull yourself up so that your chin is above the bar.
A more complicated version - pull-ups with a towel :
- We tie a towel to the crossbar.
- We grab it with our hands.
- We perform pull-ups with our knees bent.
Recommendations for performing exercises
These tips will help make your workouts as effective and safe as possible.
- Don’t get hung up on one exercise, try to master as many as possible, and it’s best to do a set of at least three exercises at a time.
- Do not use heavy dumbbells and barbells; light or medium weights are the best option.
- Do at least 6 reps of the barbell exercise.
- If you are serious about strengthening your wrist muscles, then perform exercises with high frequency - at least three times a week.
- Perform a wrist stretch: stretch your arm out in front of you, palm down. Bend your wrist so that your fingers point to the floor. We gently press on this hand with the second hand for 30 seconds. We change hands.
- Don’t rush to pump up and strengthen your hands as soon as possible; do everything gradually, without overstraining the muscles.
Many people don’t even realize how important the physical training of the hands is, so they often neglect this part of the body during training.
Meanwhile, a strong grip helps a lot when working on the horizontal bar and allows you to increase results in exercises with barbells and dumbbells.
Push-ups and pull-ups on the horizontal bar will also serve other important muscle groups: for example, they will strengthen your back and work your abs.
Source:
How to strengthen your wrists: TOP 14 exercises
November 28, 2020 Admin page » Tips and recommendations
Do your wrists hurt? Can't train properly because of them? The article contains 14 of the best exercises, after which this problem will fade into the background. strengthening the wrists.
Many people who come to the gym do not understand the benefits of training the wrist, not to mention how to strengthen the wrists and, as a result, this part of the body remains poorly trained, unlike other muscles. After all, a weak grip is not able to hold the heavy weight of a barbell in your hands.
The main coordinator of the movement of the fingers, namely the coordinating center of the moving phalanges, is located in the forearm, which is why the stronger the forearm, the stronger the compression with the fingers.
Pressure with fingers alternately
Connect the fingers of both hands and squeeze them as much as possible alternately for 2-3 seconds (thumb with thumb, index with index, and so on). After squeezing everyone in turn, perform 4 more approaches.
Weight retention
Pancakes are taken exclusively with your fingers until they are about to slip out of your hands. Perform 3-4 approaches to failure, this way your hands and arms will get a good load.
Source: https://dubna-volna.ru/trenirovki/kak-nakachat-kisti-i-paltsy-ruk-uprazhneniya-dlya-ukrepleniya-zapyastij.html
Methodology for teaching painful techniques
(Article: Methodology for teaching painful techniques)
An effective means of influencing the enemy are painful techniques that allow you to immobilize the enemy and then tie him up. In a fight, painful holds are carried out in combination with strikes and throws.
Painful techniques are learned on partners in parts (elements), then as a whole, but at first slowly. After all students have completed the technique several times according to the leader’s commands, they should move on to independently learning the technique in pairs. The leader, consistently monitoring the work in pairs, gives specific instructions for correcting mistakes. The reception must necessarily end with the partner being tied up or “injured”.
Painful holds are first learned in a standing position, and in a prone position they are performed after mastering throws. Thus, with each new lesson, the technique is, as it were, built up due to new elements that are logically connected with previous actions.
The performance of a technique (action) in a “combat situation” is assessed:
- “excellent” - if the serviceman managed to defend himself from an enemy attack, while: a) carrying out a counterattack, completed by indicating a blow to a vulnerable spot or a blow to the target;
- b) performed a throw (stall) with a final blow;
- c) performed a painful hold or designated a choke hold;
- d) carried out disarmament - in the event of an attack with a weapon and carried out an effective escort or “destroyed” the enemy (in this case, the actions of the serviceman must be quick, united and performed with proper physical concentration); if the enemy attacked with a weapon, and the subject was not armed, then at the end of the technique it should be knocked out of the hands or end up in the hands of the attacked;
Exercise 31. Special set of hand-to-hand combat techniques (RB-3)
(Article: Exercise 31. Special set of hand-to-hand combat techniques (RB-3))
Familiarization and learning of painful techniques:
Lever of the hand inward - grab the opponent’s forearm with both hands from above from the outside, kick in the shin or groin; jerking your arm inward to throw the opponent off balance, bring his shoulder under your shoulder and, pressing with it, knock the opponent down; pressing your hand on the elbow joint, move your hand to a bend behind your back and sit astride the opponent, bend the other arm, tie it.
Arm lever inward
Hand knot at the top - grab the opponent's right hand by the hand from above with your right hand; pulling it towards you, hit the elbow bend with your left hand; Raising the opponent's forearm up, grab your right forearm with your left hand (tie a knot). Turning to the left, kick the opponent in the crotch, knock him down, kick him, bend his arm behind his back, straddle the opponent and tie him up.
Hand knot at the top
Choke from behind - jump up to the opponent from behind, grab the head with your hand and, at the same time, kick him in the popliteal fold, pull the head towards yourself; With the forearm of the other hand, grab the neck with a grip on the forearm from above, joining your hands and turning to the left (right), put the enemy on your back and choke.
Clear Light
Hall
OF PLANTS, sorcerers harm grain most of all, knowing full well that by destroying peasant fields, they cause the greatest misfortune not only to individuals, but to entire peasant societies. Most often, sorcerers resort to the so-called creases, or twists (otherwise known as “dolls”).
The hall is a very tangled bunch of stalks of not yet compressed bread, broken to the right and left, twisted into a knot along with ash and sprinkled at the roots with salt, earth from the cemetery, eggshells and steamed old grains. If the ash is taken from the furnace of one owner, then the room is made with the expectation of harming him alone, foreshadowing various disasters: fire, loss of livestock and even death. The consequence of such twists is inevitably complete failure of the entire field.
The peasants are convinced that even if they manage to prevent or weaken the machinations of the sorcerers on the spoiled strips, then the grown bread will not “be shed”, that is, it will be spent in the family much more than the usual average amount, so that they will have to buy bread ahead of time for side. Moreover, from the enclosed tithe the grain obtained is lightweight and in quantity is not half equal to its neighbors.
Not a single field owner would dare to release such bread for home consumption, but would try to quickly sell it outside.
In addition to the poor quality of the grain, the zalom also has the peculiarity that it is extremely difficult to fight with it: no matter what the owners of the enchanted field do, no matter how much they tear out and burn the zalom, the envisioned misfortune will certainly come true if you do not serve a prayer service with the blessing of water and ask for the priest himself to pull out the entire twist by the roots with a cross. True, in addition to the priest, in many places in the grain-producing provinces they also pin their hopes on experienced old people and even on clever healers.
There once lived an old man who was taken everywhere to “untie” kinks in an old and very sophisticated way. He got up three dawns before sunrise and whispered to the water. And you have to whisper for a long time, so that some people move and move their lips and tongue and fall asleep.
The whole paddock was sprinkled with whispered water and then the whole pen was cut off and burned. This old man would bring a broken wheel with him to the paddock, put the cut-off wheel in the hub and burn it in front of the owners: “Ball-hall, fly under the fire, scatter ashes on the ground, don’t harm anyone! Fire cleanses, drives away disease ,” he said in the field and, moreover, usually raised his hand up, keeping his palms facing the fire.
In addition to creases, the so-called holes (or slits) should be considered an equivalent or even greater misfortune. This is not a defect in the sheaves or heaps, but that path in the rye, an inch wide, that runs from one edge of the paddock to the other and along which all the ears of corn are cut. They are cut off by bugs and worms at a time when the rye is in bloom, and therefore, of course, no traces of human feet are ever noticed on the sides, but, on the contrary, the walls of the rye are even noticeably thicker than in other places of the same grain strip.
But the peasants explain this phenomenon by the fact that the sorcerer, while making a prozhin, stands at this time with both feet on two icons, like on skis, and leads the path, like a wheel rolling.
When experienced owners notice a hole, they call the priest and raise the icons, giving great importance between them to the “Saints” (the icon of the Twelve Feasts with Sunday in the middle). The priest walks along the path with a cross and sprinkles holy water on the sides.
If these precautions are not taken, then the results of the harvest will be felt, and hopes for the harvest will not be justified: the rye on the root throughout the entire field seems to be good, that is, it is large in straw and profitable in grain, but as soon as it was harvested, it was brought to the threshing floor and began to thresh, then they immediately began to notice that instead of five or four measures from the hay, only two, or even one, of clean grain came out.
Some people interpret that the sorcerers then make money to pour grain into their bins (a fifth from the entire field); others explain it as causeless anger and a desire for complete shortage of food for all owners.
Grushko's Dictionary
Kink, curl, twist - a bunch of twisted, broken or knotted ears of grain left by witches and sorcerers in a wheat or oatmeal (less often - in a hemp or flax) field; known primarily among the Eastern Slavs as a type of harmful magic in relation to the owner of the field. It was believed that with the help of Zalom one could take away crops, destroy livestock, cause illness or even death.
The harmful effect of Zalom is due to the nature of the actions performed on plants (twisting, tying, breaking), as well as the meaning of the verbal sentences accompanying these actions, for example, such as: “I will bring you and your family!”, “I will give you health to your livestock!” (Polesie). Misfortunes could be addressed not only to those who burn the Hall, but also to those who would thresh sheaves or eat “spoiled” bread: “Whoever you reap, you will carry; whoever you thresh will be beaten; whoever eats, will climb the wall” (Volyn province).
The period of flowering of cereals, as well as the night of Ivan Kupala (Ukrainians and Belarusians), was considered the time for causing damage through Zalom; Semik on the eve of Trinity (Russians). “Knowledgeable” people made Zaloma at night or early in the morning before sunrise, stripping naked and secretly from everyone. In Russian spiritual verses, Zalom is ranked among the most serious sins, along with witchcraft: “The soul also sinned against God: I broke the creases in straw.”
The neutralization of the Zalom was usually entrusted to the healer; only in some places it was allowed to cut off the Zalom by the reaper herself or the owner of the field, but with precautions taken. For example, in Gomel Polesie they cut Zal with a sickle without touching it with their hand, and then at noon or midnight they carried it to the river and threw it into a whirlpool. Most often, the Hall was burned right there in the field, covering it with a holey pot or covering it with aspen chips from a tree burned by lightning (Minsk province). Russian peasants pulled out the Hall using an aspen stake or poker (Tula, Oryol provinces). Another way to protect against the harmful effects of the Zalom was to tie the torn ears of grain to a cart wheel, so that the one who made the Zalom would be “twisted” the way the wheel turns (Gomel region). To get rid of the danger, it was necessary not only to snatch and destroy the Hall, but also to “dissuade” it, “whisper” it, i.e. remove the curse. In conspiracies from Zalom, the healer sends the troubles contained in it to the head of the one who made it: “And send him, God, to death, to illness, so that he may lie in a corner, he will not eat bread and drink water, but he will be in the grave !” (Smolensk province).
L.N.Vinogradova
Training of painful holds (bending the arm behind the back, levering the arm outward)
(Article: 2. Training of painful techniques (bending the arm behind the back, arm lever outward))
Bend your arm behind your back - grab the opponent’s hand with your hand, with the other hand - on top of the clothes at the elbow and strike with a kick, throw the opponent off balance by jerking him towards you, bend his arm at the elbow joint, and then bend him behind his back; strike the neck with the edge of your palm, grab the collar (near the shoulder), hair or helmet with your hand and, holding it with painful pressure, escort the enemy.
To tie, throw the opponent to the ground, sit on him, strike him on the head, press the captured hand tightly and bend the other hand.
Bend your arms behind your back
Lever of the arm outward - grab the opponent's hand with both hands from below, raising the captured arm up, bend the hand to the forearm, kick and, twisting the arm outward, knock the opponent to the ground, kick, bend the arms behind the back, tie.
Lever arm out
The performance of a technique (action) in a “combat situation” is assessed:
- “excellent” - if the serviceman managed to defend himself from an enemy attack, while: a) carrying out a counterattack, completed by indicating a blow to a vulnerable spot or a blow to the target;
- b) performed a throw (stall) with a final blow;
- c) performed a painful hold or designated a choke hold;
- d) carried out disarmament - in the event of an attack with a weapon and carried out an effective escort or “destroyed” the enemy (in this case, the actions of the serviceman must be quick, united and performed with proper physical concentration); if the enemy attacked with a weapon, and the subject was not armed, then at the end of the technique it should be knocked out of the hands or end up in the hands of the attacked;