Beginning athletes often face many difficulties. How to find out the duration of an approach, where to find a schedule for exercises for a month in advance, how to receive reminders that it would be nice to stand up, or even get proper motivation for training. In this article we will talk about the best mobile applications for various operating systems, designed to make it easier to control the regular implementation of the plank.
Muscle work in the plank
The following muscles work:
- The cervical spine and deep back muscles are strengthened. In the future, it will be easier to maintain your posture, and fatigue when working at the computer will decrease. The plank prevents the occurrence of osteochondrosis.
- Hands. They take on half the total weight, due to which they quickly become stronger. The arms do not acquire muscle relief, but only become slender and toned. Biceps and triceps work.
- Press. Not only the stomach is tightened, but also the sides. The entire abdominal region works, including the oblique muscles.
- Legs. After the first classes, both calves and thighs will hurt. You can increase the load on this area by alternately raising your legs in the plank.
- Buttocks. Exercises will tighten the gluteal muscles and prevent the development of cellulite. During the exercise, they should be tense.
The plank exercise uses more muscles than the crunch. The benefit of the plank is to work the core muscles; there is less risk of harm, since the exercise is static and quite simple.
Benefits of planks
On the Internet you can see many photographs showing people before and after doing the plank. As a rule, the results are simply amazing.
Therefore, if you decide to regularly perform the plank exercise, we recommend that you take a photo of yourself before the start of training and, accordingly, after the training course.
The main thing is to always perform the plank correctly, following not complex but important instructions.
Benefits and harms
To lose weight, it is much more productive to use vigorous exercise. However, the plank trains endurance and strengthens the entire body.
Benefits of plank exercise
- All abdominal muscle groups are involved, which allows you to work out your abs well.
- The muscle corset is strengthened, especially the back muscles that support the spine. With prolonged practice, posture improves.
- The core muscles, which are responsible for body balance, equilibrium, and support of internal organs, are strengthened.
- The plank can be static, dynamic, you can give the body a more intense load, accelerating weight loss, working out the abs.
- Metabolism accelerates, making weight loss faster and easier.
Contraindications
Performing the plank may be contraindicated for persons with health problems.
Let's talk about those who should not do the plank, because the exercise is prohibited if:
- injuries of the spine or intervertebral discs, for example, hernia;
- injuries to ligaments or tendons in the wrist joint, ankles;
- the presence of inflammation in the muscles;
- late pregnancy;
- caesarean section (carried out less than 6 months ago);
- going through the recovery period after surgery.
Plank is the best exercise for core muscles
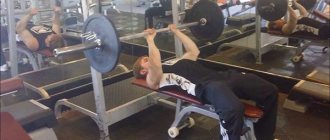
In the training room you can often see the following picture: a beginner comes in and immediately starts working on his abs, using standard types of exercises - crunches on a Roman bench or leg raises. Of course, all types of crunches are effective abdominal exercises, but it is not at all necessary to use stereotypes when working with them. Relatively strange and different from the usual exercises is the plank, which forms a rigid muscle corset on the stomach and strengthens the muscular foundation, which is called the “core muscles.”
Using this exercise alone will not pump up your abs and neither will your buttocks (about training the buttocks - here). It also will not lead to weight loss and will not get rid of the belly (see here for information on how to eat to lose weight and how to get rid of the belly). But it will help create the tone of the corresponding muscles, make them stronger, strengthen tendons and ligaments, forming the basis for subsequent exercises.
The exercise does not cause movement in the joints, therefore it is a type of isometric (static) exercise. And at the same time, the strength of the core muscles grows much faster than what happens when performing dynamic exercises. This is explained by compression of the blood vessels due to static tension, which is why the cells begin to work very intensively.
Another benefit is that muscles that don't have to move use less energy and take less time to recover. Therefore, training with static exercises can be done more often.
To work your core muscles, you will need a few minutes, which you will agree is quite a bit. This is significantly different from a regular workout, after which you need to rest for a long time. Besides this, you don’t need any equipment - just your body. The therapeutic effect of this exercise is also important - improving posture and strengthening the back. For a person recovering from an injury or having problems with the spine, the bar will gradually develop and strengthen the muscular belt of the body in its middle and lower part.
The plank exercise is not an isolation exercise and does not target a specific abdominal area. It can be considered basic and general strengthening for all abdominal muscles. It allows the athlete to develop many characteristics. Let's take a closer look at what you can achieve by regularly doing the plank.
1. Strengthen and develop strength
The plank is a unique exercise that develops the strength of several muscle groups at once.
The main effect of the exercise is to strengthen the core muscles, especially the back and abdominal muscles, primarily the extensor spinae, rectus abdominis and transverse abdominis muscles. If the exercise is performed correctly, the trapezius muscles of the neck work, improving posture and supporting the neck during sedentary activities, when a person works in an office or sits at a computer.
The plank also strengthens the shoulder muscles, and since the upper body is supported by the arms, the biceps brachii (biceps) and pectoral muscles are actively involved in the work.
The buttocks, thighs and calf muscles are also loaded. Thus, thanks to the bar, several muscle groups develop and strengthen at the same time. There are few exercises without the use of simulators that give such an effect.
2. Achieve mental concentration
When performing a plank, a psychological moment is important: a person must concentrate, concentrate on keeping his body horizontal for as long as possible. In order not to lose your nose, but to stand for the intended time, you will have to show character. So the exercise not only develops and strengthens muscles, but also trains the will, “pumping up” mental parameters.
3. Stretch your muscles
Working in a sitting position binds and compresses the muscles. When holding a plank, many muscles are stretched and tension is relieved.
4. Get an aesthetic appearance
This exercise is very useful for those who want to influence their waist, get rid of the belly and see six-pack abs. The waist plank improves, but does not replace a regimen and full-fledged training.
Static bar
This exercise focuses on the hands or forearms, using only your own body weight. The torso remains motionless during execution, but all muscle groups work.
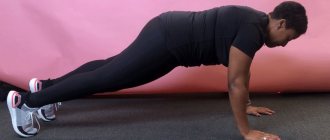
Classic plank with outstretched arms
This is a beginner exercise that you need to master before trying the dynamic plank. The press does the most work. The emphasis is on straight arms, perpendicular to the floor. The back is a straight line. The buttocks and abs are tense.
Important! You cannot perform the plank at the expense of technique; the muscles will not work correctly. If you experience severe pain, it is better to shorten the exercise time, but do it technically.
Classic plank technique
This is a bar for beginners who need to master the technique of the exercise. As soon as you manage to stand for 1-2 minutes while doing a regular plank, you can make the stand more complicated.
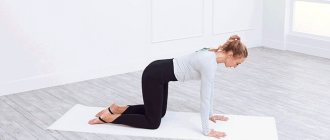
Technique:
- Get on your knees, placing them hip-width apart.
- Place your palms directly under your shoulders. You need to ensure that the weight is evenly distributed throughout the palm.
- Stretch your legs back, focusing on your toes. The heels look back, the top of the head tends forward.
- Keep an eye on the pelvis, it doesn’t fall down or lift up. Look at the floor in front of you.
- The abs are tense. Shoulders and neck are relaxed. Remove the arch in the lower back.
- Perform the exercise for 30 seconds.
- To exit the exercise, you need to lower your knees and lift your body up.
Interesting! To lighten the load, just place your feet a little further apart.
Elbow stand technique
The elbow stand or plank is suitable for beginners; otherwise it is called the lower plank. There is less risk of injury due to reduced stress on the wrists. Standing on your elbows works your abs and upper back better.
Technique:
- Emphasis on the forearms. We do not join our hands together, our forearms are parallel to the body.
- Bring your legs straight back, weight on your toes.
- The abs are tense, the stomach is pulled in, the heels are pulled back.
- You need to make sure that your back and knees are extended in one line. You cannot sink in the shoulder blades or lower back.
- Do not raise your head up, look down in front of you.
- The elbow is located exactly under the shoulder, the arm forms a 90° angle.
- The buttocks do not rise or sag down.
- You cannot turn your elbows too far away from you; they should strive to be as parallel to the body as possible.
- Perform the exercise from 30 to 120 seconds.
Varieties of exercise
Naturally, plank pose works different muscles. For example, the classic plank primarily engages the abdominal muscles and middle back muscles, while the reverse plank, in addition to the gluteal muscles, also has a positive effect on the calf muscles. What plank exercises do you know? There are about two dozen common types of this exercise.
Classic
You need to lie face down, place your palms on the floor shoulder-width apart, legs either hip-width apart, or feet together. The body should be like a stretched string - without kinks. You need to hold the exercise for about 15-20 seconds for beginners. This option helps to work out the abdominal muscles.
Elbow support
We lean not on our palms, but on our elbows, placed shoulder-width apart. The hands can be closed into a lock, the lower back should be as flat as possible. This plank pose is the most commonly used.
With arm/leg raise
The original version of the plank is complicated by a raised straight arm or leg. It is important to ensure that your hips and shoulders remain in line. This position also helps you learn to maintain balance and keep your core muscles toned.
Elbow with arm/leg raise
Do you want to have beautiful back muscles? Then this option is especially for you! We take the classic position with emphasis on the elbows, and raise the outstretched arm or leg. It is important to stretch the extended limb as much as possible.
Lateral
A more advanced version of the plank that helps improve the obliques and lateral thighs. You need to lie on your side, and then rise, leaning on your outstretched arm or elbow and forearm, and also support using the edge of your foot. Make sure that the pelvic line does not sag.
Lateral with minimal support
An advanced version of the previous exercise - you need to lean strictly on the palm and edge of the foot, and your free arm and leg should be raised.
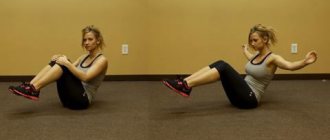
Twisting
The starting position is a traditional side plank with emphasis on the elbow and forearm. Twisting is the rotation of the hips and shoulder girdle relative to the spine in different directions. To understand how to perform the exercise correctly, I recommend watching video tutorials.
https://youtu.be/JMqOqW_HJMM
Reverse plank
As I already said, the reverse plank helps to work the buttocks and calves. We lie down on the floor, rest our hands strictly under our shoulders, pull our socks, resting on our heels, back and lower back straight, gaze directed upward (do not allow bending in the cervical region).
Reverse bent bar
A rather complex version of the plank, but very useful. This is a classic reverse plank, which is performed with emphasis on the legs bent at a right angle. What to pay attention to: you should not throw your head back, you should not lower your pelvis, you should not bend at the lower back or round your back.
Triangular strip
This option is familiar to many from yoga, where this exercise is called “Downward-facing dog.” This is a plank with emphasis on the elbows and forearms and toes; during execution, the body is bent at the pelvis at a right angle. This version of the plank strengthens all the back muscles.
Pull-up plank
During the classic plank, you need to pull one knee towards the corresponding elbow. Perform each knee separately; raising your head is not recommended; it is very important to tighten your stomach.
Side plank push-ups
We alternate side planks with classic push-ups.
Plank with jumps
From the classic position with emphasis on outstretched arms, you must perform jumps with your feet wider than shoulder-width apart. If the exercise is too difficult, you can do pacing.
Side Plank Hip Drop
We take a classic side plank pose with emphasis on an outstretched palm, and then slowly and carefully lower the hip to the floor. We fixate in this position for at least 15 seconds.
Jumping into a squat with emphasis
The starting position is a classic straight plank with emphasis on outstretched arms, from which you need to use a jump to take the position of a deep squat with emphasis.
Plank with emphasis on the ball
A classic plank, but a regular ball or fitball is used as a support. It is important to maintain balance.
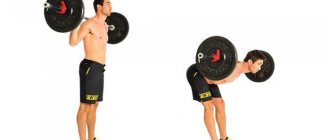
Dumbbell plank
We complicate the classic plank with dumbbells and leg weights. If you want to increase the overall load, you can ask someone to put a barbell disc on your back.
https://youtu.be/IujTlNCsZ5A
Dynamic bar
A dynamic stance includes movements and changes in body position. The load on those muscle groups that are not involved in the static version increases. The dynamic plank is a weight loss plank.
On one hand
This exercise works the muscles of the arms and abs. The maximum load goes to the supporting hand.
Technique:
- Take a lying position. The hands are located directly under the shoulders. Legs straight and brought together.
- Raise your body and bring it into a straight line. The pelvis and shoulders are at the same level as the body. Arms straight.
- Shift your body weight slightly to the right and place your left hand behind your back. You can also straighten it and place it parallel to the floor.
- The shoulders and hip remain motionless; you cannot lean to the side. The right hand holds the weight of the body.
- Execution time 5-10 seconds. Then return to the classic plank and change hands.
On one leg and one arm
It is quite difficult to perform the exercise correctly, observing the technique. When performing, much more calories are spent, the abs, muscles of the arms and legs are well worked out, and the buttocks work.
Technique:
- Take a classic plank with straight arms. Legs are brought together.
- Bring your left hand forward. Raise your right leg. Maintain balance for 15-30 seconds.
- Return to the classic plank, extend your right arm, left leg. Stand in this position for 15-30 seconds.
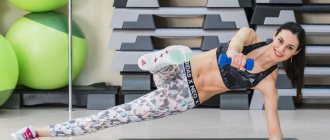
Side plank
Here the abs work especially hard and the back becomes tense. Not recommended if you have problems with the spine or lower back.
Technique:
- Lie on your side and place your forearm exactly under your shoulder. The feet lie parallel, one on top of the other.
- Lift your pelvis off the floor, stretching your torso into a straight line. Knees straight, head looking straight ahead. Emphasis on the forearm. The abs and buttocks are tense.
- In a dynamic plank, the pelvis is not fixed, but sways up and down.
https://youtu.be/Ax09msGNmIc
Benefits of the application
The functionality of applications for both iOS and Android is practically the same. Most programs aimed at helping athletes contain an identical set of tips and useful little things. For example, using such applications you can:
- Find a ready-made training schedule (for any period) or create your own. It’s much more convenient to study according to a plan!
- Turn on a timer that will track the approach time and signal that it is time to start resting.
- Remind you to do the exercise. By filling out your own workout schedule and setting a time for it, you will receive notifications when it’s time to get into a stand-up position.
- Familiarize yourself with the different types of planks. Information about static and dynamic planks aimed at various muscle groups, the required level of training and the predicted result. All this is presented in a concise and informative manner. Having found an interesting option, you will immediately add it to your training program.
Execution Rules
You need to carefully monitor the exercise technique. Beginners are advised to practice in front of a mirror. The surface for training should be flat; you can exercise on the floor or mat.
The body represents a single line. There should be no kinks in the pelvis or lower back. The back is straight. The pelvis is in line with the body, it does not sag down or protrude outward. Focus on your hands and toes.
During execution, the gluteal muscle and abs are tensed. In this case, you need to consciously relax your arms and neck so as not to overload the cervical spine.
Important! Stress in the cervical spine and severe lumbar deflection can cause serious health problems.
Hand plank exercise programs for different levels of training
Any athlete understands that simply exercising, without a goal and a program, usually does not bring much benefit, since the person himself does not really understand what he is striving for and what results he is trying to achieve. Therefore, you should immediately outline your goals, for which there are different training programs that will depend on the initial level of preparation.
Beginners: from 0 to 5 minutes per month
This program is perfect for those who are just starting to exercise or have simply decided to lose weight by the summer.
| Day | Time (sec) |
| 1 | 20 |
| 2 | 20 |
| 3 | 30 |
| 4 | 30 |
| 5 | 40 |
| 6 | Rest |
| 7 | 45 |
| 8 | 45 |
| 9 | 60 |
| 10 | 60 |
| 11 | 60 |
| 12 | 90 |
| 13 | Rest |
| 14 | 90 |
| 15 | 90 |
| 16 | 120 |
| 17 | 120 |
| 18 | 150 |
| 19 | Rest |
| 20 | 150 |
| 21 | 150 |
| 22 | 180 |
| 23 | 180 |
| 24 | 210 |
| 25 | 210 |
| 26 | Rest |
| 27 | 240 |
| 28 | 240 |
| 29 | 270 |
| 30 | 300 |
Advanced athletes
| weeks | Time (sec) | Approaches | Breaks (sec) |
| 1 | 15 | 3 | 30 |
| 2 | 25 | 4 | 30 |
| 3 | 35 | 4 | 20 |
| 4 | 45 | 4 | 20 |
Professionals
| Day | Type of plank | Time (sec) | Approaches | Breaks (sec) |
| 1 | Regular (on straight arms) | 20 | 3 | 20 |
| 2 | With your arm outstretched | 20 | 3 | 20 |
| 3 | Regular (on elbows) | 30 | 3 | 30 |
| 4 | With your arm outstretched | 30 | 3 | 30 |
| 5 | Lateral | 20 | 3 | 30 |
| 6 | Rest | |||
| 7 | Normal (at arms outstretched) | 30 | 3 | 20 |
| 8 | With your arm outstretched | 30 | 3 | 20 |
| 9 | Regular (on elbows) | 30 | 4 | 20 |
| 10 | With your arm outstretched | 30 | 4 | 20 |
| 11 | Lateral | 30 | 3 | 30 |
| 12 | Rest | |||
| 13 | Normal (at arms outstretched) | 45 | 3 | 30 |
| 14 | With your arm outstretched | 45 | 3 | 30 |
| 15 | Regular (on elbows) | 30 | 6 | 20 |
| 16 | With your arm outstretched | 30 | 6 | 20 |
| 17 | Lateral | 30 | 4 | 20 |
| 18 | Rest | |||
| 19 | Regular + extended leg | 60+60 | 2+2 | 30 |
| 20 | Lateral | 40 | 4 | 30 |
| 21 | Normal + dynamic | 60 + 8-10 reps | 2+2 | 30 |
| 22 | Lateral | 40 | 4 | 30 |
| 23 | Rest | |||
| 25 | Normal + dynamic | 80+80 | 2+2 | 30 |
| 26 | Lateral | 40 | 4 | 30 |
| 27 | Rest | |||
| 28 | Regular | 60 | 8 | 60 |
| 29 | With extended arm or leg + dynamic | 60 + 10-12 reps | 3+3 | 30 |
| 30 | Normal + with an outstretched arm or leg + dynamic | Maximum (if possible) | 3+3+3 | 60 |
Basic mistakes
Raising the pelvis above head level. This position relieves the load from the entire muscle corset, the meaning of the exercise is lost. The pelvis should be one straight line with the body.
Head lift. A deflection appears in the cervical region, which causes overstrain of the neck muscles. Your gaze should be directed to the floor in front of you. With prolonged violation of technique, disturbances in the functioning of the cervical spine may occur, and muscles will ache.
The hands are locked, and the elbows are spread to the sides. In this position, the head drops down and control over the shoulder blades is lost. Muscles are tense unevenly. Elbows and forearms should be parallel to the body.
Bend in the lower back. The stronger back muscles work, and the weak ones do not receive stress. With constant bending, problems with the lower back may occur.
Raising the shoulder blades. When the shoulder blades are located above the head, sagging of the thoracic region appears, which also provokes an uneven load. The back should be straight.
https://youtu.be/hwUh144QZ_Y
Benefits of the plank
- Does not require additional equipment. Do planks anywhere: at home, on the street, in the gym... No additional equipment or large space is required.
- Suitable for both beginners and professionals. This exercise is very easy to learn, so it will not pose any trouble for a beginner athlete. And at the same time, with an increase in the degree of complexity, it can drive a professional into a sweat.
- A large number of muscles are involved. When performing a plank, almost all the muscles of the body are involved in the work. The big advantage of this exercise is that you can shift the load on certain muscles of the body, depending on your needs and goals.
- Many varieties. There are a lot of options for performing the plank, and each of them uses certain muscle groups to a greater or lesser extent. Therefore, you can choose exactly the plank option that will maximize the use of the muscle group you need.
Now let's look at the options and techniques for performing the plank.
Classic plank
Technique: Lie on the floor, face down. Bend your elbows at right angles so that your forearms are on the floor. Rise up, placing your body weight on your bent arms and lifting your legs onto your toes. The body should be elongated in a line. Stay in this position for as long as possible.
Plank duration
In an exercise like the plank, the main thing is regularity, not duration. During execution, it is very important to monitor the technique, otherwise there is no point in using the plank in your training.
Interesting! Canadian scientists have long talked about how many times a day you definitely need to do the plank. Several approaches of 10-30 seconds are much more effective than a 5-10 minute plank once a day. In the first case, endurance is trained, and in the second, the muscles are simply clogged.
1 minute
It will be difficult for beginners to overcome even this time threshold. The plank makes your abs, legs, and arms shake. But even during this time, the muscles warm up, acquire tone, blood circulation improves, and metabolism accelerates. 1 minute of planking can burn 5 calories.
5 minutes
Planking burns 25 calories in 5 minutes. This time is enough for the muscles not only to warm up, but also to have time to start clenching. Beginners will be guaranteed strong and toned muscles.
10 minutes
10 minutes of planking burns 50 calories. The muscles become much more overstrained, especially in the arms and abs. Posture is strengthened. You can only perform such a long plank for a personal record. Short-term, but repeated approaches bring much more benefit. It is not recommended to stand in the plank for more than 10 minutes.
Optimal time
Everyone must choose the time independently, in accordance with the capabilities of the body. If it is easy for a person to stand in the plank for 1 minute, you can increase the number of approaches to 2-3 per day. Then replace the sets with one 5-minute plank.
If it is difficult to stand in the plank even for 1 minute, you need to start with 30 seconds, adding another 5-10 seconds every day.
The load is increased gradually so as not to damage the muscles and ligaments. You need to feel your comfort level. Tension should not develop into unbearable pain.
Monthly schedule
Those who find it easy to start with 20 seconds can set any time as their starting point. The main thing is to stick to the basic rules.
The essence of the graph is as follows:
- every 6th day of training is a day off, i.e. the bar is not met;
- the new time needs to be fixed so that the body gets used to this load; 2 to 3 days are allotted for this;
- first you should increase the time by 5-10 seconds, then you can increase the load by 30 seconds.
| Day | Seconds | Day | Seconds |
| 1 | 25 | 16 | 120 |
| 2 | 25 | 17 | 120 |
| 3 | 35 | 18 | rest |
| 4 | 35 | 19 | 150 |
| 5 | 40 | 20 | 150 |
| 6 | rest | 21 | 180 |
| 7 | 45 | 22 | 180 |
| 8 | 45 | 23 | 180 |
| 9 | 60 | 24 | rest |
| 10 | 60 | 25 | 210 |
| 11 | 90 | 26 | 210 |
| 12 | rest | 27 | 240 |
| 13 | 90 | 28 | 240 |
| 14 | 105 | 29 | 270 |
| 15 | 105 | 30 | 270 |
Dear readers, if you see a mistake in our article, write to us about it in the comments. We will definitely fix it. Thank you!
Share this article with your friends:
How to do the plank exercise
The plank will help you strengthen your muscles and get rid of excess fat. It is worth noting that it is very important to take the right position and only then begin the exercise. The basic rules are as follows:
- The back should always remain straight. Bend in one direction or another can lead to injury.
- The pelvis should be parallel to the floor so as not to overload the lower back.
- The legs must always be kept straight, since any bending leads to additional stress on the lower back.
- The neck, head and shoulders should be in the same plane and not tense.
- To avoid injury, your shoulders should be either over your wrists or over your elbows.
It is important to remember that the longer you can hold the bar in the correct position, the greater the effect you will achieve. It is better to stand properly for 10 seconds than to have your back or legs bent for a minute. Start with minimal load and gradually increase it.
So, before starting the plank exercise, you need to understand what position all parts of the body should be in. To do this you will need:
- put your feet together and stand with your back to the wall;
- the back of the head, shoulder blades, buttocks and heels should touch the surface of the wall;
- lower your shoulders a little so that a small space appears in the lumbar region (your palm should fit into it, but no more).
You need to stand in this position 3-5 times a day, and always before starting the exercise. After a few days, the body’s muscles will get used to the load, making it much easier to do the plank. That is, the body itself will acquire the correct position.