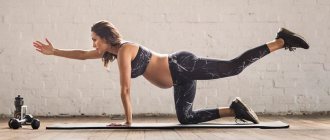
Up-down plank
In a straight-arm plank, lower your right elbow to the ground and then to the left, entering a bent-arm plank. Place your right hand on the ground directly below your right shoulder and straighten your right elbow, then your left hand under your left shoulder and straighten your left elbow, returning to a straight-arm plank. Continue alternating.
The 30-day plank – how effective is it?
There are probably no exercises that can compete with the bar in terms of versatility. The plank is a fairly simple, effective exercise that does not take much time, but at the same time “works” the whole body. By standing in the plank for five minutes every day, you can strengthen the muscles of your abs, back, arms and legs, and also work hard on your posture, flexibility and balance. Just some kind of holiday!
Another advantage of the plank is that it can be done anywhere and in any equipment. At home, in the gym, on the green grass, morning and evening, in pajamas or sportswear - the bar will always be equally effective.
A month is enough to see the first results. True, if you perform the exercise correctly and regularly. Do you promise not to mess around? Then let's go!
30-day plank challenge
To complete the monthly challenge, follow the following scheme:
Day 1: Keep your plank in perfect shape for as long as possible.
Day 2: 30 seconds plank + 30 seconds rocking plank.
Day 3: 30 seconds plank + 30 seconds plank with hip movements.
Day 4: 30 seconds plank + 30 seconds up-down plank.
Day 5: 30 seconds of each plank.
Day 6: rest.
Day 7: 30 seconds of each plank.
Day 8: 30 seconds of planks + 30 seconds of planks with hip movements, repeat 2 times.
Day 9: 30 seconds plank + 30 seconds up-down plank, repeat 2 times.
Day 10: 30 seconds of each plank, repeat 2 times.
Day 11: rest.
Day 12: 45 seconds plank + 45 seconds rocking plank.
Day 13: 45 seconds plank + 45 second plank with hip movements.
Day 14: 45 seconds plank + 45 seconds up-down plank.
Day 15: 45 seconds of each plank.
Day 16: rest.
Day 17: 45 seconds plank + 45 seconds rocking plank, repeat 2 times.
Day 18: 45 seconds of planks + 45 seconds of planks with hip movements, repeat 2 times.
Day 19: 45 seconds plank + 45 seconds jump plank, repeat 2 times.
Day 20: 45 seconds of each plank, repeat 2 times.
Day 21: rest.
Day 22: 1 minute plank + 1 minute rocking plank.
Day 23: 1 minute plank + 1 minute plank with hip movements.
Day 24: 1 minute plank + 1 minute up-down plank.
Day 25: 1 minute of each plank.
Day 26: rest.
Day 27: 1 minute plank + 1 minute rocking plank, repeat 2 times.
Day 28: 1 minute plank + 1 minute plank with hip movements, repeat 2 times.
Day 29: 1 minute plank + 1 minute up-down plank, repeat 2 times.
Day 30: 1 minute plank, repeat 4 times + 1 minute jump plank.
Day 31: Hold the plank for as long as you can.
Let's get to the fun part
https://youtu.be/XIGiYFSDlCI
How to do the exercise correctly? First you need to prepare for it. This is necessary for both beginners and professionals who have not trained for a long time.
Get down on your knees and place your elbows and toes on the floor. Elbows should be strictly under the shoulders. The back is straight, the neck is extended forward. This is quite easy to do and you only need to hold out for 1 minute. But, if you find it difficult, you can start with 30 seconds.
Recommendations
For combo moves, take a break between exercises of 10 to 30 seconds. The amount of time will depend on your level of training (beginner, intermediate or advanced).
For circuits, perform all exercises back to back without rest; where there are multiple rounds, take a maximum of 60 seconds of rest between sets.
You can also exercise things by performing half holds on one plank and half on the other.
Be sure to record your plank time on day 1 and bonus day 31 (don't worry, the plan officially ends in 30 days!) so you can track your progress.
How to do a plank correctly at home
Technically the pose is simple and should not cause problems for anyone. But the question often arises, how to do the plank? It is better in front of a mirror to constantly monitor and correct the position into which the body falls as a result of fatigue.
Plank exercise step by step
- Lie on your stomach. Lean on your forearms, bending your elbows at right angles.
- Place your shoulders directly above your elbows.
- Using your toes, lift your torso. Be sure to tighten your abdominal muscles.
- Do not lift your buttocks up or arch your lumbar girdle. Place your heels, hips, and shoulders in one straight line.
- The head should be a natural extension of the spine. Don't lower it too low or raise it too high.
- Hold your torso in this position for several seconds (beginners can start at 30 seconds and increase the time by 10 seconds each week until they are able to hold for 60 seconds).
The exercise is good for abdominal endurance, which can be improved with the right training program. Plank exercises for 30 days look like this:
- 1 day – 20 seconds.
- Day 2 – 20 seconds.
- Day 3 – 30 seconds.
- Day 4 - 30 seconds.
- Day 5 – 40 seconds.
- Day 6 – rest.
- Day 7 – 45 seconds.
- Day 8 – 45 seconds.
- Day 9 – 60 seconds.
- Day 10 – 60 seconds.
- Day 11 – 60 seconds.
- Day 12 – 90 seconds.
- Day 13 – rest.
- Day 14 – 90 seconds.
- Day 15 - 90 seconds.
- Day 16 – 120 seconds.
- Day 17 – 120 seconds.
- Day 18 – 150 seconds.
- Day 19 – rest.
- Day 20 – 150 seconds.
- 21 days – 150 seconds.
- Day 22 – 180 seconds.
- Day 23 – 180 seconds.
- Day 24 – 210 seconds.
- Day 25 – 210 seconds.
- Day 26 – rest.
- Day 27 – 240 seconds.
- Day 28 – 240 seconds.
- Day 29 – 270 seconds.
- Day 30 – do it for as long as you can.
What are the benefits of plank pose?
This position is beneficial and provides countless benefits to the body when practiced for just a few minutes a day. The pose itself is not easy to perform: it requires great strength and concentration.
Why the plank exercise is useful and its main advantages:
Better defined muscles
- Helps train the muscles of the sacrum, rectus and oblique muscles of the abdominal cavity and buttocks.
- Increases tension in the transverse abdominis muscles, results: lifting more weights and a flatter stomach.
- Increases athletic performance where jumping is required.
- Strong buttock muscles provide support for the back, and the stronger they are, the more attractive the buttocks look.
- Help prevent injury.
If you want your body to be able to perform a wide range of motion, you need to strengthen your muscles and joints. Plank pose effectively builds muscle mass and reduces pain caused by intense exercise and other workouts.
Can be practiced anywhere
To perform the ab position, you only need a portion of the floor that is the length of your body. The position is very convenient when traveling, or if the apartment is very small.
Improves posture
Strong muscles and joints have a beneficial effect on your skeleton. Once you master the plank technique, you will stand up straight and look taller. It strengthens the muscles that support the spine and helps form correct posture.
We take into account age and days
In order for the results after training to be truly noticeable and last a long time, regular intensive training is necessary. Reviews note that the 30-day program gives good results. Beginners to the program should begin by determining their capabilities. Don't try to do 100 repetitions right away. Start with the amount you can handle. Don't forget about age standards. The table will help determine your level, which is based on the ratio of age and the number of repetitions performed:
Other Squat Variations
In addition to the standard one, there are several types of squats that can be used to perform the complex.
- Using one leg. Take the starting position: standing pose, legs spread wide, arms extended forward. Raise one leg while bending your knee. Move it forward or backward, whichever is more comfortable for you. Lower yourself down using your other leg. Return to the starting position, switching legs if desired.
- Spring. Sit down as usual, but do not take a standing position, but linger at the bottom. Make several sharp springy movements up and down.
- We sit down on a chair. Stand straight with your feet together. While performing the exercise, move your pelvis back (imagine that you are lowering yourself onto a chair or armchair). Your arms should be extended. You can make the task more difficult by standing on your toes at the beginning of your workout.
- In a sumo pose. With your toes turned out, spread your legs wide. Pull your hips back, lower yourself down until your knees form a right angle. Squeeze your glutes and repeat again.
What determines the effectiveness of the program?
This push-up scheme will work if you don’t go to the gym in parallel with it and don’t pump up your pectoral muscles and triceps there, like your mother’s bodybuilder. Otherwise, your muscles simply will not recover, therefore, you are unlikely to be able to progress.
also undesirable to skip any days from the program so that your body does not get out of the habit of dangling above the floor in a horizontal position.
And there is no need for amateur performances. If you think that you are a terminator and you don’t need to do 3 repetitions in the second week, but you can do all 23, then you are mistaken.
You also need to take into account that your energy is your food, if you drink only kefir, then do not expect that there will be enough strength in your muscles. I wrote about how a girl who is into fitness should eat here.
Squat technique
- Before performing the complex, you need to stretch your muscles. Perform several warm-up activities, paying special attention to the ankle.
- Starting position – straight stance, straight back, feet shoulder-width apart, toes slightly pointed to the sides, arms extended forward. Bend your knees until your thighs are parallel to the floor.
- At the initial stage, conduct training without equipment. Subsequently, you can use weights, dumbbells and a barbell.
- Take your time when doing the exercises - this will allow you to use your muscles to the fullest. You should feel them tense.
- Breathe calmly and keep your abdominal muscles tense. Try not to lift your heels off the floor.
- The smallest number of squats per day is 50, which can be stretched into four sets. Break - five to ten minutes.
- A tip that will increase your motivation: Make a small exercise chart and place it in a visible place. This way you can evaluate your results.
Other interesting workouts by Anna Cukur
If you are interested in Anna Cukur's workouts, you can try her other videos for problem areas and getting rid of excess weight.
Brazilian Booty: Safe on the Knees (18 minutes)
https://youtu.be/GtJ-dktNUfk
Effective workout for beginners (23 minutes)
https://youtu.be/FflCAAYCoHY
Lose weight in your thighs (10 minutes)
https://youtu.be/6vRyjkOgrVg
Cardio workout without jumping or running (33 minutes)
Making the right monthly lesson plan
Every experienced athlete knows that before training you need to draw up a training program, which should take into account the following points:
- Goals. Determine your priorities: build muscle, lose weight, increase strength, make your body sculpted.
- Program. You need to select a program based on your goals. Fat burning combines cardio and strength training with light weight and at a fast pace. The weight gain scheme involves working in a low-repetition mode with maximum weights.
- Method of performing exercises: for gaining mass and increasing strength - separate, 1 set or superset method, for weight loss and relief - supersets, circular, combined.
- A set of exercises. Select exercises, sort them by muscle groups.
- Distribution of exercises. To increase mass/strength, load 1 to 3 muscle groups per workout. If you want to lose weight, work on each muscle group a little.
- Number of repetitions and sets. When increasing mass - from 6 to 12 times three or four times, as well as 10-15 additional elements for 4-5 sets. To increase strength - from 2 to 6 times in 4-5 sets. When losing weight - from 12 to 20 repetitions twice or four times, for relief - from 12 to 15 times for 2-4 sets.
Start your workouts with a warm-up (about 10 minutes), then perform 3-4 elements to load large muscles (legs, back, chest), then 4-5 movements for secondary muscles (for example, shoulders and lower body), finish the training with stretching ( up to 10 minutes). To lose weight, do cardio exercises for about 25 minutes after the complex.
Keep a notebook of the training program, refine it, record how the weight of the equipment increases, which exercises are effective and which are better to replace.
Required training regimen
To achieve your goal, you need to train intensively. To gain weight and increase strength, an athlete should exercise 3-4 times a week; to lose weight and develop relief - from 4 to 5 trainings.
The break between classes should be 1-2 days.
Strength training lasts about an hour, and classes for weight loss and relief last from 30 to 50 minutes.
Time for recovery and rest
Giving your muscles time to rest is just as important as maintaining technique. After all, it is known that during the recovery period, muscles grow.
To speed up this process, you need to drink mineral water during and after training. Also, throughout the day after classes, you need to consume protein foods.
After 2 days, you need to saturate the body with amino acids and complex carbohydrates to stimulate muscle growth and prepare for the upcoming load.
It is during this period that you need to conduct the next training.
Important! If after 2 days the athlete does not conduct classes, then progress will slow down.
On non-training days you need to rest more, eat well, and drink more fluids. A massage after training will relax the muscles and prepare them for the upcoming load.
What kind of course is this?
All 30 lessons are a translation of a marathon of articles by the Canadian Excel guru, Debra Dalgleish . Every day from January 2, 2011 to January 31, 2011, there was an article on the Contextures blog describing one of these features. All functions fall into categories: text, information, and search and links. The Feature List section provides links to translations of all these articles.
Each article contains the following:
- A description that details how each individual function works.
- All 30 lessons are accompanied by screenshots that allow you to more clearly convey important information (images taken in Excel 2010).
- Practical examples of using Excel formulas both alone and with other functions.
- Pitfalls that may arise when working with functions.
- As well as a lot of other equally useful information.
How and how much to do to have an effect
In total, perform three times a week in all positions.
- Plank for beginners: 10 seconds for three approaches.
- Advanced: 30 seconds for 3-4 sets.
- For professionals: 60 seconds for 4-5 approaches.
If this seems too difficult for you, try holding the position for as long as you can, then increasing the time by 5-10 seconds each week.
Main conclusions
It is possible to achieve your goals in 4 weeks, but to do this you need to follow the following recommendations:
- Determine the goal of your training: weight loss, weight gain, strength gain, relief contouring.
- Create a training program, determine a set of exercises, distribute them among workouts, and calculate the number of repetitions and sets.
- If you want to gain mass or increase strength, then work 3-4 times a week, use heavy weights, reduce the number of repetitions.
- If your goal is weight loss or definition, exercise 4-5 times in 7 days, combine cardio and strength exercises.
- Always warm up before exercise; if you want to speed up fat burning, then start and end the complex with cardio exercise.
- Give your muscles time to recover.
By following these rules, you can achieve noticeable results in 30 days.