Lifting the barbell to the chest is also called clean. Some old school athletes refer to this exercise as the push pull. The essence does not change from this. The movement consists of lifting the apparatus from the platform to the shoulders using the strength of the legs and inertia. It resembles a deadlift in its trajectory, but differs in that during the lift the apparatus is literally lifted onto the shoulders and the body and arms are involved in the movement. The exercise has found its use in multiple disciplines. Weightlifters use it as a special preparatory exercise. Like competitive – CrossFitters. As part of general physical training – those training for basketball, American football and strength and speed disciplines. Some trainers believe that lifts can also be done in fitness. By the way, even in the Hot Iron group lesson there are mini-barbell cleans. After all, this movement helps to quickly burn a lot of extra calories.
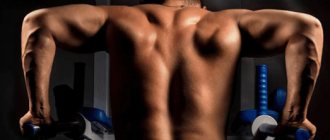
Cleaning weights to the chest
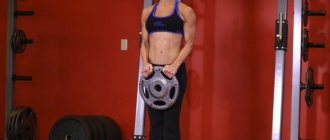
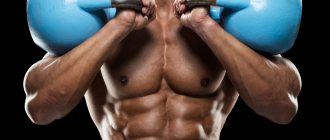
Performed with one or two kettlebells, depending on your training. Starting position – the weights are between the legs.
Doing a small kettlebell swing
By extending the legs of the hip joints, we lift the weights as high as possible
We throw the weights on our chests so that they look in different directions. Like all cleans, we perform the technique either in a squat position or in a standing position. The main thing is not to relax your back, keep it straight.
We stand up until the joints are completely straightened.
Below I will show images of one kettlebell clean on the chest.
As you can see, there is nothing complicated in this exercise. The main thing is not to rush and take the projectile correctly on the chest.
Training programs
Working muscles
When pulling a barbell to the chest in an inclined position, the rear deltoids ensure that the elbows are lifted upward. It is these muscles that bear the main load when performing the exercise correctly. Additionally, the latissimus dorsi and trapezius muscles are included in the work.
Lifting dumbbells to the chest, on the one hand, is somewhat more difficult than barbells, because you additionally have to stabilize the position of the equipment. However, using a barbell you can work with more significant weight.
This exercise is somewhat similar to the waist row. However, in the latter case, it is the lats that take the lead, and the deltoids work on an additional principle.
In combination with exercises for the front and middle deltoids, rowing or lifting weights to the chest allows you to create a beautiful rounded contour of the shoulders. And this, in turn, makes the shoulder girdle more massive and prominent.
Posterior bundles of deltoid muscles.
Contraindications to performing the exercise are injuries to the shoulder joints, weakness of the back muscles, and poor flexibility of the hip joints. To perform the exercise correctly, you will need to keep your back straight while standing in an inclined position.
We carry out coordination
How much of a difference there is between how you hold the barbell, the clean, and the clean and jerk will determine how much change and adjustment you'll have to make to perform it all as one exercise. Some weightlifters, due to their nature, manage to change the position of their hands and elbows before performing a clean and jerk in such a way that they do not even move the bar itself. But most lifters need to lift the bar slightly off their shoulders to get their arms into the desired position.
These adjustments can be made after the lifter has fully stood up by performing a clean. You just need to use a little leg movement (a little momentum) to take the weight of the barbell off your shoulders for a moment and give your arms room to move. But this is a waste of energy and time, and such a solution can only be considered a last resort.
Instead, the lifter must use the momentum and momentum that is gained as he moves upward while performing a clean. It is in this interval between exercises that you should feel the fine line, and thanks to the previously accumulated energy, find a moment to make small changes in the grip and placement of your hands. This opportunity occurs when the lifter aggressively finishes the clean, causing the bar to not stop at the lifter's chest (shoulders), but to momentarily fly into the air. At this moment, you can change the position of your hands and prepare to perform a push.
Look how multiple world and European champion and world record holder in the clean and jerk, Tatyana Kashirina, does it.
Sometimes minimal, barely noticeable changes can improve our results. Experiment with these positions until you get the best results possible.
Translation from catalystathletics.com
Important points
The exercise has a number of features that should always be remembered:
- The bar moves strictly along the body, and not along a vertical trajectory.
- There should be no stops between phases of movement. The exercise is performed holistically, with a smooth transition between phases.
- The projectile moves due to the coordinated work of a large number of muscle groups. If any of them, for example, your hips, back or shoulders, are lagging behind, work on their development separately.
Including this exercise in your training program will allow you to develop muscle strength and get a significant increase in muscle mass. The phases of the movement can be practiced separately, and then combined into one movement. It is better to start training with a light weight, and after lifting becomes completely controllable, increase the load.
Errors
Despite the fact that at first glance the exercise looks quite simple, not all athletes perform it correctly. Listed below are the main mistakes that can not only make the exercise ineffective, but also cause injury.
- The first thing to remember and always monitor is the condition of your back. The fact is that if, while standing at an angle, you round your back, your spine experiences a colossal load. It is affected not only by the weight of your body, but also by the weight of the barbell or dumbbells. But the back muscles in this position are stretched and do not provide support.
- Don't look down at the floor. Aim to look in front of you or diagonally to the floor. Otherwise, you will again be tempted to round your back.
- While standing at an angle, balance by bending your knees.
- Keep your elbows close to your body and hold the barbell with a wide grip. The projectile is lifted vertically. It is important to pull the weight towards the chest, and not to the lower abdomen. Otherwise, the back will work primarily, not the shoulders.
By following these recommendations and monitoring the technique of performing the exercise, you can achieve excellent results without unpleasant consequences for the body. Training the deltoid muscles makes your shoulders voluminous and defined, and your figure athletic.
Analysis of the exercise
The barbell clean is primarily an element of the basic weightlifting exercise – the clean and jerk.
However, mastery of the chest clean technique is also very useful for representatives of related strength disciplines for the development of a number of physical qualities. In addition, the position with the bar on the chest is the starting position for some popular bodybuilding movements, such as the military press.
From the point of view of biomechanics, lifting refers to complex coordination and functional exercises that require a coordinated effort of a volumetric array of muscle groups:
- Gluteal;
- Calf;
- Biceps femoris;
- Quadriceps;
- Trapezoidal;
- Abdominal Press;
- Erector spinae muscles;
- Latissimus dorsi muscles.
The classic variation of the exercise involves lifting an apparatus onto the chest from the floor or platform.
Preparation for execution
Before performing barbell cleans, it is important to warm up thoroughly.
In addition to doing a moderate-intensity cardio session, pay special attention to developing your joints. As part of this task, you can perform a series of lead-up exercises that involve rotating your shoulders and elbows
Additionally, perform a set of deep squats without weight or with light dumbbells.
Proper execution
- In the starting position, the athlete’s feet are positioned at pelvis width, with the toes of the feet and knees spread out to the sides.
- The barbell lift is performed at the moment when the bar is directly above the heels, and the knees slightly “step” beyond the line of the bar.
- In the starting position, the shoulder and knee should be in the same vertical plane, as if covering it.
- When performing a deadlift from the floor, the elbows should be in a “closed” state.
- At the starting point of the barbell movement, the athlete’s body weight should be on the heel.
- The back must be kept straight until the end of the exercise.
- The use of a lock grip in the exercise is rather a “signature” rule of weightlifting. When working with heavy weights for a weightlifter, this requirement is necessary and justified primarily from a safety point of view. If you are introducing the barbell clean into your program as an auxiliary movement with a light weight load, it is quite enough to use a classic pronated grip.
- By analogy with the deadlift, the bar of the bar should be as close to the body as possible, that is, slide along the body.
- It is unacceptable to maintain pauses between phases - the movement must be “solid” and continuous.
- When receiving the barbell, you need to slightly raise your shoulders. This allows you to soften the fall of the projectile and more effectively resist the action of weight.
Errors
- Moving the knees away from the “line” of the toe (rolling them towards the middle).
- Uncoordinated work of muscle groups.
- “Carrying” the bar away from the body.
- The impact of a projectile on the thighs at the moment of detonation.
- Movement delay between phases.
Efficiency Tips
When performing this exercise, the speed at which the bar lifts off the platform/floor is critical. Slowly moving (pulling) the projectile allows you to accurately “guess” the moment when it is necessary to explode and further lift the barbell to the chest.
Inclusion in the program
The barbell clean is performed in a series of 2-3 sets of 3-5 repetitions. At the same time, athletes who are proficient in clean techniques should work with a weight that would allow them to perform all repetitions of the set efficiently and cleanly. The beginner's lot is to use minimal weights - the bar.
Contraindications for implementation
The athlete may be unable to perform this exercise technically due to limited functionality, mobility, or injury to the shoulder joints and elbows.
In the presence of old injuries of the lumbar region (lumbar osteochondrosis), it is recommended to refuse to perform lifts or give preference to the option of performing them from the hip. This variation of the lift eliminates the actual pulling phase, where the greatest load falls on the lower back.
Working muscles and joints
When performing barbell cleans, almost all muscle groups, except the chest and triceps, receive the load, but the main load, naturally, is received by the larger muscle groups, namely the legs and back. In the lower phase of the amplitude of movement, the main load is received by the back extensor, hip biceps and buttock, the biceps of the shoulder and forearm are partially loaded, the abs receive a static load, performing the function -tion sta-bi-for-to-ra. In the second phase of the exercise, the emphasis of the load shifts to the quadriceps, deltoids and latissimus dorsi muscles, while the long back muscle and abs participate as stabilizers, and the biceps and forearms hold the barbell.
Since many muscle groups are actively involved in the exercise, therefore su-s-ta-vov works just as much, which makes barbell cleans a basic exercise. It’s worth noting that if usually in basic exercises 2, max-si-moom, 3 sus-ta-va work, then in this case everything works, starting from the ankle and the back of the shoulder. mi. In the first phase of the amplitude of movement, the knees and waist actively take on the load, then the ankles, elbows, hands and shoulder joints are also included in the work. Of course, the spine also receives the load, which is not something to joke about, so make sure you have the correct technique for performing the exercise and the ability of the muscles to perform the exercise !
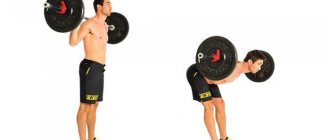
Execution technique
Initial position:
- Come close to the apparatus lying on the floor (so that your shin is 2-3 cm from the bar) and take a position with the classic position of your feet, hip-width apart, with your knees and toes spread to the side.
- Looking ahead, while inhaling, slowly lower yourself into a half-squat and grab the bar with a straight (pronated) grip slightly wider than shoulder width.
- Keeping your back straight, bend at the lumbar region, squeeze your shoulder blades together and fully extend your arms at the elbow joints.
Movement:
- As you exhale, keeping your core tight, lift the barbell off the floor/platform and slowly “pull” it along your legs to about mid-thigh.
- Without pausing, perform a lift: with a powerful and simultaneous movement, straightening your back and legs, raising your shoulders similar to shrugs, set the barbell in an upward direction.
Note: detonation is the “forced” acceleration of a projectile at the peak point of thrust, accomplished by the combined effort of the legs and back.
- While the barbell is in the “free fall” phase, sit under the bar (until your thighs are parallel to the floor), bringing your elbows forward and taking the projectile to your chest.
- With the barbell resting on your front delts, straighten your knees under control into a vertical position.
- As you inhale, quickly bring your elbows out from under the bar, bend your knees slightly, and in a controlled movement lower the bar to your hips (alternatively, return it to the floor in a “deadlift” style).
- Perform a series of repetitions as planned.
Bugs!
- Hunched back.
- Bringing your knees to the middle.
- An attempt to “yank” the weight with force of the arms.
- Removing the bar from the legs.
- Maintain pauses between phases.
- Hitting the bar against the thigh in order to give greater acceleration to the projectile.
- Excessive abduction of the body back at the moment of receiving the projectile on the chest.
Adviсe!
- The secret to the correct starting position is to ensure that the body forms an extremely rigid structure with the barbell. The stronger the “frame”, the stronger the impulse transmitted to the bar.
- At the moment of pulling, the bar should move in close proximity to the legs.
- During the “fall” of the barbell, cushion it with your knees to soften the inertia of the projectile.
- Remember, an attempt to pull the barbell with your hands will not be successful - in order to give the projectile a powerful upward impulse, the entire shoulder girdle and legs must work in concert.
- If you feel that the barbell has not gained enough “speed” when moving up, it is better to drop it to the floor.
- The detonation should approximately coincide with the moment the projectile is at hip level. An earlier transition to the detonation phase sets the wrong trajectory of the barbell, “sending” it forward.
- Try to spread your knees to the sides - this is necessary in order to “freely” (without bending your knees) lift the barbell to hip level.
- At the moment of jerking (undermining) the barbell, only a slight deviation of the body back is permissible, while simultaneously moving the pelvis forward.
- To make the “joining” with the barbell during the chest clean more smoothly, slightly raise your shoulders at the moment of squatting.
- Avoid using straps as this greatly increases the risk of wrist injury.
- When returning to the starting position, do not take the barbell on your hips - when working with significant weights, this is traumatic for the knee joints.
- Since the movement essentially consists of several elements, it is much easier for a beginner to learn the technique by practicing each of them separately with an empty bar. As you complete the exercise, note your mistakes and work purposefully to eliminate them. When the technique of the individual elements is correct, combine them into one movement.
- Execution options
Hanging barbell clean. A “simplified” version of the basic movement, often used as a lead-in exercise to mastering the technique of getting up from the floor. The classic execution of this take option assumes that in the starting position the bar will be located at hip level (just above the knees). However, alternative options with a higher or lower bar position are also practiced. Due to the fact that in this version of lifts there is no thrust phase itself, the trajectory of movement and the acceleration path of the projectile are greatly shortened. As a result, this starting position greatly limits the weight of the barbell, but also allows the athlete to more accurately control the balance of the body when practicing a powerful lift.
Correct technique for performing the exercise
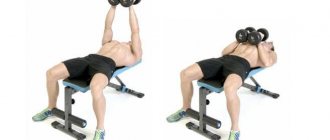
Stage No. 0. Initial position.
Walk up to a barbell with a weight and grab it with an overhand grip slightly wider than shoulder-width apart. Straighten up and hold the barbell at your hips. Place your feet exactly shoulder-width apart.
Stage No. 1.
Squeeze your abdominal muscles under control. Keeping your back straight, lower yourself into a half squat as if preparing to jump vertically (see image).
Stage No. 2.
Pull (“explode”) the barbell with a powerful upward force from your entire body (see image). The movement is somewhat reminiscent of jumping shrugs, i.e. the upward movement impulse of the barbell is set by the explosive force of the muscles of the entire shoulder girdle, and not specifically by the hands. If only your hands are involved in the movement, then nothing will work, keep this in mind.
Stage No. 3.
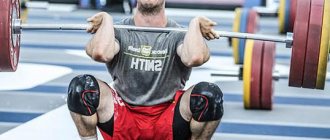
As soon as the bar stops its upward movement and begins to fall, immediately bring your elbows out and accept the bar in your palms. Begin to slowly squat with the barbell, while simultaneously “damping” its inertia (see image).
Stage No. 4.
Squat as low as possible (until your thighs are parallel to the floor) with the barbell on your chest (see image).
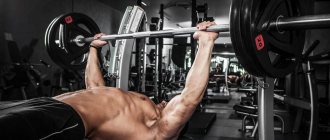
Stage No. 5.
Slowly and under control, straighten your heels into an upright position (see image). Quickly bring your elbows out from under the bar and return the bar to its starting position (mid-thighs). Get ready for the next approach.
To make it easier for you to navigate, the sequence of all phases of movement will look like this (clickable).
Note:
- Try to keep the bar as close to your body as possible throughout all phases of the movement; it should seem to slide along you.
- “Undermining” the bar must be done with the combined effort of all muscle groups (and especially the muscles of the shoulder girdle).
- To perform such a technically complex exercise with weights, first practice all phases of its movement with an empty bar in front of a mirror.
- Don’t be lazy and get advice from an experienced security officer in your area.
- To perform this exercise technically correctly, you must have well-developed hamstrings, lower back and abs. If this is not the case, focus on these muscle groups first by performing hyperextensions, deadlifts, and barbell squats.
So, in fact, all the technology.
Difficult? Naturally, who said it would be easy. Well, now we run to the gym, try, practice, fix mistakes and set the correct technique for performing barbell lifts.
scheme
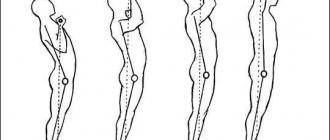
1) In the starting position, the athlete should stand as if he were going to perform a classic deadlift, that is, the grip is slightly wider than the shoulders, feet shoulder-width apart, the back is arched, the head looks forward, the legs are bent enough to create a “spread” heaviness" in the back and arms. 2) Raise the barbell up, approximately to the level of the mid-thigh, even a little higher, once again straightening the ruts and the back, but you do not need to fully straighten your back in this phase, just like your knees. 3) In the position when you have already completed the first phase, your shoulders should be further than the bar relative to the body, in this position you sit down, once again throwing the bar over your shoulders, turning your hands with your palms up. 4) You need to sit down in a jump, that is, you do not jump up, but do a step-up, spreading your legs wider than your shoulders, but you keep the center of gravity in your heels, in no case shifting it to your toes. 5) Throwing the barbell over your shoulders, as if catching it at the beginning of the squat down, you sit down in a full squat and stand up with the barbell up, then at the top point, remove the barbell from your shoulders, open your hand and lower it to the belt, and then lower yourself to the original position, as if performing a deadlift.
notes
1) You need to take the barbell with a lock grip when the thumb is under the thumb, that is, you take the barbell first with your thumb, and then place all the rest on top of it, which provides better control of the barbell. 2) You must perform the exercise in lace-up shoes with a stable sole, since you will have to jump and if you slip, then everything will end extremely badly. 3) It’s better not to use anything from ammunition, since you need to be as mobile as possible, and at the same time, the weights are not so large that a safety belt or wrist straps are really needed. 4) Pay attention to your breathing, as it will allow you to better concentrate on the phases of the movement. As you exhale, you should throw the barbell over your shoulders, inhale when you sit down and exhale when you stand up with the barbell up. 5) Pay attention to the fact that you throw the barbell with your hands, and not by tilting the body, yes, of course, you catch the inertia, but you apply the force with your hands and deltas.
Anatomy
Since almost all muscle groups work during barbell cleans, it is important to highlight only the key point, which concerns the shoulder rotation. The rotator cuff is part of the rotator cuff of the shoulder, consisting of ligaments, tendons and muscles that ensure stable operation of the shoulder joint in di-na-mi-ke. The point is that the humeral rotator provides tight pressure and correct alignment of the head of the humerus to the glenoid cavity, which creates a stable point of rotation. It follows from this that in order to safely perform barbell cleans, the athlete must necessarily develop the rotator cuff muscles, which include the spinal muscles, supraspinatus, subscapularis and teres dorsi, or rather, their tendons.
To summarize, we can say that barbell cleans are a very effective basic strength exercise that allows you to develop strength and mass in almost all muscle groups. It is recommended to perform the exercise with more or less moderate weight, in any case, the athlete should not perform the so-called forced reps -re-tion, the maximum that can be achieved in this exercise is approaching positive failure in the last repetition of the last approach. You can manage the re-commendation for athletes of different profiles, but the athlete must be prepared to use such a complex This is a multi-joint exercise, so beginners should not include it in their training program.
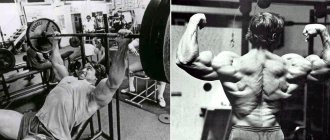
Wide, muscular shoulders are not a natural gift, but the result of competent work on the development of the deltoid muscles. These muscles consist of three bundles and cover the shoulder joints like a shoulder pad. The front bunch of deltas is involved in many bench press exercises, the middle one is loaded when raising your arms to the sides, but with the back it’s not so simple. The back of the shoulders under normal conditions receives minimal load. To train the rear deltas, an exercise such as lifting or rowing a barbell to the chest is intended. It is performed while bending over.
Raising the barbell to the chest. We study theory and move on to practice.
Have you ever wanted to know about the most powerful exercise that can literally make you a strength machine? I think I wanted to. So, quite recently I discovered such an exercise for myself and I hasten to share it with you. This exercise is a barbell chest lift . I won't say that I haven't heard of him before, no, I have. Although, it is worth saying that you most likely will not find any mention of it in modern bodybuilding textbooks. However, I heard the ringing, but somehow I didn’t get to know all the secret secrets and nuances until now.
Well, first, let's find out why it is so good, and whether it really is so. Well, firstly, from several reliable sources it was found out that this exercise was used in their training practice by many American actors who needed to achieve an impressive “oversized” look in a matter of months. Secondly, having rummaged through the English-language scientific press (bearded year), I came across the following. One “bourgeois” article said that the barbell clean is the most productive exercise (from the point of view of productive growth of muscle mass), because It is precisely this that is the heaviest in terms of the total loading capacity on the entire body. (I didn’t understand what I blurted out just now :)).
In other words, this exercise has no equal in terms of the severity of its implementation and the stress that the body experiences when performing it. It's no joke if (according to scientific research) this exercise requires the body to produce 4 times more total muscle effort than a squat with a barbell, and 9 times more than a classic bench press. It is worth saying that it is not only distinguished by its heavy load on the body, but also by its exceptional technical complexity when performed. Therefore, you will have to spend a little more time on the correct technique and its setup, but “the game will be worth the candle.”
So, let's proceed to the descriptive-pictorial part of the story, i.e. to study the technology itself.
Load by muscle group
The load is indicated on a 10-point scale (the total load is summed up)
| Front thigh | 8 (high) |
| Buttocks | 7 (high) |
| Shin | 8 (high) |
| Upper back | 8 (high) |
| Small of the back | 6 (average) |
| Posterior thigh | 5 (average) |
| Forearms | 4 (average) |
| Inner thigh | 4 (average) |
| Latissimus muscles | 3 (average) |
| Biceps | 3 (average) |
| Total load/exercise type | 57 (high) / basic global |
General details
Some elements are the same for both methods of holding the barbell, so I'll cover those first. In both exercises, the barbell must be directly supported by the body - i.e. The bar should rest on the shoulders and create pressure on the athlete's torso, not on the arms.
Shoulders should be slightly raised and slightly forward
But here it is important to understand that the location of the shoulder blades and the thoracic spine is not the same thing! At the same time, it is quite natural that when the shoulders lean forward, the person begins to hunch over. But be that as it may, we must avoid this! Keep your torso as level and straight as possible, with your back as straight as possible, to keep the barbell over your hips and maintain a rigid body position
Bringing your shoulders forward a little and lifting them allows you to create a channel in which the barbell can safely rest between the highest points of your shoulders and your throat. Do not place the barbell on these high spots created by your shoulders as this is unsafe and it can easily slide and move forward when you squat before the chest push, and ruin the trajectory of the barbell by dragging you forward as you push it out of the bottom of the squat. .
The position of the bar should be reliable and not depend on whether you hold it with your palms or not. In addition, such an incorrect position directly on the shoulders (and not between them and the throat) leads to the fact that its weight will be slightly ahead of your body, and the further the bar is, the greater the load on the spine and back, and as a result, the harder it will be for you to maintain an even body position during a clean or jerk.
Raising your shoulders slightly does two other simple but important things. First, due to the raising of the shoulders, the bar does not lie on the collarbones themselves. A little contact between the bar and your collarbones is normal, but if you have a habit of allowing the barbell to rest entirely on your bones, then you are causing yourself extra and unnecessary pain directly during the clean, plus, over time, you will be causing yourself regular bruising, which will lead to growths between the bone and the skin, which will raise the profile of the collarbones and make them even more vulnerable to impacts from the barbell, exacerbating the problem further.
Secondly, such raising of the shoulders allows you to protect the carotid artery from squeezing - it is enough to press on this artery for a few seconds to make you fall asleep. Add to this the standard breath-holding that athletes do when performing heavy movements, and you get the perfect set of factors for losing consciousness.
Holding a barbell across your chest to perform a clean and jerk
Here everything gets a little more complicated compared to the chest lift. Not only should we strive for the same confident hold of the barbell with our torso, but we should also place our hands and arms as conveniently as possible for the subsequent pushing ourselves under the barbell after the lifting phase is completed. Those. We strive to find the most optimal position for pushing the barbell, without sacrificing torso support and the safety of the barbell on the chest.
The first difference we will immediately notice is the grip width. Many weightlifters use different grips to push and clean the barbell. I would even say that most athletes perform with at least a slightly wider grip than when performing a clean. The difference can be subtle or huge - it all depends on what is more comfortable and what is best for a particular athlete.
The grip on the bar should also change so that we can comfortably wrap our hands around it. At the same time, when trying to improve our grip, we, again, should not sacrifice core support, etc., changing the position of the shoulders only in accordance with what is described above
Again, it doesn't matter how you palm the barbell (fully or not), but the grip should be relatively loose - too tight a grip can prematurely move the barbell out of its safe position on your shoulders, and this can slow or even limit elbow extension .
Elbows should be lowered and spread out to the sides. The lower they are (while not being directly under the barbell! They must always be somewhere in front of it), the clearer will be the subsequent movement under the barbell after it has been set to move upward, with the help of the athlete’s legs. Keeping the elbows out will also help the athlete apply maximum force to push the barbell off the chest.
Holding a barbell on your chest with a full grip before doing a chest clean
Holding a barbell on your chest with an open grip before doing a chest clean
Rules for performing the exercise
Note: This exercise is very complex and requires many phases.
Phase 1. Starting position
1. Stand straight, legs slightly wider than shoulder-width apart, feet slightly apart.
2. Do a squat and grab the barbell with a pronated grip. The distance between the hands should be slightly wider than shoulder width and located behind the knees, elbows fully straightened.
3. Position the bar approximately 1 inch in front of your shin, above your toes.
4. Keep your back straight or slightly arched, chest raised, shoulder blades retracted.
5. Keep your head in a natural position (in line with the spine, do not tilt or turn), gaze directed forward. Perform this phase while inhaling.
Phase 2: First pull
1. As you exhale, lift the barbell off the floor, straightening your hips and knees with a sharp movement. Tip: The position of the upper body remains unchanged. Don't bend at the waist or let your hips lift in front of your shoulders (This will lift your butt into the air and stretch your hamstrings).
2. Keep your elbows fully extended, your head in a neutral position, and your shoulders over the bar.
3. Once you have lifted the barbell, keep it as close to your shin as possible.
Phase 3: Transition phase
1. Once the bar has passed your knees, push your hips forward and bend your knees slightly to prevent them from locking. Tip: In this position, your thighs should be opposite the bar.
2. Keep your back straight or slightly arched, elbows fully straight, and head in a neutral position. Tip: Hold your breath until the next phase.
Phase 4: Second Pull
1. Inhale and with a sharp movement straighten your hips and knees, stand on your feet.
2. Keep the barbell as close to your body as possible. Tip: Your back should be straight, your elbows out to the sides, your head in a neutral position. Keep your shoulders over the bar with your arms straight and extended as far as possible.
3. With the joints of your lower body fully straightened, as you exhale, quickly lift your shoulders without allowing your elbows to bend.
4. When your shoulders reach their highest point, bend your elbows and begin to pull your torso under the bar.
5. Continue to pull as long and as far as possible. Tip: Due to the explosive nature of this phase, the back will be straight or arched back, the head will be tilted slightly back, and the feet may leave the floor.
Phase 5: Receiving Phase
1. Once your lower body is fully extended and the bar has reached its maximum height, pull your body toward the bar and rotate your arms around and floor the bar. 2. Simultaneously bend your hips and knees into a quarter squat.
3. When your hands are under the bar, inhale and then raise your elbows so that your shoulders are parallel to the floor. Hold the bar along the front of your collarbone and the front of your shoulders.
4. As you exhale, grab the bar with a straight and rigid body, head in a neutral position, feet straight.
5. Stand with your hips and knees straight until your body is vertical.
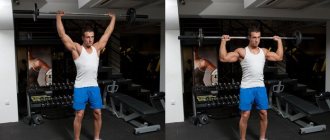
Holding a barbell overhead
Now I invite the student to show how he will hold a barbell of the maximum weight for himself above his head. Typically, students raise the bar above their head in such a way that the head and neck remain behind the raised arms, and the gaze is directed somewhere at the ceiling.
Incorrectly holding the barbell overhead
I immediately explain to the student that he should not hold the barbell above his head in this way, since you cannot hold the maximum weight in this position. Then I invite the student to hold the barbell above his head so that his hands are behind his head and the closure of his shoulder blades is felt, his head is pushed forward as far as possible between his hands, and his gaze is again directed forward and down. The student’s torso should be slightly tilted forward, and his arms, on the contrary, should be slightly tilted back
Here it is important to ensure that the hands are tilted back and down, and the arms are straight at the elbows - so if the student is wearing a shirt, then you need to insist that he either take it off or roll up the sleeves above the elbows
Correctly holding the barbell overhead
So, at this stage, the natural “standing” pose with the barbell above your head should be firmly learned. Any deviations of the body from the natural position back, “not pushing” the head forward between the hands, looking not forward and down, but in any other direction, not straightening the arms at the elbow joints, lack of a feeling of “closing” the shoulder blades, not bending the hands back - all these are very serious errors that the coach must initially keep in mind and eliminate in the bud.