Other ways to train
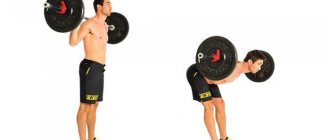
It is useful to replace wall squats with regular squats using weights (used as an additional load), with their weight reduced. The recommended additional weight for an adult in this case is no more than 30 kilograms.
Instead of regular squats with weights, you can use standing squats on one leg. In this case, it is also possible to hold light dumbbells in your hands.
Standing squats done at a slow pace can also help. This will avoid unnecessary injuries associated with the unpreparedness of the legs for large dynamic loads.
Another way to replace wall squats is to increase the number of sets and reps of regular standing squats. A good option in this case would be to increase the number of repetitions of the exercise in one approach to 12-15, and the number of approaches to 4-6. This method will change the nature of the effect on the muscles, but will maintain the growth of their strength with an emphasis on strength endurance.
What is the exercise used for?
Wall squats can be used to dilute classic squats or, for example, diversify the exercise program for the legs and buttocks. More often this exercise is recommended for girls, as it is aimed at known problem areas and can be considered quite gentle in terms of load.
But everything is not as clear as it might seem at first glance. If you add additional weights (for example, hold a weight plate in front of you) and complicate the exercise by slowing down the movements and trying to stay at the bottom point as long as possible, then this option may not be feasible for every athlete, even a well-prepared one. A powerful static load will be provided to you.
Exercise chair
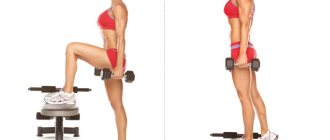
The principle of the exercise is very simple. You need to sit down and press your back against the wall so that its entire surface is adjacent to the plane. The top of your legs should be parallel to the floor. This position will provide maximum load on the entire surface of the leg and buttock. Your arms should be parallel to your body. Essentially, you sit on a chair without one.
If it is difficult to start doing the exercise right away, you can not bend your legs completely at first, but the effect of such incompleteness will be much less.
You should breathe deeply and evenly while doing this. If breathing is intermittent and confused, blood circulation is disrupted, it becomes quite difficult to be in this position, but you should not hold in the air either.
Perform for one or two minutes while you have the strength. If it becomes very difficult, it is better to stop the exercise and repeat it on the next approach.
It is important to avoid putting excessive pressure on your knees
The number of approaches depends on the fitness of the body. On average, 3-5 approaches are done
It is very important to stretch after performing the exercise to stretch the muscles and thus relax them. Otherwise, the leg may become cramped and the muscles will remain tense
Static exercises for legs and buttocks
With regular exercises for the legs and buttocks, combined with proper nutrition, you can transform your body in a few months. During the week you should do 3 to 5 workouts of 30 minutes each. In this mode, you can get rid of 4-8 centimeters of hip volume and 2-5 kilograms of excess weight in a month. For successful weight loss and high-quality muscle development, follow the following rules:
- do a five-minute warm-up before training (running, walking, jumping);
- perform the selected static exercises one after another, not exceeding the interval between them of 10 seconds;
- At first, perform one circle, increase the number of cycles every week;
- At the end of your workout, stretch to relieve tension.
Errors and contraindications
1. A common mistake when performing the “chair” is failure to keep the thighs parallel to the floor. It's great if you can maintain a right angle between your back and hips, as well as between your thighs and shins. However, if your level of physical fitness is insufficient at first, it may be difficult for you to immediately be in the correct position, and you will raise your hips a little, taking the load off your quadriceps. As you get used to it, try to lower yourself to parallel with the floor, but not lower - this is harmful and fraught with injury.
2. The next popular mistake is the incorrect position of the knees, when they go beyond the shins, and are not located strictly above them. Such a “chair” increases the load on the knee joint and can lead to injury.
3. Regarding the position of your feet, make sure that your heels are firmly pressed to the floor. The weight of the body should be supported on the heels and never on the toes. The more you press your hips into the correct part of your foot, the better the back of your thighs will engage.
4. After completing the approach, slowly move up the wall, rather than falling to the floor. A sudden move down is also dangerous for the knee joints.
The main contraindication to performing the “chair” is injuries or problems with the knees. When performed correctly, the exercise is quite safe, but any incorrect movement can worsen your condition. Therefore, first consult with your doctor, and if you experience pain or severe discomfort in your knees, stop the exercise immediately. In addition, holding a high chair is not recommended for people who have varicose veins. In principle, any static load on the legs is contraindicated for such patients, and this exercise is no exception.
Standing exercises - without equipment
Standing exercises are in no way inferior to classic exercises on a mat - they are great for losing weight in problem areas such as the stomach and sides. Moreover, such training works more muscles, has a positive effect on posture and develops a sense of balance throughout the body. Such exercises also reduce stress on the lower back and the likelihood of injury.
- Exercise No. 1 – rotation of the torso . We stand straight, place our feet shoulder-width apart, and place our hands on our belts. The upper part of the body is maximally fixed. Start moving your pelvis in a circle while standing still. Do 15 laps in each direction.
- Exercise No. 2 – leg swings . Stay in a standing position with your feet shoulder-width apart. Having tightened your stomach, begin to lift your right leg, bringing it parallel to the floor. At the same time, extend your left hand forward and try to touch your toe with it. Return to the starting position and repeat with the opposite leg and arm. Do 12 times on each side.
- Exercise No. 3 – mill. We place our feet slightly wider than our shoulders, and fix our hands at the waist. Now lean your upper body forward so that your fingertips are as close to the floor as possible. Point one hand up, leave the other down. Swap your hands, imitating the movement of a windmill. Do 20 of these movements.
- Exercise No. 4 – oblique twists. Feet are shoulder-width apart, hands behind the head. Bend your left knee and pull it towards your right shoulder. At the same time, the body turns slightly to the side. Do the same with the opposite arm and leg. Do 12 times on both sides.
- Exercise No. 5 – bending. We again place our legs slightly wider than our shoulders, and place our hands on our belts. Lean to the right. At the same time, the opposite hand straightens up and also stretches to the right side. You should feel a stretch in the side of your torso. Return to the starting position and perform the same movement to the left - with your right hand. Do the movement 20 times.
Tilts
- Exercise No. 6 – unilateral crunches . Take a comfortable standing position with your hands on your waist. We move the knee of the right leg up and to the side (the toe is turned outward). We bend our right arm at the elbow and try to touch the elbow to the knee. Then do the exercise on the left side. Number of repetitions: 10 times on each side.
Complication of the exercise - hands behind the head
Real achievements in a short time
Numerous reviews online confirm that clear changes are visible in just a month. Not only the legs or buttocks are pumped, but also, in principle, excess weight is removed from the hips and abdomen, since these muscles also become tense. If you do this twice a day, you will achieve success quickly.
Look at the photos of the “before” and “after” results of the Chair: you too can achieve success. The main thing is to make the exercise regular. You will no longer be able to make excuses that you don’t have time to go to the gym, or that you don’t have time for a full workout.
Is there a wall nearby? Do you have 5 minutes? Start your workout now!
There are a large number of exercises that can help improve the shape of your buttocks and thighs. Most women believe that this includes strength training and explosive cardio, and for some reason they completely forget about static loads. From the article you will learn about one of the most effective exercises for the lower body - “Chair”. At first glance it seems easy, but after 20-30 seconds you will understand why “enlightened” fitness enthusiasts call it the “Death Chair”.
If you don’t have time for a full-fledged training complex, then “Chair” is just for you. Feel free to perform the exercise twice a day for several approaches, and also adjust your diet in favor of healthy foods.
Quick results
There is no doubt that the result will not take long to arrive. After just a few sessions with this exercise, your legs will become stronger and your buttocks stronger. The most important thing is regularity and patience.
The exercise is approved by all trainers and fitness instructors, which once again confirms its effectiveness. Even without the opportunity to go to the gym regularly, you can get in shape, and a “chair” (exercise) will help you achieve your goal.
By following these tips and instructions, you can check if you are doing the exercise correctly. Under no circumstances should you feel any sharp pain in your back or legs. If you feel such pain, you should stop doing the exercise. In any case, it’s never too late to correct and correct everything.
An effective exercise for strengthening the buttocks is cycling.
Scientific studies have proven that cycling helps eliminate adipose tissue from the legs and abdomen. However, it should be remembered that to obtain the desired result, you also need to eat right and exercise regularly. You must understand that fats are not disposed of in one place, but are burned throughout the body. Moreover, lipolysis processes are first activated in the upper part of the body.
Actually, the weight loss formula is not a secret and for this you need to consume less energy than you expend. Only thanks to an artificially created calorie deficit, the body activates lipolysis processes. However, let's return to the movement we are considering now and find out which muscles are involved in the work.
All abdominal muscles work as actively as possible when performing the “bicycle”. In addition, the buttocks, muscles of the lower back and thighs are involved. In this case, the load is evenly distributed between the legs, which allows you to develop the body harmoniously.
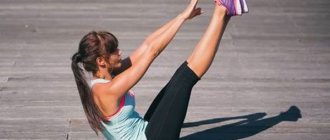
Lie on your back with your legs extended forward. Raise your shoulder joints and place your hands behind your head
It is very important to ensure that your lumbar back does not leave the ground. Raise your legs and bend them at the knee joints so that your hips are at an angle of 45 degrees relative to the ground.
After this, begin to perform alternating movements with your legs, as if moving on a bicycle.
The ideal option for performing the movement is to touch the knee and elbow joints. However, it will be difficult for beginners to achieve this, but it is necessary to strive for such a technique. Movements must be uniform and jerking must be avoided. According to research, the “bicycle” movement is second only to squats and glute bridges in terms of the effectiveness of pumping the buttocks.
How to perform a high chair against a wall, see below:
Many women dream of finding some magical remedy that would help them change their figure in a colossal way without counting calories and sweating for many hours in the gym.
The women's website “Beautiful and Successful” will today tell its readers about such a magical remedy.
This is the “chair” exercise against the wall. By doing it, you can not only tighten the muscles of your hips and buttocks, but also get a beautiful waist.
The main advantage of this exercise is that there is no need to buy any additional equipment to perform it. To train your body muscles using the chair exercise, you just need to stand against any wall. The results of this simple workout are amazing.
Statics exercises
Not only active movements, but also static (isometric) exercises will benefit weight loss. Although static gymnastics leaves the body and limbs motionless, the muscles experience serious stress. Even deep muscle tissues work at full strength, helping to tighten the figure and give the body sculptural shapes. For a long time, static training was not given worthy attention, but now its effectiveness for weight loss has been scientifically proven. Dynamic loads are often replaced by static complexes.
What does the chair exercise do?
The benefit of this sports movement is to strengthen and work out a large number of muscle groups. Such squats strengthen tendons and ligaments, which play an important role in attaching muscles to the skeleton. Another name for the high chair is the wall exercise, it promotes:
- increasing spiritual concentration while maintaining breathing control;
- normalization of blood circulation, pressure;
- foot training, helps correct flat feet (if done barefoot);
- promotes the return of organs to the desired position during prolapse (for example, a “floating kidney”).
Excessive volume in the hips, cellulite and excess weight are the main reasons that guide people when performing this exercise. But does everyone know that several variations of the “chair” can pump up different muscle groups? And, in addition, significantly improve your health:
- normalize blood circulation;
- reduce swelling;
- improve posture;
- prevention of intervertebral hernia;
- strengthen the vestibular apparatus;
- strengthen the heart muscle.
From the above points it is clear that this exercise will not only “pump up” the legs, but will also help get rid of varicose veins, restore posture, reduce or relieve pain from problems with the spine, as well as from “wandering kidney”. This exercise is useful for those who experience frequent dizziness when raising their heads suddenly.
Important Tips
First of all, don’t forget about other exercises. Despite the fact that the “chair” (exercise) perfectly trains almost all muscle groups, you won’t go far with it alone. Both the abs and buttocks need additional work.
Also, don't rely on this exercise as a key exercise. Over time, muscles tend to get used to one type of physical activity, and training the buttocks requires special attention. As soon as you feel that you have stopped getting the effect of this exercise, you can replace it with swinging your legs back in a kneeling position or simple squats. In any case, you need to maintain active tone for each muscle involved.
And in no case should we forget about a healthy lifestyle in addition to all the stress. Home training should be accompanied by regular and nutritious meals, eight hours of sleep and walks in the fresh air.
How to do the chair exercise
Classic exercise technique
Start your workout with a light warm-up to warm up your muscles and prevent injury. Then come with your back to the wall at a distance of 40-50 cm. Feet should be directed straight forward and stand shoulder-width apart. We press our backs against the wall, stretch our arms along it and lower ourselves until the thighs are parallel to the floor. Imagine sitting on an invisible chair.
The neck and back should be straight and the back of the head pressed against the wall. Lock yourself in this position, tensing your body. Breathe evenly and control your timing. You can just count slowly. For clarity, we recommend looking at a photo or video of the high chair technique.
Chair with fitball
A more complicated version of the chair requires the use of a fitball. The exercise uses the same muscles, but is more active on the back. The technique is similar, but there should be a fitball between the wall and your back.
If you don't already have a gymnastic ball, you can buy one at any sports store. You can keep it on the balcony, and with its help you can perform many useful exercises. And from the article on our website you will learn.
With dumbbells in hands
This exercise additionally loads the shoulders and arms, and also increases the load on the leg muscles. It is performed in exactly the same way as the first classic exercise, but you should have small dumbbells in your hands - 1-3 kg. Stretch your arms forward and keep them parallel to the floor. The main thing is not to forget to breathe, since many people hold their breath during exercise - this is a very common mistake.
With leg extended
There is an exercise called a pistol - squats with one leg extended forward. The high chair can also be performed using a similar technique. You do everything the same as in the classic version of the exercise, but extend your leg forward. Try to keep it straight and strictly parallel to the floor. It will be difficult at first, but with regular training, you will master this technique. In this exercise, the load on the quadriceps of the raised leg increases, and the abs are also strongly involved in the work.
Chair without wall
Another version of the chair exercise, which is not at all difficult to perform correctly, but you need to practice. Standing straight, sit down as if sitting down on a chair. Your thighs should be parallel to the floor and your shins perpendicular to it. Stretch your arms forward to maintain balance. Breathe evenly and count slowly or time the time on a stopwatch. Try to increase the exercise time by at least 5 seconds with each workout.
Making the exercise more difficult
A more difficult form of the same exercise is to do the same without back support, i.e. without a wall. This option is more difficult to perform due to the desire to relieve tension and lean forward. It is important to keep your back straight. But both with and without support, the “chair” (exercise) is complex for the whole body.
You can add load to your legs and lift them one by one, holding them in the air for about 5-7 seconds and stretching them forward a little. This will put extra pressure on your foot on the ground and make your butt workout more active.
You can also take dumbbells in your hands and lift them one by one, trying not to upset your balance. If you don’t have dumbbells, you can add additional stress to your arms by stretching them out in front of you parallel to the floor or placing them behind your head.
Variants of the exercise can be completely different, but do not forget the basic principle, which brings great benefits in training
How to do the chair exercise correctly
With any workout, it is extremely important to maintain proper technique. If you place your foot incorrectly and do not straighten your back, this will not only reduce the effectiveness of the exercise, but can also lead to injury.
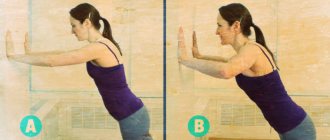
Wall exercises are not particularly difficult, but you should still know how to do them correctly. You should always start with a warm-up to warm up your body and prepare it for the load. Perform bending, raising your toes, squats, turning your knees to the sides.
The exercise technique has a classic version and can be performed with additional objects and movements. The first option is good for beginners; as your skill grows, you can move on to using dumbbells or squats on only one leg
In this case, the number of repetitions is not so important; what matters more is the time you can hold your body in a static squat. After training, be sure to warm up and stretch again
Basic exercise
This is a classic option for making a chair against the wall. All of the muscle groups described above are involved, perfect for those who are just starting to train. If wall squats come first in your routine, be sure to do a warm-up. The exercise technique is as follows:
Stand close to the wall (preferably without a plinth), press your heels, keep your feet straight (it is better to do the workout barefoot) at shoulder distance. Keep your arms along your body, do not place them on the wall. As you inhale, lower down, leaning on the surface. Lower until you sit in a chair (imaginary). Your thighs should be parallel to the floor. Keep your neck and back straight, the back of your head pressed firmly against the wall. Fix the position, tensing all your muscles. Breathe evenly and count the seconds to yourself. For the first time, 30-40 is enough; over time, increase the time in static mode to 2-3 minutes. Keeping your back and neck straight, rise up, pushing yourself out of the chair. At this stage, the muscles of the buttocks and thighs will work more.
With fitball
This is one of the variations of static load training. Squats with a fitball against a wall differ only in that its use helps to more actively pump up the stabilizer muscles of the back. The exercise technique completely repeats that described above with one difference: a fitball should be placed between the wall and your back. All other training details remain the same. This fitness ball does not take up much space in the apartment, it can be used for other weight loss workouts.
Without a wall
This performance technique is borrowed from the eastern style of martial arts wushu. The wall-less chair exercise is very similar to the mabu step. Externally, the movement is similar to dynamic squats:
Keep your feet shoulder-width apart, your shins perpendicular to the floor, your thighs parallel, and your feet straight. As you exhale, lower to the “sitting on a chair” position. Keep your back and neck straight.
The main difference is that a wall is not used for additional support. In this case, it is recommended to stretch your arms in front of you. Keep all your muscles tense, breathe evenly, counting down the seconds. When you feel like you can’t stand anymore, begin to rise up, maintaining your body position. Stretch well, bend over a couple of times and proceed to the next approach.
With dumbbells
Be sure to do a short warm-up before starting your workout. Squats with dumbbells in your hands are a complicated version of the chair exercise, which is aimed at additional stress on the shoulders and arms. The load also increases on the main muscles involved in the movement: quadriceps, inner thigh, back stabilizers, soleus. The movement is performed like this:
Lean your back against the wall (you can do without it). Place your feet at shoulder level and begin squatting. Extend your arms in front of you while holding the dumbbells. When you get a 90 degree angle at your knee, stop the movement. Stay in this position for 1-3 minutes. As you inhale, begin to rise to the starting position.
With a leg raise
There is a certain similarity here with the “pistol exercise” that everyone did in physical education at school. The main difference is that the squat was performed completely to the floor - this is a dynamic load. A chair with legs raised is a static load that transfers all the stress only to the right or left leg. The technique for performing it against the wall is the same as in the classic version. The difference is that one of the legs should be extended forward and kept as parallel to the floor as possible. Be sure to alternate legs during your workout to distribute the load.
Standing exercises - with dumbbells
The abdomen and sides are one of the most problematic areas for all women, and not only overweight and overweight women. Even thin representatives of the fair sex accumulate subcutaneous fat in this area. Therefore, if you want to make your workout more effective and achieve quick results, you need to use equipment. In the classic variation, the exercises are performed with dumbbells, but you can also use water bottles instead.
Important! There is no need to immediately move on to exercises with equipment if you have not trained for a long time before. Let your muscles get used to the load and do exercises without dumbbells for a couple of weeks.
- Exercise No. 1 – bending. Starting position: standing, legs in a stable position, arms with dumbbells located along the body. Bend to the right side and take the starting position. Now lean to the left. Only the upper body moves (don't move your hips to the side!). Do the exercise 15 times on both sides.
- Exercise No. 2 – weighted turns. Take a stable position, point your arms with dumbbells up and bend your elbows. Rotate your upper body first to the right, then to the left. Knees point in front, hips are fixed. Make 12 turns on each side.
- Exercise No. 3 – leg swings. We remain in a stable standing position. Bend your torso to the right side, keeping your dumbbell arm straight. Simultaneously with this movement, move your right leg to the side - towards your hand. Straighten up and repeat the movement on the other side. Number of repetitions: 6 times on both sides.
- Exercise No. 4 – semicircle with dumbbells. Place your feet shoulder-width apart. Tilt your body slightly to the right side first, bring it to the middle and tilt to the left. Imagine as if you were drawing a semicircle - right side, middle, left side. Return to the starting position and do the movement 9 more times.
- Exercise No. 5 – final jumps. You can finish your workout with a short cardio workout without equipment. Perform jumps with your legs spread shoulder-width apart and your arms raised for 1-2 minutes. This will help speed up the fat burning process.
Jumping
The figure of your dreams is very close - you just need to get up and start practicing! Moreover, to achieve results you don’t have to exhaust yourself in the gym, because the workout is done at home. By regularly performing exercises to lose weight on your stomach and sides while standing, you will be able to notice results in just a couple of weeks.
What type of exercise do you prefer – standing or lying down?
What are the benefits of an imaginary chair?
Just like other static exercises, the “chair” against the wall strengthens the muscles well, but does not put much strain on the joints and ligaments, making it safe even for amateurs. Its regular implementation will give the following results:
- Muscles, ligaments, tendons and joints will become more elastic and stronger.
- The back muscles, strengthened as a result of training, will support the spine well, which is an ideal prevention of osteochondrosis.
- Extra calories received at lunch or dinner will be burned quickly and easily.
- The internal organs will also benefit: the abdominal muscles, tensing during the exercise, will massage them, increasing blood circulation in the abdominal cavity. This will have a beneficial effect on the functionality of all digestive organs, and especially on the functioning of the intestines.
The wall chair exercise is a great workout for almost the entire body. It develops strength, endurance and flexibility. Everyone can adapt it to their capabilities, choosing the type of training that they like best.
There are practically no contraindications for the “chair”.
If you have some experience in fitness, you can perform the exercise a little longer, use it more often, use dumbbells or other equipment.
Whatever your goal - to improve the shape of your buttocks, to tone up your abs, or simply to cover up traces of extra calories after eating chocolate - the “chair” will certainly be useful to you. So try it in a variety of variations. You will not regret.
There are a large number of exercises that can help improve the shape of your buttocks and thighs. Most women believe that this includes strength training and explosive cardio, and for some reason they completely forget about static loads. From the article you will learn about one of the most effective exercises for the lower body - “Chair”. At first glance it seems easy, but after 20-30 seconds you will understand why “enlightened” fitness enthusiasts call it the “Death Chair”.
If you don’t have time for a full-fledged training complex, then “Chair” is just for you. Feel free to perform the exercise twice a day for several approaches, and also adjust your diet in favor of healthy foods.
Benefits of the Chair
Isometric pose will be very useful for those who want to go to the gym, and for those who are just plunging into the world of fitness and training. In the first case, the exercise will strengthen the muscles and increase strength in the legs. And this is important for those people who start training using dumbbells or barbells.
We advise those training in the gym to start from their goals. If you want to focus specifically on performing the Chair, then it is better to sit down in it after warming up. But if your goal is to “finish off” your muscles and at the same time stretch them after intense training in the gym or at home, then do it at the end of a sports session.
Under no circumstances should you try to hold this isometric pose with cold muscles.
What muscles work
Of course, the largest share of the load falls on the buttocks and quadriceps, and the inner thigh. But it should be noted that when performing the exercise as a standard, a considerable load is felt by:
- the muscles of the back of the thigh (since in the process of holding an isometric pose they are responsible for stabilizing the knees and joints);
- caviar;
- stomach;
- muscles of the lower and upper back, neck;
- arm muscles (if you take dumbbells, put on weights or just spread your arms to the sides).
Like strength training, static training allows you to displace cellulite. Moreover, sitting in the Chair helps to say goodbye to the so-called ears - an eternal problem for many young ladies of all ages.
What are the benefits of an imaginary chair?
Every person tries to choose a comfortable and at the same time effective exercise for training. The chair is well suited for both of these parameters; it helps not only strengthen muscles, but also tendons and ligaments. You can perform training in any convenient place where there is a wall. The benefits of the chair exercise are as follows:
- You can independently adjust the number of repetitions. The muscles should begin to “burn”, this signals that they have received the necessary load.
- The chair is an extremely “unpretentious” movement. No additional equipment or special training equipment is needed. At first you will only need a wall for support, but as your strength increases you will be able to perform the exercise without it. Minimum required space – maximum result.
- You can train using this method every day; some people even do a chair in the morning and evening. Muscles recover quickly after static load
- You will minimize the likelihood of injury during training, the knee joints will remain intact and unharmed (which cannot be said about squats with a barbell). Physical activity should not only be effective, but also safe.
- The exercise is a good prevention of spinal hernia, like all back workouts.
Just like other static exercises, the “chair” against the wall strengthens the muscles well, but does not put much strain on the joints and ligaments, making it safe even for amateurs. Its regular implementation will give the following results:
- Muscles, ligaments, tendons and joints will become more elastic and stronger.
- The back muscles, strengthened as a result of training, will support the spine well, which is an ideal prevention of intervertebral hernia and osteochondrosis.
- Extra calories received at lunch or dinner will be burned quickly and easily.
- The internal organs will also benefit: the abdominal muscles, tensing during the exercise, will massage them, increasing blood circulation in the abdominal cavity. This will have a beneficial effect on the functionality of all digestive organs, and especially on the functioning of the intestines.
The wall chair exercise is a great workout for almost the entire body. It develops strength, endurance and flexibility. Everyone can adapt it to their capabilities, choosing the type of training that they like best.
There are practically no contraindications for the “chair”.
If you have some experience in fitness, you can perform the exercise a little longer, use it more often, use dumbbells or other equipment.
Whatever your goal - to improve the shape of your buttocks, to tone up your abs, or simply to cover up traces of extra calories after eating chocolate - the “chair” will certainly be useful to you. So try it in a variety of variations. You will not regret.
Subtleties of the exercise
To get the most out of this exercise, consider the following tips:
- Keep your thighs away from each other.
- The angle under the knee should be 90 degrees.
- Focus on your heels.
- Stand until you feel a burning sensation in your quadriceps.
- To reduce the load, you can put your hands on your knees.
By the way, this exercise will not only improve the contour of your legs, but also pump up your buttocks, back muscles and abs. Try standing in a “chair” and you will feel how they tense up.
Contents of the article: There are a lot of exercises to improve the shape of the gluteal muscles and legs. Many girls believe that strength movements and explosive cardio are the best. At the same time, they completely forget that static loads can also bring excellent results. Today you will learn how the wall chair exercise will help you make your legs even more attractive. You can do it at home and it won't take much time.
A few more benefits of exercise
- Firstly, the “Chair” exercises are extremely unpretentious
. You may need a wall at first, but this is not necessary, because beginners in the eastern gymnastics “Wushu” perform the “mabu” stance in their first lesson, which is in many ways similar to the “Chair”, and without any wall. Then this “delayed squat” can be done in any small interior. - Secondly, you yourself can determine the number of visits and duration of “sitting”
. The main thing is to feel the “warm-up” of the tendons. You will really feel hot. - Thirdly, you can repeat this exercise every day
, even twice a day, and only twice a week. The more often, the stronger you will feel already in the second week of mastering the “Chair”. - The knee joints are minimally exposed to injury
, which occurs during regular squats, and even with excess weight or. Although there is still a load on the knees. That’s why you need to monitor the correct technique for performing the “Chair” in order to distribute most of the load between the pelvis, feet, back and hips. - The “chair” relieves intervertebral hernia
, like all exercises that involve the back muscles
Do you know any other interesting branches from the classic “High Chair”? No matter how you perform it, the static orientation of this exercise will soon manifest itself in a noticeably increased strength of your legs, with their visual improvement.
There are many exercises that can help pump up your legs and buttocks, making them slimmer and more toned. Some people prefer squats, others prefer cardio, but many people forget about the existence of static exercises. These include the so-called high chair.
Recommendations for training
Training with standing exercises is a great option for exercising absolutely anywhere. You no longer need to have a special mat with you, as well as a large amount of space for practicing. You can perform this simple and universal complex even at work, when you can allocate 10-15 minutes of your time.
The exercises are universally suitable for all women, regardless of physical fitness and age - even for those over 50. It is only important to follow the correct technique and do all movements clearly and accurately, without sudden jerks.
Rules for effective training from the abdomen and sides:
- be sure to warm up before class (at least for a few minutes);
- do not take too long breaks between exercises - 30 seconds will be enough to catch your breath;
- in each exercise, concentrate on the abdominal muscles - you should feel them, and not the muscles of the back or lower back;
- you can perform training without equipment and training with dumbbells alternately or combine exercises from both workouts;
- conduct classes at least 2-3 times a week.
Muscles
Types of chair exercises for experienced athletes
The type of wall chair exercise you choose depends on the muscle group that needs to work harder than others. Using a chair, people usually try to strengthen their legs and buttocks.
This method of performing a “chair” against a wall will help you make your calves beautiful:
- Take the position as for performing the basic “chair” exercise. Lower yourself down as you inhale, keep your arms along your body, do not lean them against the wall. Squat down with your thighs parallel to the floor.
- Stay in this position for 1-3 minutes.
- Begin to exhale slowly and rise up, straightening your legs. Don't take your back off the wall.
- Straighten up. Freeze in this pose for 30-60 seconds.
When performing the exercise described above, do not lift your feet off the floor. When pushing off the ground, keep your back straight, putting the main load on your legs and hips.
A “chair” with a leg raise will help to load your calves, thighs and buttocks even more. It should be performed using the same technique as the basic exercise, but you must squat on one leg with the other extended forward. This addition significantly complicates the training, making it more effective.
A “chair” against a wall with an outstretched leg is a wonderful training for good posture, beautiful, sculpted legs and toned buttocks. This exercise also helps to develop the abdominal muscles.
To improve the shape of your buttocks and make them more toned, do a “chair” against a wall with your arms extended forward: this will allow you to shift your center of gravity and use the muscles of your buttocks more than your calves. Sitting against a wall with your arms extended forward is a great workout for your abs.
A “chair” against the wall with dumbbells in your hands will help you combine working out the muscles of your buttocks and thighs with training your biceps and triceps. But this exercise can only be performed by experienced athletes who have well mastered the basic training technique. To make a chair against a wall to strengthen your arm muscles, you need to follow these rules:
- Get into the starting position, take it in your hands.
- Inhale and begin to lower yourself down until you “sit” on the “chair.” As you go down, extend your arms forward. Freeze. Try to keep your hands parallel to your thighs.
- Exhale and slowly rise up, pressing your shoulder blades against the wall while lowering your arms down.
- Repeat the movements several times.
To complicate and diversify training with dumbbells, when rising from the “chair”, you can not lower your arms down, but spread them to the sides.
A “chair” against the wall can be made using. A large ball needs to be placed between your back and the wall. It will help out if the house has no walls without baseboards. Training with a fitball is not only an effective exercise, but also a pleasant back massage that relieves muscle tension and prevents pain after training.
No matter how you do the “chair” exercise against the wall, in any case it will bring you considerable benefits.
Static abdominal exercises
Using isometric training, you can achieve a flat and beautiful stomach. Experts recommend using such exercises for beginners and professionals. Often dynamic exercises are not effective enough, the body gets used to repeated contraction and relaxation of muscles, so it is worth using an isometric complex for weight loss. Static training affects muscle tissue by tension and relaxation, and engages deep muscles.
A variety of positions for losing weight on the abs allows you to avoid performing the same complexes every time you workout. Combine positions that are difficult for you with easy ones, choose different variations to form a beautiful belly. Don’t overdo it at first; the apparent ease of the exercises is deceptive; if you’re not used to it, your muscles will ache. The obvious advantages of such training are the minimum amount of time and space.
Plank
One of the most popular static exercises is the plank. It takes little time to complete but is very effective. It will take just five minutes a day to thoroughly pump up your abdominal muscles, core, and give your arms and back a workout. The plank gives excellent results if your goal is weight loss. Performance:
- Take a position lying on your stomach.
- Stand on your forearms so that your elbows are under your shoulder bones.
- Rest on your palms and toes, lift your body up.
- Tighten your stomach.
- Keep your breathing smooth and inhale through your nose.
- Maintain the position until you feel a slight burning sensation, gradually increasing the time from 30 seconds to 5 minutes.
The plank is an effective weight loss method for men and women, but sometimes it cannot be done. Refuse the rack in any variation of the plank in the following cases:
- within 6 months after birth;
- for diseases of the cardiovascular system, musculoskeletal system;
- for vertebral hernia, spinal injuries;
- during periods of exacerbation of chronic diseases.
Martin
The Swallow exercise can be used effectively not only for the abs, but also for working out the back, legs, hamstrings of the buttocks, and losing weight. Although the technique is simple, the effect of the Swallow will be noticeable. Weight loss, training the vestibular system, strengthening the back and abdominal muscles are the results of static exercises that take a few seconds. Performance:
- stand straight, place your feet together, and raise your arms parallel to the floor;
- slowly move your left leg back, straining your abs;
- lean forward until your legs and torso are parallel to the floor surface;
- hold the position for 15 seconds, repeat for the right leg.
Sitap
A simple weight loss exercise – Sitap – will help strengthen and tighten your abdominal muscles. There are several techniques for performing it. For beginners, the simplest option is recommended - the classic one:
- Starting position - lying down, arms crossed on the chest, legs bent at the knees.
- Raise your body to a sitting position, keep your back straight, tense your abs.
- Hold the position for 2 minutes.
Why do the chair exercise against the wall?
First of all, practice is necessary for women who want to round their buttocks and outline their hip line. The “chair” is also suitable for those who need to give it shape. If you don’t have time to do a basic set for your legs, it’s enough to go up to the wall twice a week and train them with squats. Athletes prefer to sit on a “chair” at the end of training in order to “finish off” the lower body.
Technique:
- develops endurance;
- strengthens the quadriceps, hamstrings, and knee joints;
- forms the basis for performing strength exercises;
- helps maintain balance;
- activates blood circulation in the lower body.
The practice is classified as isometric. When performing the “chair” technique against the wall, the following muscles work:
- calf;
- biceps femoral heads;
- quadriceps;
- large gluteal;
- lumbar
When the back and legs are trained, the technique is complicated, the number of repetitions is increased, and the movements are modified. In the first month
perform
4-6 approaches with a pause at the bottom for 30 seconds
.
After a while,
each time
the pause is increased by 10 seconds
. The breathing rhythm is arbitrary - inhale and exhale through the mouth.
- Good indicators for men
are sitting on a “chair”
for 80-100 seconds
; - for women
—
60-70
.
With the indicated values, it is possible to get strong legs and elastic buttocks of a round shape in a month.
Nuances of doing the exercise: benefits and harms
This exercise belongs to Eastern practices, as it has its origins in Chinese Wushu gymnastics. Moreover, it is available for any level of physical fitness; anyone can perform it without much effort, which beginners really like. It should not be underestimated because of its apparent simplicity. In fact, it is very effective. Results will be noticeable after just four weeks of training. However, it is still better to clarify some nuances in advance in order to be prepared for anything.
- At first, and then too, you can regulate the duration of such squats yourself, and most importantly, fixation at the desired point. The exercise begins to work only when you feel a clear “warming up” of the tendons. It's worth checking out, you'll actually get hot.
- Many advanced athletes say that by performing the Wall Chair twice a day for just thirty seconds, you can achieve visible, tangible results after just two weeks of training.
- Due to the static nature of the exercise, the knee joints, which are highly susceptible to injury during running, regular squats and other sports, are in the minimum risk zone. However, here you need to very strictly monitor the correct technique, otherwise there will be no point, and you may get injured.
- For knee injuries, doing the “Chair” is not recommended, especially for beginners who have not yet mastered the technique.
- Some complain that after exercise or even during it, their calf muscles cramp and cramps occur. To avoid this, be sure to warm up, don't be too overzealous with your sitting time, and always do stretching exercises as a cool-down after exercise.
Execution technique
How to do the exercise correctly? To perform it, you need to choose a flat, fairly “sliding” wall surface and suitable clothing. This is because wall squats involve high friction between your back and the wall.
The floor in the place where you squat with support on the wall should be non-slippery so that your feet do not slip during the exercise.
To perform the chair exercise, you need to stand with your back to the wall, placing your legs at a distance of 60 centimeters in front of you, placing your feet flat on the floor. The legs are positioned hip-width apart.
! The optimal distance of the legs from the wall depends to some extent on the height of the person performing this activity.
Hands can be placed on your knees or with your palms resting on the wall to maintain body balance. Bend your knees and slide your back down the wall, squatting until your knees are at a 90-degree angle.
The 90-degree angle is very important because if the thighs are not parallel to the ground during the full squat phase, the quadriceps muscles will not receive the necessary load and the benefits of the exercise will be greatly reduced.
During the full squat phase, the knee joints should remain at the same level as the ankle joints in the vertical plane and not extend beyond it. This may require placing your feet a little further to create the correct angle.
During the full squat phase, your thighs must be kept parallel to the wall and pressed against it. It is not recommended to lower your shoulders forward.
Depending on the strength of the performer, after squatting at a 90-degree angle, you need to hold this position for 10-20 seconds (up to 60 seconds for advanced athletes), and then slowly stand up, pushing your body up using the force of the quadriceps muscles of the thigh and resting your feet on the floor.
This type of movement ensures intense work of the quadriceps, leading to their active strength and muscle development.
Technique
Let's figure out how to do this exercise correctly. Starting position - position yourself standing at some distance from the wall, pressing your back tightly against it. The wall acts as a support. Feet are slightly wider than shoulder width, toes slightly turned outward. Legs are slightly bent at the knees, hands are on the hips or crossed in front of you. If you are using weights, as mentioned above, you can take a plate from the barbell and hold it in front of you, pressing both hands to your chest. We keep our back straight, our gaze is directed in front of us, our shoulders are straightened. So, the technique:
- From the starting position, begin to squat down smoothly and slowly, bending your knees. The back is still pressed tightly against the wall.
- Reach the bottom point when your knees are bent almost at a right angle (80–90°) and your thighs are parallel to the floor. The most common comparison is that you sit on an imaginary chair. Depending on your fitness level, stay at the bottom for as long as you can. The longer the better.
- Rise up smoothly and under control, but at the same time quite strong and powerful, and return to the starting position. Repeat as necessary.
It is important to choose a suitable and level wall surface, comfortable clothing that does not restrict movement, and non-slip shoes.
If you want to reduce the static load, do not linger at the bottom point, lower as you inhale, rise as you exhale.
Feedback on the results
The greatest effect from the exercise can be obtained with regular training.
According to reviews, in combination with a healthy diet, two to three months of such training lead to excellent results - muscles are strengthened, legs become slimmer, buttocks are tightened, excess weight is lost. It also makes it easier to perform heavier exercises.
Well, by the way, yes, it’s a good exercise. I also started doing this, plus a plank (it strengthens the abs well). I read that Jessica Biel regularly makes such a “chair”.
Guest
https://www.woman.ru/beauty/body/thread/4842469/
Exercise "Chair". You need to stand against the wall for 2 minutes, pressing your shoulder blades against the wall, in a position as if you were sitting on a chair. And then squat 20 times, placing your feet shoulder-width apart, with your toes turned away from each other, your butt pulled in, your back straight.
Mauritanian
https://www.u-mama.ru/forum/women/fashion/406475/
Do 3 sets, every day or every other day. Try to increase the time by 5–10 seconds every week. And definitely on warmed muscles, I do it after training or after running, because you can injure your muscles. Good luck.
Catherine
https://www.woman.ru/beauty/body/thread/4842469/
Can exercise be harmful?
There are many reviews online about the results of training with the chair exercise, but it has several contraindications. The first of these is injuries and diseases of the joints, especially the knees. The knees experience high stress when performing a high chair with any technique.
Also, overweight people should be careful with the exercise. If there is a lot of it, it is better to lose a little weight first. This is due, again, to the load on the knee and hip joints.
Sources:
https://www.fitnessera.ru/uprazhnenie-stulchik-u-steny.html https://wefit.ru/uprazhnenie-stulchik-u-steny/ https://www.sportobzor.ru/yagodicy/uprazhnenie-stulchik -dlya-nog.html
What muscles work?
The static exercise, also called the Chinese chair, uses a lot of muscles. The main load falls on the front of the thigh, that is, on the quadriceps. The auxiliary muscles include the hamstrings, gluteal, calf, lumbar muscles and even the abs. With the correct technique, you will only feel tension in your legs and buttocks, and your back should not strain too much and cause discomfort.
In order for the muscles to work fully, the time required to perform the chair exercise must be sufficient. Beginners should start with 30-40 seconds, but gradually increase the duration to 2-3 minutes. How long a workout should last depends on your physical fitness. It is advisable to perform 3-4 approaches for at least 2 minutes. Taking into account rest, the training time will not exceed 15 minutes.
How many calories does a high chair burn?
Everyone who loses weight is interested in how much energy is spent on performing various exercises. Accordingly, you might be wondering how many calories does a high chair burn? On average, you burn 6-7 calories per minute if you perform the exercise using the classical technique.
Accordingly, by doing 4 sets of 2-3 minutes each, you will burn 50-80 kcal. By choosing the option with a raised leg or without support, calories will be burned even more actively. It turns out that this static exercise is very useful not only for pumping muscles, but also for losing weight. You can create a training set that includes several variations of a high chair and abdominal exercises: planks, crunches.