Straps for horizontal bar
A webbing is a straight sling that is connected into a circle and is used in this form. In order for it to withstand the load, the ends of the sling must be overlapped. The overlap should be at least 5 centimeters. The straps for the horizontal bar must be connected conscientiously so that they do not break and you do not get injured. First you will need to stitch around the perimeter, and then, in the middle of the resulting rectangle, stitch with a cross for better connection. Instead of a cross, you can sew a strap in the form of a lattice of four lines. In general, how to make belts for a tunic is already clear, but that’s not all.
The length of the straps depends on the thickness of your wrist and the bar you will be using. In order to decide on the length, you will need to walk with the blanks to the horizontal bar on which you are training, or find out the diameter of the crossbar, and try it on at home on something of the same diameter. You can do it “by eye”, as I did, but it may end up having to redo everything. The diameter of the crossbar can be measured by taking a caliper with you to training. You can also take some kind of string, or a piece of sling, to measure the diameter, and at home look for something with the same diameter, measuring with a string.
To measure a piece of sling for the future strap, we will need several pins for connection.
As a replacement for the crossbar, in order to measure the straps, there may be the handle of a garden tool, some kind of pipe, and so on.
It is advisable that both straps be made from the same slings, since different slings may have different elasticity. And, of course, the length of the sling should be the same.
Straps sewn in the middle
There are also slightly different types of straps for the horizontal bar. In general, they are made from the same circle sewn from straps, but sewn in the middle to make it easier to throw on the horizontal bar and put your hands into the loops. This is a pretty good option for straps for a horizontal bar, but not as common as the first one.
You can also make these straps yourself. To make them you will need the same tools and the same materials. In the middle, pieces of dense, wider sling or leather can be sewn onto the sling, which will better fix the hands and will not put pressure.
Horizontal bar straps are really necessary equipment. The straps serve as insurance while performing various gymnastic elements. If you're just doing pull-ups, then they may also come in handy, as they help reduce the load on the forearm muscles, which will help you do more pull-ups, and with more weight.
How to take
A few words about how to grasp the horizontal bar using straps. We hang the straps for the horizontal bar on the crossbar, and as a result there should be two loops hanging down. You need to put your hands into these loops, scroll them towards yourself, and grab the bar so that the straps on the horizontal bar remain near your little fingers.
Straps for traction and horizontal bar
Also, I want to talk about one more type of straps that may come in handy. Of course, it will be more useful to people in the gym, and less useful to those who train on the street. These straps are designed for deadlifts, and for pull-ups on the horizontal bar and with these straps you will not be able to perform any gymnastic element, since they are simply not designed for this.
They can be used outdoors, but again, only for pull-ups. If you want to twirl, the first and second types of straps are best.
https://youtu.be/MagPI6-7Cyc
Choosing material
In order to make our own straps, we will need a needle and thread (or a sewing machine) and the material from which our safety belts will be made.
The main requirement for the material is high strength. Safety belts are the key to your safety. Typically, the following materials are chosen for the manufacture of straps:
- Kimono belt. Can be purchased at most sporting goods stores. In a sportsmaster, such a belt costs about 200 rubles. The material is very durable and quite soft. One belt is enough for 1 pair of straps.
- Towing strap. Sold in automobile stores. Such a belt can withstand a load of up to 8 tons, and costs about 200-300 rubles. For this money you will have material for 2-3 pairs of straps.
- Corsage ribbon. It can be found in sewing stores. If you order online, some stores offer to buy 200 m of grosgrain ribbon for 1,200 rubles. This amount of material would be enough for 30 pairs of straps. The material is quite thin, so the straps for the horizontal bar from such tape will have to be made in several layers.
- Waistband. Also can be found in sewing stores. There is an offer on the Internet to buy 4 m of waist tape for 120 rubles.
There is no need to try to make straps (on which your safety will depend) from stretchy materials such as an elastic bandage. You should also avoid using materials like tarpaulin. They may seem very strong, but these belts can easily tear at the seam.
When choosing, you should pay attention not only to strength, but also to the rigidity of the material. Choose a softer material, as straps made from too hard material will chafe your skin during training.
Rubber loops where to buy
Rubber loops have several levels of resistance, each of them has its own color and a specific band width. The resistance level has an equivalent in kilograms, but since the muscle load from the elastic band and free weights is different, the ratio will be quite approximate.
Types of rubber loops according to load:
- Red color: 7-10 kg (band width 1.3 cm)
- Black color: 10-20kg (band width 2.2cm)
- Purple color: 22-35kg (band width 3.2cm)
- Green color: 45-55 kg (band width 4.4 cm)
- Blue color: 55-80 kg (band width 6.4 cm)
Red and black colors are usually used for training small muscle groups: biceps, triceps, deltoids. Purple, green and blue colors are used for training large muscle groups: chest, back, legs. The load is adjusted depending on your capabilities and strength training.
A wide variety of rubber loops at affordable prices is offered by the Aliexpress online store. You can purchase a set of loops or choose 1-2 bands of a specific resistance. We have selected popular products with good reviews and a large number of orders so that you can purchase quality equipment. It is also better to additionally read customer comments before purchasing.
Very often there are discounts on products, so the price indicated in the review is not final.
Set of rubber loops of different resistance
Usually the set includes 3-5 tapes of different resistance. For training the whole body, it is better to purchase a set of rubber bands, since large and small muscles require different loads. The cost of a set of tapes is usually in the range of 2000-3000 rubles.
1. J-Bryant rubber loops (3 sets of options)
- Option 1
- Option 2
- Option 3
2. Kylin Sport rubber hinges (2 sets of options)
- Option 1
- Option 2
3. Winmax rubber hinges
4. ProElite rubber hinges
5. Jumpfit rubber loops
Rubber loops individually
Instead of a set, you can purchase a separate tape of a certain size. Remember that the resistance level is usually very approximate and this must be taken into account when choosing rubber loops. The cost of one tape is 300-1500 rubles, depending on the resistance level. The more elastic the tape, the more expensive its cost. To increase the load, you can fold the loop in half.
1. J-Bryant Rubber Hinges
2. ProCircle rubber loops
3. Power Guidance rubber loops
4. Kylin Sport rubber hinges
5. Powert rubber hinges
- Option 1
- Option 2
Do you like to workout at home? Then check out our other sports equipment reviews:
- Horizontal bar: what is it for, how to choose, a selection of exercises with a horizontal bar
How to quickly learn how to do pull-ups on a pull-up bar with an elastic band for beginners
Every self-respecting man should learn how to do pull-ups on the horizontal bar, but not everyone can do it right away. Now you will see that there is nothing complicated about this. Below is a simple and effective instruction that clearly explains how to quickly learn how to do pull-ups on the horizontal bar. Pull-ups are accessible to anyone, even a beginner can master the technique from scratch if they try.
Pull-up technique
Of course, if you can’t do a single pull-up, immediately throwing yourself on the horizontal bar and trying with all your might to do at least one pull-up is a waste of time. Because you need to start training your arm muscles not with your full weight, but with part of it.
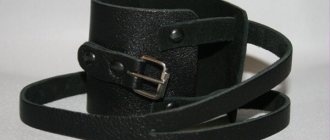
This is achieved using a special rubber called a “rubber Martens bandage”; it can be bought at almost any pharmacy. You need to select a specific type of rubber bandage based on your weight, because different types of this bandage have different degrees of rigidity.
Try to make so many layers of bandage that you can do at least 9-10 pull-ups in one approach. As you might guess, the bandage needs to be secured to the horizontal bar and to yourself.
Note. You can use any rubber, choosing it according to your weight; a rubber bandage is offered as an easily accessible, inexpensive means
With the help of a rubber band, we remove some of the load from the latissimus muscles and gradually increase our strength.
How to do pull-ups with an elastic band
You need to train at least 2 times a week: 3 sets of classic pull-ups (direct grip) with rubber bands and 3 sets of pull-ups with a reverse grip.
Each approach must be done to the maximum, that is, try your best until the last pull-up can no longer be done.
Gradually reduce the number of layers and increase your strength.
When you learn to do at least 1-2 pull-ups without a band, try to increase this number of pull-ups with a regular grip. The main thing is not to give up and set yourself a goal.
Adviсe
Beginning athletes think that using a safety loop helps one hundred percent avoid injuries. Actually this is not true. Since the hand remains fixed, you can get into a difficult position. It is not so easy to let go of the horizontal bar in such a strap. One wrong turn is enough for a person to be jerked sharply. Because of this, dislocations and even fractures often occur. This is especially dangerous for the shoulder and hand, which bear the main load.
This is one of the reasons why athletes and simply physical education enthusiasts are required to use such insurance wisely and not treat it irresponsibly. The body must be physically prepared.
Although the harness appears to be made of a soft material, it puts quite a lot of pressure on your wrist, creating friction as you move. Because of this, some people wash their hands with blood in the literal sense of the word. Therefore, professional athletes can often see special gloves on their hands. These are not leather or athletic, but made from wool that cover the wrists well.
If you correctly make safety loops with your own hands, you can save a lot and at the same time not fear for your own safety on the horizontal bar. The main thing is to choose the right material and take into account the individual parameters of the wrist, which is important when performing complex tricks.
A master class on making straps for a horizontal bar can be found in the video below.
https://youtu.be/-aoyOO70d1M
How to choose a rubber loop for training to suit your level
I already talked about what the colors and numbers on the rubber loops mean in one of my previous posts, so today I’ll focus on answering the question of how to understand which loop is right for you for your level of training and your goals.
I'll start with the most frequently asked question:
How to choose rubber loops for pull-ups?
The resistance force of the rubber loop is selected depending on your own weight and whether you can do at least one pull-up on your own. Below is the complete diagram:
If you have never been able to do a pull-up on your own:
- and your weight
- and your weight is 50-60 kg, then a yellow or purple rubber loop will suit you
- and your weight is 60-70 kg, then a purple or green rubber loop will suit you
- and your weight is 70-80 kg, then a green or blue rubber loop will suit you
- and your weight is 80-100, then the blue or next most powerful rubber loop will suit you
If you can pull yourself up at least 1 time:
Where to buy rubber loops for training?
The leader of the Russian market of rubber sports loops for training is (workoutshop.ru). They were among the first to supply this product to Russian athletes and have accumulated vast experience and expertise in the production of high-quality loops. Rubber loops WORKOUT RUBBER BANDS have earned recognition from athletes of various disciplines, from street athletes (workout) to Olympic champions in gymnastics and various martial arts. I buy from them myself, so I can answer for the quality of the product and recommend this store to you too.
How to choose rubber loops for warming up before training?
The resistance band warm-up is an excellent continuation of the normal warm-up because by adding a small load, it better prepares the muscles, ligaments and tendons for the work ahead. Since we are talking specifically about warming up, the resistance of the loop should be small, and yellow loops are best suited for this purpose and, in more rare cases, when we are talking about large muscle groups, red loops.
How to choose rubber loops for pumping up muscles?
In fact, this question is the simplest, because it doesn’t matter at all which loops you take at the beginning. The main thing is to increase the number of repetitions with the selected loop over time or switch to a more powerful one. My personal benchmark is 20 reps for heavier exercises (such as advanced pull-ups or muscle-ups) and 50 reps for lighter exercises (dips and the like).
How to choose a rubber loop for training gymnastic elements?
When it comes to learning advanced gymnastic exercises, such as front or back hang, horizontal, flag, you need to start with a loop that will allow you to maintain a static position for 50-60 seconds. Only after you can confidently fix the body for 1 minute, only then can you switch to a weaker loop.
You may also be
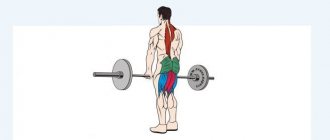
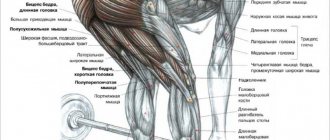
What muscles work during pull-ups?
Before you do this, you need to figure out which muscles work when doing pull-ups, since targeted work on strengthening and developing them will help you learn how to do pull-ups on the horizontal bar in the shortest possible time.
So, I’ll briefly answer the question, what muscles work when doing pull-ups? First of all, pull-ups work the back muscles (latissimus, trapezius and teres major) and arm flexors (biceps, brachialis), as well as the core muscles, which are responsible for stabilizing the spine, pelvis and hips.
You need to identify and eliminate your weak link. Strengthen the muscles that work during pull-ups and you will be able to do pull-ups without any problems, gradually increasing the number of pull-ups on the horizontal bar.
If you work out in the gym, you can use seated lat pulldowns as an auxiliary exercise. In this exercise you can adjust the weight of the weight. This way you will strengthen your back muscles and biceps. To strengthen your core muscles, you can even use regular push-ups that are accessible to everyone.
I'm sure you're already eager to learn ways to learn how to do pull-ups. Therefore, let’s not drag our feet, but get straight to the point.
Manufacturing process
The process of creating belts looks quite simple.
- The material is cut to size and then sewn together in a couple of layers.
- Hand stitches are not suitable for this; you must use a sewing machine and strong threads.
- Before use, you should check the products for durability and comfort. They should fit tightly on your hands and not dangle. However, they should not put pressure on your hands.
When using, be sure to take into account the type of grip that the athlete will use.
With a standard overhand grip, the belt is simply bent in half and thrown over the horizontal bar. Both parts should hang evenly. A hand is inserted into the loop, a turn is made and the horizontal bar is grabbed.
How to learn to do pull-ups on a horizontal bar from scratch
There are many different ways to learn how to do pull-ups from scratch. We will not go deep and list all of them, but will focus only on the most effective and accessible to everyone.
Negative repetitions
With the help of support or a partner, pull yourself up until your chin touches the bar. Then lower yourself down to the starting position as slowly as possible. Perform 2-4 sets of negative reps as high as possible. You shouldn't train every day, as your muscles need time to fully recover. The optimal amount is 2-3 workouts per week.
It has long been no secret that negative repetitions are much more effective at increasing strength than positive ones. After a few weeks of regular training, you will easily be able to do pull-ups several times and gradually, if you do not stop there, the number of pull-ups on the horizontal bar will increase.
Static pull-ups
Static pull-ups are very reminiscent of our first method of learning how to do pull-ups on a horizontal bar from scratch - negative repetitions. You also need to, with the help of support or a partner, pull yourself up on the horizontal bar and then try to stay in this position for as long as possible. Statically holding your body weight is also very effective in increasing the strength of your muscles and tendons and strengthening ligaments. Perform 3-4 sets of static pull-ups, trying to hold your body weight as long as possible. Static pull-ups can be performed more often than negative pull-ups on the horizontal bar. However, you should not combine these two ways to learn how to do pull-ups in one workout.