First step. Performing a bridge from a lying position
For beginners, the easiest exercise option is to perform a bridge from a lying position. Before practicing standing, a mandatory warm-up of muscle groups not only in the back, but also in the whole body is required. This will help avoid damage that can occur with cold muscles. Setting up from a prone position is as follows.
- You need to take a horizontal position - lie on your back on a flat surface.
- Next, you need to bend your knees, moving your feet towards your buttocks.
- Rest your hands on your palms, preferably positioned just above your shoulders. The fingers are turned towards the body.
- Using muscle tension, you should gradually lift the pelvic area up. It needs to be raised so that the body bends in the back.
- Having received a deflection, you need to straighten your legs at the knees and straighten your arms at the elbows.
- To return from the rack to the starting position, it is advisable to first lower your shoulder blades to the floor. After the back, the buttocks descend.
- To better consolidate the technique, you need to repeat the bridge exercise from a lying position several times.
A set of special exercises
The bridge does not fit well into the usual fitness training; you rarely see it in the gym. We spend more time on tightening our abs, arm and leg muscles. Therefore, most people require training to perform a full bridge. Don’t rush to set records right away - instead of the desired benefit, you will get a broken back.
Before exercise, you need to warm up your muscles well. To do this, do:
- hand rotations;
- twisting the spine to the sides;
- stretching upward;
- bending the back backwards with the head thrown back, hands on the lower back;
- bending forward and to the sides;
- bending the back up and down from a standing position on all fours;
- push ups;
- lifting the upper body from a lying position on the stomach, hands clasped behind the back;
- bending from the same starting position, during which you grab your ankles with your hands and begin to swing back and forth.
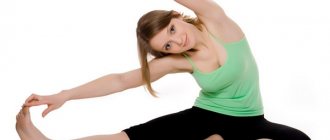
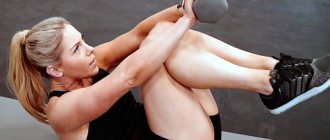
Designed to develop flexibility of the back muscle group. All exercises are aimed at ensuring that performing a gymnastic bridge does not bring painful sensations, but is performed as easily and quickly as possible.
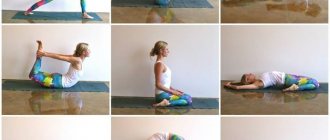
Exercise one
Lying on your stomach, arms extended upward. Trying to bend as much as possible, lift your legs and arms at the same time. Keep your knees straight. In each upper position they linger for 30-60 seconds.
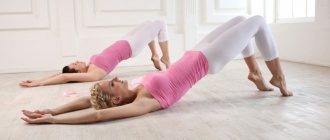
Exercise two
Lying on your back, legs bent at the knee joints, arms extended along the body. The pelvis is raised to the maximum possible height, held in this position for about 5 seconds and smoothly lowered back onto the back.
Exercise three
Kneel down so that your legs are hip-width apart. The torso is slowly tilted back, bending at the lower back, and the hands touch the heels. In this case, you need to tilt your head back and arch your back.
Lie on your stomach, holding your ankles with your hands. While bending, they simultaneously raise their legs, chest and head. In the upper position they linger for several seconds.
Exercise five
Performed on a fitball. They lie on it with their backs, put their feet shoulder-width apart, raise their arms, and then try to touch them to the floor.
Exercise six
Performed from a prone position. Straight arms are placed at hip level. First, the back is bent back, and then, bending the legs at the knee joints and throwing back the head, touch the toes to the head. In the final position you need to stay for 30 seconds.
Exercise seven
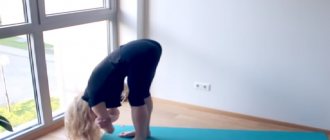
At the end of the complex, a bridge is performed from a supine position. First, bend your arms and legs. Place your hands as close to your shoulders as possible, and your elbows point up. Then from this position they try to stand on the bridge. The legs and arms are straightened and the lower back is bent.
As soon as you feel that it is no longer possible to bend further, you need to stay in this position for at least two seconds. When the exercise ceases to cause difficulties, it is necessary to complicate it. To do this, the arms are pulled closer to the legs and then swung back and forth.
The given exercises must be performed daily. They will not only allow you to easily stand on the gymnastic bridge, but will also relieve problems with the spine. The complex can be performed by absolutely everyone, regardless of age.
Second step. We train to stand on the bridge from a standing position
For those who have become comfortable with the exercise from a horizontal body position, you can try to perform a more complicated version - from a standing position. Just like before a simpler bridge, you need to warm up and warm up your muscles. It is not advisable to immediately try to stand on a bridge while standing, since not everyone will be able to complete this exercise the first time. For training you will need a Swedish wall or a regular wall.
- You need to position your back at a distance of a little less than a meter from the chosen assistant.
- You need to carefully monitor the position of your legs and arms - your feet should be shoulder-width apart, and your arms should be extended upward.
- Next, you need to start bending back until your palms touch the wall.
- With your palms resting on the wall, you need to start lowering further, gradually moving your hands a few centimeters lower.
- As a result, your hands should be on the floor and your body should be in a stance position.
- In order to master the technique of performing the element, it is advisable to repeat the exercise with the wall several times.
After you can easily bridge with the help of a wall, you need to proceed to the next stage of mastering the exercise. For subsequent training you will need a gymnastic mat. It is best that, in addition to the mat, there is a person who can provide backup when performing the element.
How to get on the bridge from a standing position:
- first of all, you need to stand facing the belayer, if there is one;
- the legs should be, as in the previous exercises, at the width of the shoulder joints;
- Next you need to raise your straight arms up;
- after your legs are positioned at the required level and your arms are raised up, you can begin to lean back;
- at the moment of bending, the belayer should already easily support the back of the person performing the exercise;
- It is advisable to go down as slowly as possible, excluding sudden jerks;
- in order to return to the starting position, you need to push off the floor with your hands and use your back to rise, also being supported;
- You should not refuse the help of the belayer until the technique of the gymnastic bridge element is fully mastered.
The most common mistake among beginners is to use only the lumbar and shoulder regions for the bridge, forgetting about the arms. They are the main ones in this exercise.
Currently reading ❤️
- Double pleasure: 20 best sex positions for both partners
Transfer the experience of masturbation to classic sex
This is the main stage of the bridge technique. It is as follows. During sexual intercourse, a woman - herself or with the help of a partner - actively caresses the clitoris. Only when there are only a few seconds left before orgasm does classic vaginal sex begin: the man enters his partner and in a few thrusts brings her to climax.
Helen Kaplan assumed that after several such acts, a woman would develop a connection between penetrative sex and orgasm. This means that she will begin to receive maximum pleasure more often, and these moments themselves will be as bright and sensual as during masturbation.
Actually, Kaplan turned out to be right: today the “bridge” technique is actively used in sex therapy to help couples improve their sex life.
Third step. Learning to get up from the bridge to your feet correctly
For many, learning how to properly stand on a bridge is many times easier than returning from a stance to the starting position.
How to get up from the bridge to your feet?
- A preparatory exercise is to transfer the weight in a standing position from your feet to your hands and vice versa. This can be achieved by gently rocking back and forth.
- The first step in getting into a standing position is to transfer all the weight from your hands to your feet.
- Next, you need to use your back to lift the entire body. To make this action seem simpler, you can imagine that someone is pulling upward on the top of your pants or by a string tied to your stomach.
- It is not advisable to try to stretch your body forward, as the consequence may be falling to your knees. You must strictly lift your torso up.
- The first time you need to get up from the bridge using a jerk. Further, when the technique of getting to your feet succeeds without much effort, it is advisable to try to rise smoothly. But for a smooth lift, a stronger back and abdominal muscles are required.
Lightweight bridge options
To prepare your body for a difficult exercise, use the tools at hand. It is known that the higher the initial position of the body, the easier it is to stand on the bridge. Therefore, learn to do it, starting from the table, and then from the bench (if you don’t have one, a regular bed or sofa will do). This strengthens the arms, shoulders, and thoracic spine.
How to stand on the bridge from an emphasis? To begin, place your feet shoulder-width apart. Lean back, placing your upper torso on a bench or table. Bend your arms, lean on the surface, turn your fingers towards your feet. Now straighten your elbows until your head and neck are supported. Raise your hips too. Try to see the wall behind you. Don't be upset if you can't fully straighten your arms. Keep training and the results will come.
About the benefits of the bridge and how often it should be done
The gymnastic bridge is one of the simplest exercises and stances. Despite this fact, the benefits of this element are considerable. The following positive changes occur in the human body.
- The muscles that fix the spinal column become stronger and stronger. With the help of these muscles, the back bends and extends.
- In addition to working out many of the back muscles, the muscle groups of the shoulder girdle, arms, buttocks and legs are also involved.
- The flexibility of the spine and back muscles increases.
- The abdominal muscles are stretched.
- The wear resistance of the vertebral discs increases, which occurs due to improved blood circulation in the tissues.
https://youtu.be/QbqjJqmqEPM
Climb
How to get up from the “bridge” position? This task requires good preparation. First, learn to go down and up the wall by “stepping” with your hands. What is important here is not so much flexibility as strength. To master lifting without support from a wall, stand facing it at a short distance. Place a mat at the back. This will protect you from falling back and forth.
Lifting is performed by transferring weight to the legs, bending the knees more. We move our pelvis forward, lift our fingers off the floor and straighten up using the muscles of our back, abdomen and legs. Hands are always near the ears. No need to pull them forward. The exercise is easier to perform if your legs are spread wider.
Once you know how to stand on the bridge, start training. Remember: thanks to the exercise, you will gain not only strength and good stretching, but first of all a healthy spine. It is the framework that ensures the proper functioning of other organs. Take care of your body and it will respond well to you.
- How to clean your feet at home
What is a somersault
This term refers to one of the acrobatic elements. Performing the exercise requires dexterity and the ability to group. The athlete must land correctly to avoid injury when contacting a hard surface. Trained people jump high and far, quickly getting to their feet from any position, like cats. In the air they perform different elements - turns, somersaults.
A somersault involves a jump in which a person tumbles forward or backward. Depending on this, the exercise can be direct or reverse. Even people unfamiliar with the sport have seen similar stunts in films.
https://youtu.be/oCEc9i8TsL8
Materials
This equipment is used both in professional sports and in educational institutions, so the requirements for the quality of the materials from which it is made are very high. It is usually made from multi-layer wood plywood about 15 mm thick. The raw materials used are hard wood: birch, cedar, ash.
In modern designs for the manufacture of take-off platforms, the use of artificial materials, such as combined carbon fiber and bakelite, is common. A slip-reducing padding material, such as carpet or corrugated rubber, is placed on top. The body may be entirely wooden or contain steel structures. Between it and the repulsion platform, sheet or wire cylindrical springs made of hardened chrome-plated steel are placed. They are securely fastened with bolts and nuts. For safety reasons, the fasteners are mounted so that there are no protruding parts anywhere.
Reverse plank
Not easy, but involving many muscle groups at once, and therefore a very effective exercise.
- We sit on the floor, legs extended and connected.
- Place your palms on the floor slightly behind you, shoulder-width apart.
- As you exhale, raise your pelvis, torso and legs until a straight line is formed. The tailbone is curled.
- We tense the muscles of the abdomen and buttocks, moving our shoulders away from our ears.
- We try to stay in this position for 15 seconds to two minutes.
If you feel pain or discomfort, your legs begin to shake, or you feel tired, go down and take a break. Between sets, remain seated or bend forward to give your muscles a rest.
Performing a reverse plank
The correct execution technique, and not the duration and number of approaches, will help you achieve excellent results here. Do this exercise 3-4 times a week, as shown in the photo, and then your posture will improve, your muscles will tighten, and your gait will become more beautiful.
You can also perform a simplified version, which is also called a “table”. To do this, bend your knees and repeat the same steps as described for the classic reverse plank.
Simplified variation of the reverse plank