What is the best material to make a bridge from?
When it comes to materials for a bridge over a ditch, almost all owners begin to remember where the boards and timber are located, but at the same time someone begins to think about trusses from a corner or channel. Without any doubt, metal welded bridges for summer cottages are much stronger and more durable than wooden ones, but near water it is better to use stainless steel, which is not cheap. Regular iron will rust even if painted regularly.
In addition, a corner or channel is more appropriate in technical structures, but not in decorative ones, and it is quite difficult to assemble structures from them with your own hands.
If metal seems like the best addition to your landscape design, choose forged products, which will not only allow you to install a beautiful bridge with openwork railings, but also create a composition with a similar gazebo. As supports, many are trying to install concrete “bulls” - supports in the middle of the bridge span, or metal piles. However, such a decision is justified only if the site is cut across by a deep and, most importantly, wide ravine.
It will be enough to span a span across a stream or a small ditch without intermediate supports, with a maximum of two abutments at the ends. That is why, to make a bridge with your own hands, a few long beams with a section of 15x15, and with a short span, 10x10, are enough. In fact, even an ordinary log with a longitudinal cut can serve as an excellent and durable foundation for a bridge.
If you are a supporter of solidity, you can use natural stone. Moreover, the straight and humpbacked spans spanning rivers and gorges look very picturesque. But when choosing this option, prepare yourself in advance for multi-day and rather complex construction. By the way, just when working with stone, or more precisely, with concrete, which will be needed for pouring the base, you will also need metal very useful, but not a channel, of course, but only an angle and steel reinforcement. If you prefer lightweight structures, you can get by with just boards, which, when placed on edge, are in no way inferior in strength to timber.
Additional recommendations
Tip: before hammering in nails, the instructions first recommend making a small hole in the board with a drill.
This will prevent cracks from appearing in the wood and, therefore, increase the service life of the structure.
Frame of the future structure
In the case when you plan to build a stepped bridge, you need to attach the risers to the foundation, forming the base of the steps. Fix boards of small width on top, which form the outer fabric of our structure.
Having finished with the external decoration of the bridge, we make supports that are located parallel to the steps along the edges of the bridge. They serve to hold the structure together and lift the structure.
To make railings, buy balusters or use regular boards of small thickness. They need to be sanded and treated with an antiseptic for protection.
Wooden structure with railings
Self-made railings are usually made straight. To achieve a rounded shape, you should calculate the height of the last balusters, provide for the joining of the railings and assemble the bridge using fasteners.
Tip: treat the constructed bridge with a special wood varnish. This will increase the reliability of the structure’s protection, and the wood will acquire a beautiful color.
https://youtu.be/udjEo05VVto
Which bridge design should you choose?
In rural areas, to overcome narrow obstacles, which, however, cannot be simply stepped over, 2-3 logs, tied or stapled, are often used. In such cases, as a railing, either a perch is placed on posts dug on both sides of a ditch or stream, or a stretched rope is tied. Such a decorative bridge looks organically against a pastoral background, and therefore can be used to decorate the landscape of your site.
A log with a longitudinal cut can be laid across a stream, ditch or small pond, across which wooden planks are laid as a flooring. The above options are the simplest, except for large flat stones placed at a short distance from each other across the stream bed. However, boulders as a replacement for a bridge are not always appropriate, in particular, they are unsuitable for walking, respectable and elderly people, and are also unsafe for children.
Therefore, large stones are best used as supports on which, for example, granite or basalt slabs with a rough surface will be laid. If the stream or decorative pond is shallow enough and there is no risk of falling from the resulting decorative bridge, you can do without railings.
A more complex, but no less beautiful structure can be knocked together from timber and ordinary boards, or assembled and welded from metal. The easiest option to implement is a straight platform with railings on one side. A humpbacked bridge for a dacha looks much more impressive, but not everyone can make it with their own hands. But an intermediate scheme for constructing a span is quite accessible, when several wide steps lead to the main deck from both ends (over a narrow stream you will get an almost humpbacked bridge). This type will tower over the area and provide an excellent vantage point.
What is this element for?
In general, the flip does not resemble any of the elements known in the gymnastics program - somersault, float, cartwheel. To perform it, you need to do a headstand one by one, with your legs spread horizontally, almost in a split, then make a bridge, and only then turn over. Despite the rather childish exercise, you need to have good gymnastic training and acrobatic skills, the body must be flexible and physically prepared.
Acrobatics is a very spectacular part of the gymnastics discipline. Various elements and complex exercises can be done both statically and in musical dance. They show very interesting performances at competitions; this is a difficult sport.
Choosing a place for the bridge
It would seem that this question does not require clarification: there is a stream and a deck that can be thrown across the riverbed - everything is simple. However, if there is neither a water hazard nor a ravine on the site, then the decorative bridge at your dacha will no longer become a decoration of the garden? Of course, such a structure in the middle of a lawn will look ridiculous; the span should be thrown, if not over a ditch, then at least over a flower bed.
Let's look at several options for what to do when you want to add a bridge to your landscape design, but there is nothing to throw it over. Actually, there is already one solution - a transition over the flower bed. In this case, a humpback bridge or a stepped structure is suitable, or, as an option, a straight span with ramps at both ends.
If you don’t have a stream on your site, you can create one with your own hands by laying out an artificial riverbed from different-sized stones, very similar to the real one (if you don’t take into account such a trifle as the lack of water). To create the illusion of a stream, tint sand and small crushed stones blue and azure and place them between the cobblestones. Another option for installing a bridge is a small island in the center of a pond or even a swimming pool. If the area of the man-made reservoir is large, the size of the island can be made such that it can accommodate a simple gazebo with a table and a couple of benches.
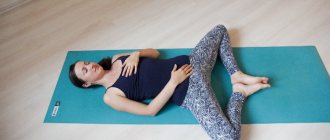
How to perform a bridge while lying down
- Lie on your back, bend your knees, heels near your buttocks.
- Palms on the floor above the shoulders, fingers facing the torso.
- Tighten your leg muscles and lift your pelvis.
- Leaning on your hands, bend your back, try to straighten your legs.
When returning to the starting position, first the shoulder blades touch the floor, then the buttocks.
Repeat the exercise several times.
Bridge construction work on a garden plot
To make the flooring you will need a frame, and you can make it yourself from wood in two ways: by installing the boards on edge or by laying them flat. The first option will require less lumber, but the span will most likely be straight, since bending the board along the plane is a long and difficult task. The maximum that can be done is to give it a slight bend by cutting off part of the edge along an arc. It is much easier to build wooden humpbacked bridges for a summer house from planks placed flat, so we will go this route, considering various assembly possibilities.
To fly through a narrow ditch, two boards with overall dimensions of 3x18x200 centimeters will be enough for the frame. They are connected to each other by thinner crossbars, nailed to the bottom at the ends, as substrates. However, you can connect the foundation logs with two beams; they will also serve as “supports” for the bridge. If the flooring needs to be thrown over a long distance, under the load-bearing boards, along the outer edge of the frame, it is advisable to fill the beams of the appropriate length, with a cross-section of at least 10x10, and only then attach the cross members.
Next, we begin to form the ledges. To do this, we lay shorter boards of the same 3-centimeter thickness directly along the load-bearing joists of the frame at an equal distance from the ends. Thus, if your frame is 3 meters long and you want the steps to be 40 centimeters wide, the next board should be 0.8 meters shorter than the base. If you want higher steps, use 10x10 timber instead of the boards that form them (including load-bearing ones), this will only make the bridge stronger and more durable. True, it will be more difficult to put together such a frame, and, most likely, you will have to use metal plates from the inside of the frame to reliably connect the beams.
Now you can start laying the flooring. To do this, you need narrower boards, 10 centimeters (commensurate with the cross-section of the beam), with a thickness of at least 2 centimeters and a length exceeding or equal to the width of the base frame. You will need quite a lot of them, so it is logical that you need to stock up on all the materials before you get ready to build a bridge over a ditch or ravine in your country house. First, we fill the boards onto the ends of the ledges, starting from the very bottom, that is, from the frame if it was assembled from timber. If the steps are made of boards, then we immediately begin installing the flooring. The crossbars can be nailed closely or at small intervals.
Warm-up exercises
Before developing flexibility of the spine and standing on the bridge, it is necessary to warm up the body properly.
Warm-up of the shoulder girdle:
- Rotate your straightened arms forward and backward simultaneously or each in turn.
- Left arm bent at the elbow at chest level, forearm parallel to the floor. Rotate your upper body to the right, twisting your spine. Repeat with the other hand to the left.
- Raise your arm up, bend it at the elbow, with your forearm behind the back of your head. With the other hand, pull the raised arm to the side and down. Execute for the other side.
- Straightened arms below in the lock. Raise them up, bending in the shoulder girdle and back.
Warm up the shoulder girdle and lumbar region:
- Palms on the lower back. Bend your back back while throwing your head back.
- Bend the upper body forward while simultaneously extending the closed and straightened arms parallel to the floor.
- Close your hands and bend your torso parallel to the floor. Swing your straightened arms above the back of your head, tilt your torso, and touch your fingers to the floor.
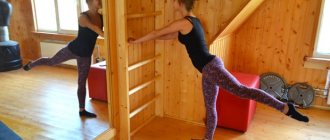
- Place your palms on the bar or back of a stable chair at waist height, legs straight. Bend the spine and shoulder girdle down as much as possible.
Warm up the back muscles:
- Torso rotation. Your back and legs are straight, try to describe a circle with your upper body.
- Straight legs shoulder width apart. Tilt left and right, simultaneously straighten your upper arm parallel to the floor.
- Get on all fours. Arch your back up and down with maximum amplitude, like a cat.
- Standing on all fours, imagine a crossbar in front of you, located close to the surface. Perform movements as if crawling under an imaginary crossbar.
- Lie on your stomach, palms clasped at the back of your head. Bend your upper body at the lower back as far as possible.
- Lying on your stomach, extend your clasped arms forward, bend your spine back in an arc. Roll on a gymnastic mat from your hips to your chest and back.
- Leaning your palms on the floor, hips on the floor, bend at the lower back. Throwing your head back, try to touch the back of your head with your toes.
- While lying on your stomach, raise your straightened arms and legs as high as possible. Try to stay in this position for some time.
- Get on your knees, hands resting on your heels. Bend your torso at the lower back.
- While kneeling, perform leg swings, bending at the lower back and neck. Try to see your foot above your head. Repeat for the other leg.
After performing spinal bending exercises, you need to remain in position for some time to arch the spine:
- Sit on your knees, buttocks on your heels, stomach on your thighs, back arched upward, arms outstretched, palms on the floor.
Assembling balusters and handrails for the bridge
So, the span is ready, and completely made with your own hands, and if it is installed in the garden as a decorative element, then you can leave it that way. But when used for its intended purpose, that is, to overcome a stream or ditch, it is advisable to make a railing. This is what we will do now. The handrail posts themselves, or, in other words, wooden balusters, can be purchased ready-made, carved, or thin bars can be used. If the cross-section of the posts at the bottom is square, all that remains is to screw them with long screws to the base so that the upper ends are at the same level.
If the cross-section is round, it is better to carefully cut off the plane on one side and secure it with screws. If necessary, cut down part of the baluster from below. All that remains is to install the handrails, for which we take 2 bars and, having measured the spaces between the balusters on them, drill shallow holes in the appropriate places. Then we place them on posts and secure them to the side or top with screws. It is better to install the finished bridge not on the ground, but on pre-cast concrete platforms.
- Author: Mikhail Malofeev
Rate this article:
- 5
- 4
- 3
- 2
- 1
(0 votes, average: 0 out of 5)
Share with your friends!
Belyasiny
To make a handrail for a homemade bridge, you can buy white stripes at a hardware store or come up with a replacement for them, such as wooden blocks. In the case of using ordinary wooden blocks as strips, their aesthetics can be achieved using a round file. This can be done as follows:
We measure equal distances from the top parts of the boards (20-30 cm), and then mark with a pencil the envelope lines that will go to the bottom of the boards. Then, exactly along these lines, you need to cut out shallow grooves with a semicircular or round file. The distance from line to line should be 1-2 cm. Twenty lines will be quite enough to direct the pattern - this is a labor-intensive process that requires patience. The file needs to be cleaned occasionally with a dry brush. Once the cutting of the grooves is completed, this job will be completed.
After the strips are ready for installation, take a protractor and mark with a pencil on the bases the places for their installation. We drill holes for nails/screws from the bottom and use them to drive/screw the strips into the base. It must be said that the excess parts of the strips that will be installed in the center of the bridge will need to be previously measured and cut to fit the “bottom” of the bridge.
Learning to do a headstand
The headstand for this exercise is special; the legs should be wide open, so it is more difficult to maintain balance. You not only need to be able to do everything dynamically, you need to have gymnastic endurance and fix positions at certain points. To learn, you need:
- Place a pillow against the wall and stand in a stance, leaning against a vertical surface.
- We transfer the entire mass to the head and slowly disconnect the feet from the wall.
- Make a cross split with your feet.
- When we find a stable position in the splits, we need to stay for a while and strengthen our stability by moving our legs in a horizontal position.
This training in the gymnastics program must be repeated until the abdominal and back muscles become stronger and a stable position can be maintained without much effort, then the inversion will be more impressive.
https://youtu.be/NWzMJxG5XNE